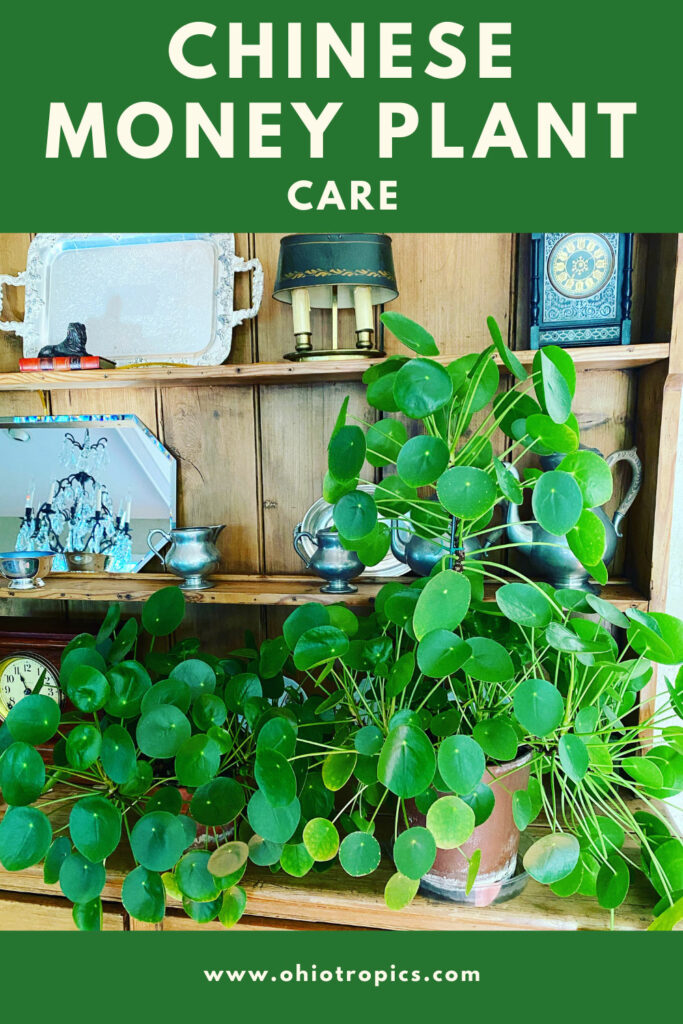
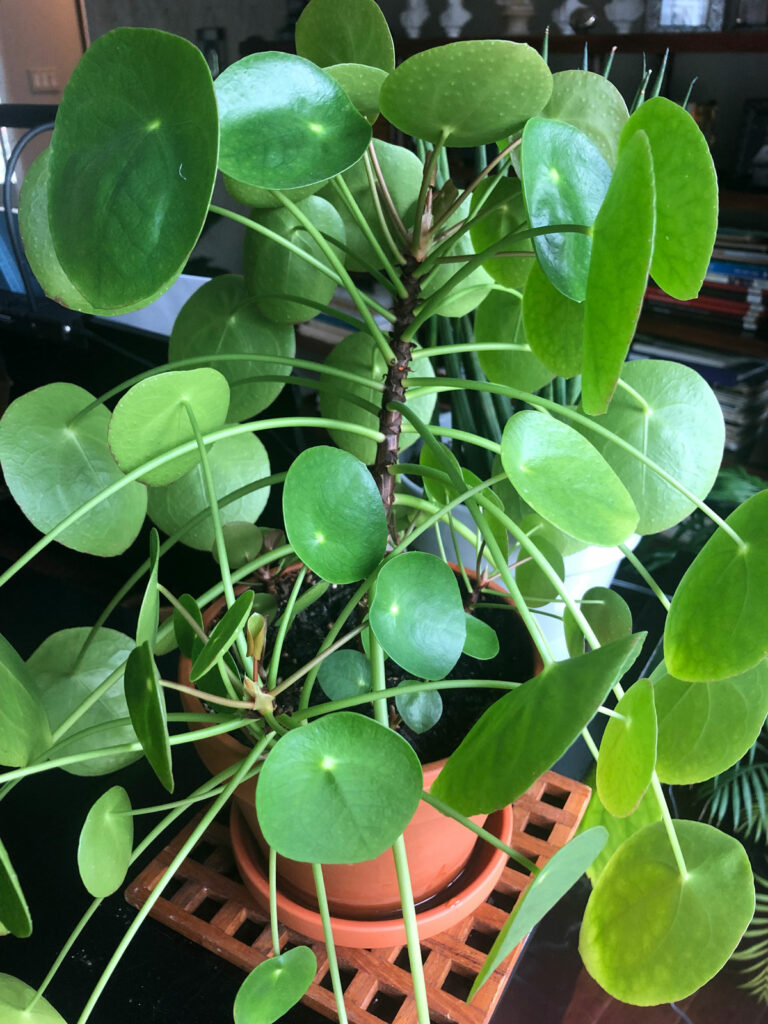
Few houseplants plants have caused such an uproar in the plant world as Pilea peperomioides. Commonly known as Chinese Money Plant, UFO Plant, Friendship Plant, Missionary Plant, Coin Plant or Pancake Plant...Pilea peperomioides care is easy if you can provide the ideal conditions that it prefers.
Keep reading so I can show you exactly how to care for this amazing plant, and I will also talk about propagation, as well as the most common Pilea peperomioides problems and how you can fix them.
Would you like to save this post?
Enter your email, and I will send this link straight to you!
This species is only native to southern China in both the Yunnan and Sichuan provinces where it is reportedly rare in the wild, but is plentiful in cultivation.
It is a member of the stinging nettle family, and legend has it that Chinese Money Plant brings good fortune to its owner.
Now let's get on to how to care for this plant.
Table of Contents
CHINESE MONEY PLANT CARE - 5 SECRETS
1. Light
Light is a hard issue in general to digest as far as growing plants go. It requires some experimentation, trial and error, and observation to see what works best for YOU!
Despite what you read on the internet on many sites, this plant can take some direct sun. I will tell you what has worked well in my experience.
Actually, I have corresponded with two people that have had their Pileas growing in full sun. I'm not advocating this necessarily, but it can work.
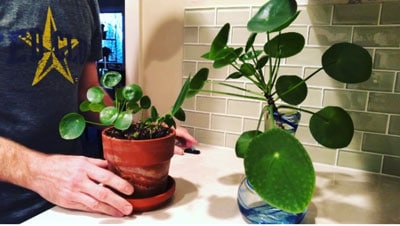
One thing that can happy though is that the color of your leaves will turn an overall yellow-ish green color in stronger light.
Plants grown in lower light will typically have leaves that are deeper green.
The general advice you'll see on many sites is "bright indirect." The dreaded bright indirect recommendation! Let me tell you what has worked for me.
I have two Pilea peperomioides plants and both are in different areas of light exposure. I have one that receives no direct sunlight at all, but it is just inches away from a very large Northern exposure window.
I would qualify this as "bright indirect light" because the room IS pretty bright, but it does not receive any direct sun. It is growing beautifully!
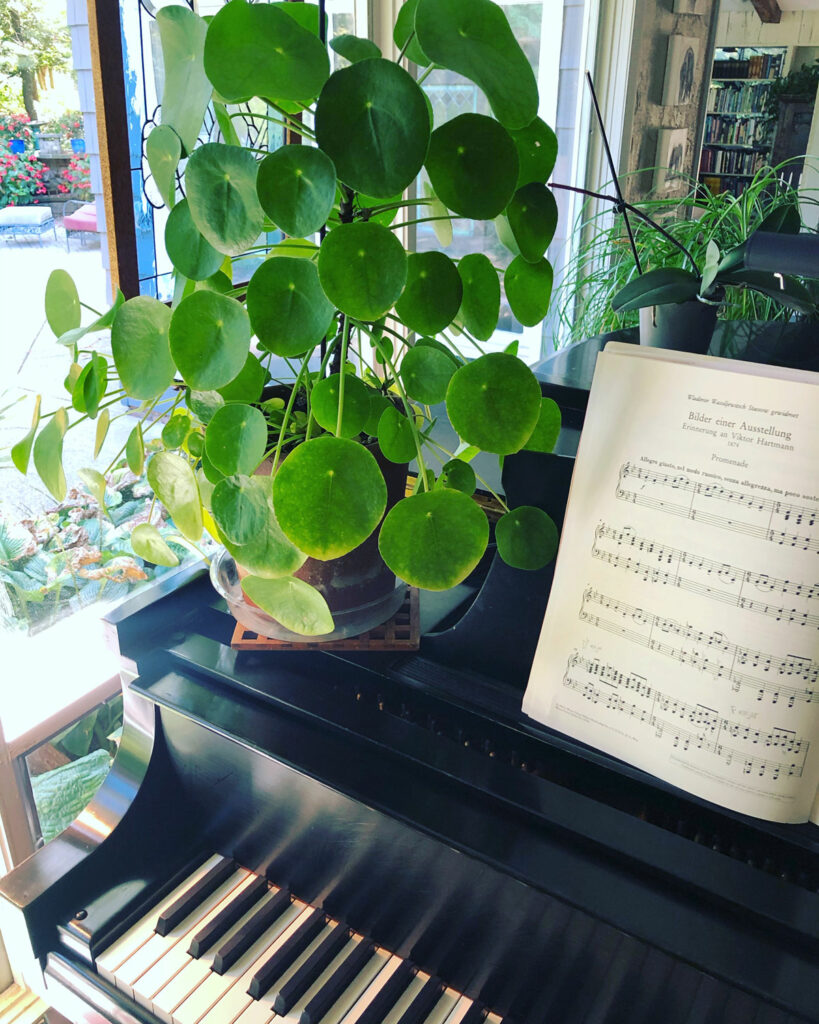
I have another Pilea peperomioides plant that is sitting on top of my piano right in front of a large Eastern exposure window. As a result of this, it does get some morning sun which is wonderful!
I found that this plant is growing faster and bigger than the one I have in the Northern exposure window. Both are perfectly acceptable locations!
Now, what should you avoid when it comes to light? I don't care where you place this plant, but just don't place it far away from a window. You will be disappointed and the plant will just not give you good growth if you don't have it in a sufficiently bright spot.
This is not a low light plants and it needs to be right in front of a window for best results.
Under good light conditions, this plant is actually a pretty fast grower and you will get many more baby pilea plants being produced as well.
A few hours of sun, especially morning sun, are not only acceptable, but very beneficial in many cases!
Just keep in mind that the stronger the light is, the quicker your soil will dry out. So be aware of that! Chances are, your plant will dry out more quickly so you'll have to be more vigilant with your watering.
If you do have a very sunny window, like a sunny Southern exposure window, you may need to place it a little further back (or use a sheer curtain to diffuse the sun). Just experiment and monitor your plant. If it looks good and is growing well, then you know it is happy!
One last comment for light is that you need to rotate your plant every so often so that it grows evenly. You will notice that plants will start to reach toward the window.
Simply turn the pot 180 degrees about once a week or so in order to keep your plant growing evenly.
2. Potting Mix / Soil
This is an important section and I have a lot to say about potting mixes.
First off, these plants hate to stay wet for too long, so it is imperative that you provide the appropriate potting mix. The potting mix should be very well drained and porous. Allow me to recommend some potting mixes that work well. I purchase everything I need most of the time on Amazon to keep it simple.
Hoffman Cactus & Succulent potting mix works very well. Just because it is labeled a cactus and succulent mix, doesn't mean that you can only use it for cacti and succulents.
I use these blends for most of my succulents and also for some other plants such as all my Pilea and Peperomia species, and other plants that require good drainage and the need to dry out quickly.
To these blends though, I do like to add some important ingredients in order to improve them. I rarely use a packaged potting mix as-is.
Sometimes if I run out of a premixed cactus/succulent potting mix, I will use any good houseplant potting soil that I have on hand.
You can easily amend your "normal" houseplant potting mix to make it more suitable for Pilea peperomioides:
Coarse sand is wonderful to add to a standard houseplant potting soil and make it instantly suitable for succulents and plants like Pilea. You can't use any old sand though! Definitely not beach sand or finer sand because this can cause the soil to compact too much.
¼"pumice is a wonderful soil additive and really works well to create the aeration and porosity that many plants love. It is a great potting mix amendment for cactus, succulents, and Pilea and others.
Perlite accomplishes the same as pumice, but since it is much lighter, it will sometimes float to the top when you water.
Depending on what I have on hand, I will vary what I add to my potting mix. I typically use about 2 parts of the potting mixes mentioned above plus 1 part of pumice.
The end goal for Pilea peperomioides is a potting mix that drains quickly and also dries out pretty quickly. So experiment with your potting mixes and see what works best for you.
They do prefer slightly moist soil, but I allow the top inch or two to dry out before I water again.
If you're looking for an amazing potting mix that you can use straight out of the bag for your Pilea, check out the Tropical Succulent soil blend from Oh Happy Plants. This is an amazing mix and you will get 10% off at checkout automatically if you use my link.
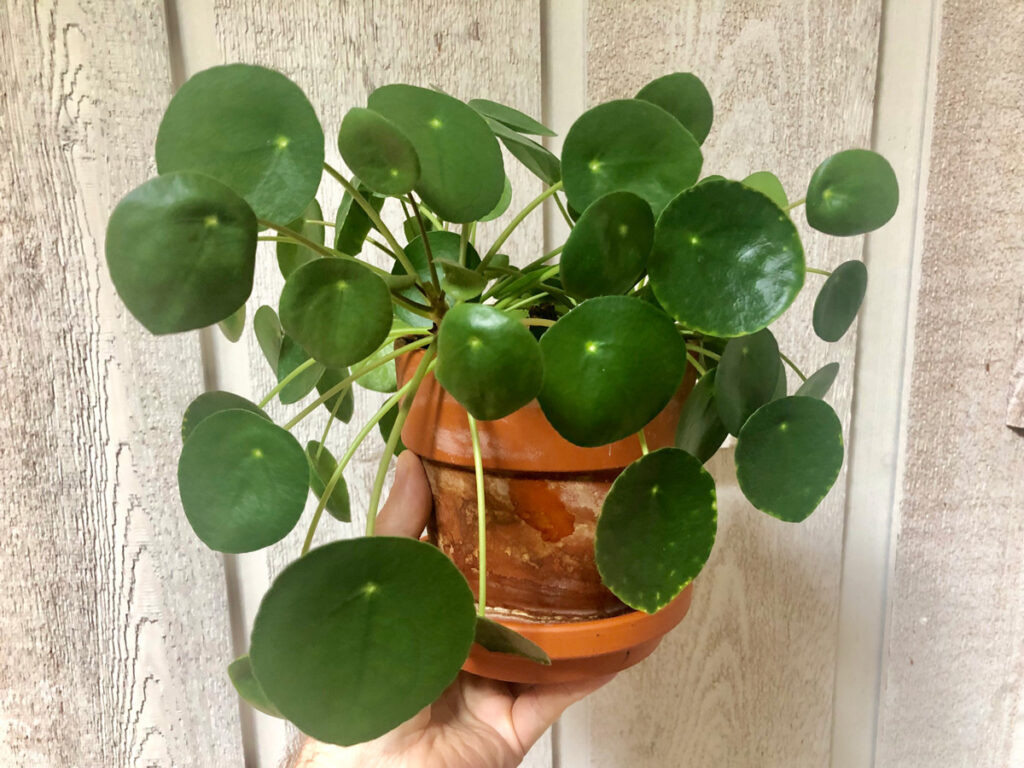
3. Pots
This is really a matter of preference. You can successfully grow Pilea peperomioides in a variety of different types of pots, as long as the pot is appropriately size and not too large.
If you have a pot that is too large, the potting mix may take too long to dry out and cause you problems! Especially if you also use a poor quality potting mix.
Whenever you repot your plants, a rule of thumb is only to repot into the next 1 or 2 sizes up from where you currently are.
For example, if you are using a 4 inch pot and need to repot, only move up to either a 5 or 6 inch pot. No bigger!
And be careful of pots that are unusually deep. These can be problematic in terms of the soil drying out quickly enough.
As far as pot construction, I really like terra cotta pots! They allow the potting mix to dry out sooner. Of course, this means that (depending on your watering habits and potting mix), the soil might dry out TOO quickly!
It all depends on your watering habits. I really believe that these plants grow better in terra cotta pots.
And you will need a lot of pots! These plants are very prolific and will produce many new plantlets that you can share with family and friends!
I wrote a very informative blog post on terra cotta pots so be sure not to miss that after you finish reading this post. I talk about the pros and cons, and many other tips that you may not have heard of anywhere else.
Other types of pots would work well too. Whether you choose plastic pots, glazed ceramic pots, or anything else, the important part is that the pots have drainage holes. Absolutely by no means should you plant directly into a pot with no drainage hole.
However, it is OK to plant in a plastic pot with drainage holes and then slip it into a decorative pot with no drainage hole. Just slip the plant out to water it, and then return it back into the decorative pot.
The plant should never sit in standing water or it will suffer root rot...and BYE BYE PILEA PEPEROMIOIDES!
Again it's all personal preference as far as pot type so experiment and see what works best for you!
One of my Pilea peperomioides that I grew outdoors one summer.
4. Water & Fertilizer
Those of you that follow me closely on Instagram (@ohiotropics) know my philosophy on watering. Water thoroughly until water comes out of the drainage hole. Don't stop adding water until this happens.
Let it all drain out, and then return it to its window.
I like to take my Pilea peperomioides straight to the sink and I water them there. I circle the watering can or faucet attachment all around the pot to ensure that ALL the soil will be moistened. Let ALL the excess water drain away.
As a rule of thumb, I always wait until at least the surface of the soil is completely dry before I water this plant again.
Don't even think about watering if the surface of the potting mix is still moist.
ON THE OTHER HAND! You want to try and avoid letting your soil dry out completely, especially for long periods of time. These plants will quickly develop yellow and brown leaves (starting at the base and working their way up) if you do this.
I'd recommend not using a watering schedule, and instead, go ahead and feel the potting mix with your fingers to determine when to water.
As far as fertilizing goes, I like to fertilize all my houseplants pretty much year-round except for the dead of winter when almost nothing is growing.
I like to use Dyna-Gro Grow fertilizer for most of my houseplants including Pileas. There are instructions on the label on how to dilute it so that you can use it every time you water your houseplants.
This is how I prefer to fertilize because I can do it every time and not have the remember the last time I fertilized.
Dyna-Gro Grow is an AMAZING all-purpose plant fertilizer. It costs a little more than typical fertilizers, but it is a COMPLETE fertilizer that has all the macro and micronutrients that plants need and is urea-free.
I switched to this fertilizer for almost all of my houseplants and the results are amazing.
So check it out for yourself! You will be pleasantly surprised at the results. Remember though that proper plant conditions come FIRST.
Fertilizer will only enhance your results. You will not fix a plant that has had poor care (poor light, poor drainage, etc.) with fertilizer.
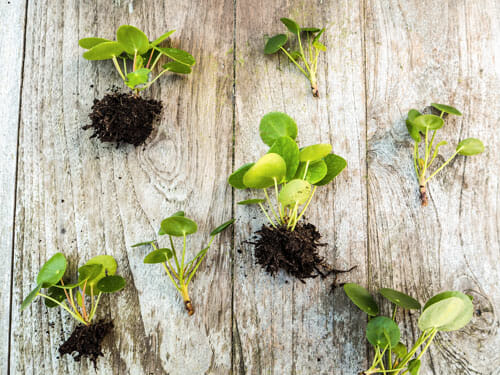
5. Propagation
One of the best parts of growing this plant is that it is super prolific in producing babies.
All you need is one of these plants and your home will soon be overrun with new plants in every room! Or you can share and give them to friends.
And there is nothing wrong with NOT separating the babies. You can leave them all in the same pot and this will just result in a very full plant.
I will show you an example of that shortly with one of my plants.
Some people like that look and it is certainly OK to do so! But you can easily separate the babies and pot them up into small pots and share with friends! Let's go over how to do this.
This is one of the easiest plants to propagate because perfect little plants will grow right out of the potting mix at the base of the plant.
Once they have at least 3 or 4 small leaves, you can simply separate them.
Be sure to get at least part of the stem that is under the soil. If you can do this without taking the plant out of its pot, go ahead and do so.
If not, it is OK to take the plant out of its pot so that you can easily separate the babies. You can use your fingers, scissors or a sharp, clean knife to sever the small plants.
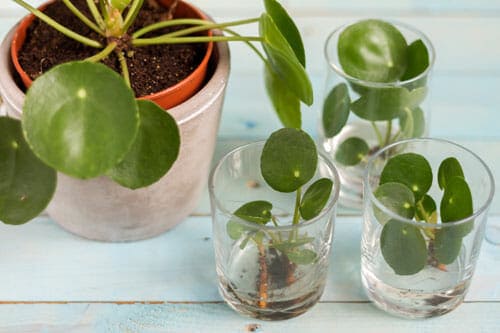
If you were able to get some roots on the pups, simply pot them up. If not, you can simply take the little pups that you separated, and place each one in a small glass or vase of water and allow it to root.
Just make sure that the water level submerges just the roots and not the whole plant.
After it has developed a few roots, you can pot it up! I would suggest 2-3 inch pots for the babies and wait until they are big enough before transplanting into a larger pot.
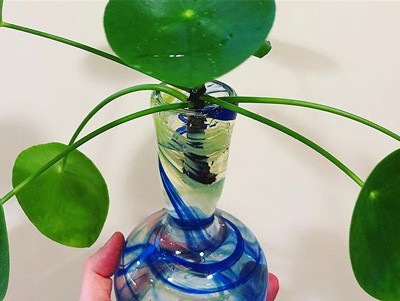
In one case, I actually chopped off the main growing stem of my plant and placed it in water. If your Pilea is getting to leggy, this is a good solution! Just cut it off and place it in water!
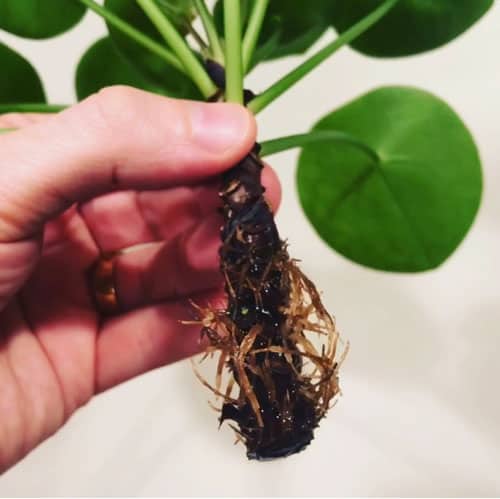
I rooted the plant below easily in water and then potted it up.
It took about 2-3 months or so before the cutting rooted and was able to be potted up.
Here is the rooted cutting:
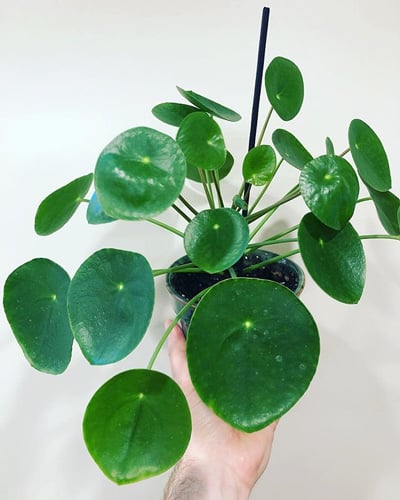
And this is how it looked like after I potted it up and grew for a few weeks. I ended up giving this plant to a friend.
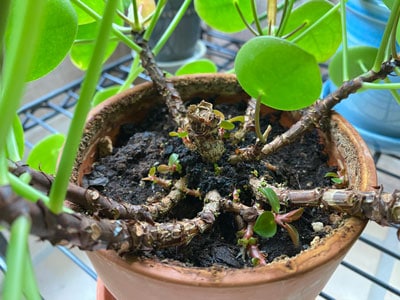
This is what the original plant looked like when I chopped off the main stem.
The original pot on the left had a few pups. Now...fast forward 5 months after I cut off the main growing stem, and this is what the original mother plant looks like:
In addition to all the pups filling out and growing beautifully, it also has 9 new pups forming. You can't see all of them in the photo below, but you get the point!
If you would like to watch my YouTube video on how to propagate Pilea peperomioides, check it out below!
Lastly, if you'd like to explore Pilea peperomioides propagation in more detail, including an unexpected way to propagate this plant that was not covered in this post, visit my Pilea Peperomioides Propagation post.
I've included a special question and answer guide below detailing common Pilea peperomioides problem that people have with these plants.
This IS an easy plant to grow, but if you don't know what it likes, it can give you some problems. Take a look at some of the main problems that people have had with this plant, as well as my recommended solutions.
Why is my plant not growing? I’ve had it a while and there has been no new growth!
You are probably not giving it enough light! Plants need light to photosynthesize so that they can make their own food in order to grow.You can't expect a plant to grow well if you shove it in a dark corner of your home, or if it is very far away from a window.
I’ve heard that these plants produce a lot of babies. Why is mine not growing any babies???
Nature teaches us patience. Just give it some time! If your plant appears healthy and is growing well and receiving proper light, it is just a matter of time before it grows little baby plants.Depending on how old your plant is, it may be at least a few months before you see babies start to appear.
Why are my leaves curling?
There can be a variety of reasons why this happens, but one reason that this will happen is if your potting media is not drying out quickly enough.
Once, I repotted one of my Pilea peperomioides into a pot that I knew was MUCH too big, but I didn't have anything smaller and was too lazy to go get an appropriately sized pot.
Needless to say, the potting mix was not drying out and the newer leaves were curled.
I immediately corrected the issue and replanted it into a smaller pot, and it resolved the issue. Of course I knew better but I was being lazy (which ends up creating more work later.)
If you have a potting mix that is not well drained, this can also be an issue.
Be sure to follow the recommendations on soil blends found earlier in this post.
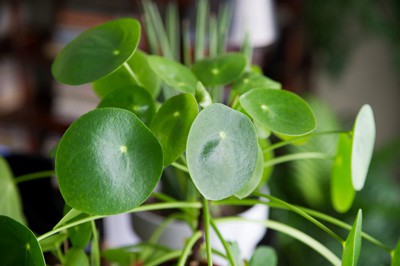
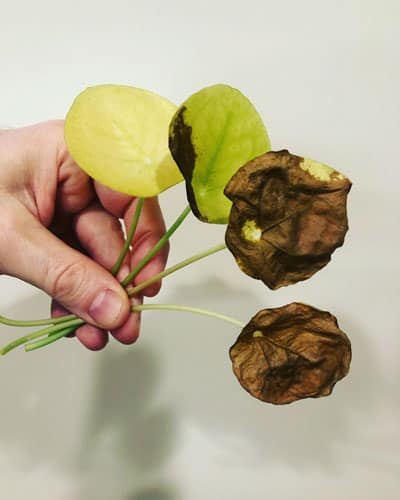
Why are there white spots symmetrically scattered on the leaves?
Pilea peperomioides have pores on the undersides of the leaves and sometimes the plant will release excess minerals (from tap water or fertilizer) through these pores. It will almost look like little grains of salt.
It does not harm the plant, and you can simply brush them off gently with your finger. If you switch to purified or distilled water, this issue will be eliminated. Again, it will not harm the plant.
My plant is drying up so quickly! Much more quickly than it used to. Am I doing something wrong?
Your plant may need to be repotted into a larger pot. This happened to me as well with one of my plants. It seemed to dry out twice as quickly as it used to, but nothing else changed (light, season, etc.) It turned out that it was very potbound, so repotting it into a larger pot did the trick.
I got a yellow leaf! What am I doing wrong! Am I killing my plant?
I get this complaint a lot from so many people freaking out over one or two leaves yellowing. There is no reason to worry if the leaves were older leaves from the base of the plant.
This is a natural cycle of nature! Eventually the older leaves will turn yellow. It doesn't necessarily signal that you are doing something wrong.
However, if you are getting a lot of yellow leaves, at the base of the plant, immediately check your soil. This can happen if you let your soil dry out completely for a while.
If this has happened, immediately water your plant!
Why are all my leaves yellowing?
There are various reasons why this can occur. If more leaves that just one or two at the base are yellowing, it could be the sign of a more serious problem.
"Overwatering "is one reason that you can get many yellow leaves.
The potting mix needs to dry out in between watering. I actually despise the word overwatering. It is a very deceiving word and has caused a lot of misunderstanding in plant care.
I highly recommend reading my blog post on watering myths. It will really help you a lot because the term "overwatering" is VERY misunderstood!
Also, if you let your plant sit in a saucer of water for extended periods of time, this is very problematic.
Another reason for yellowing leaves can be lack of nutrients. Do you fertilize? Learning how to fertilize is a very important aspect of being a plant parent.
If you have gone way too long without fertilizing, this can also be an issue, especially if the plant has been in the same pot for a very long time.
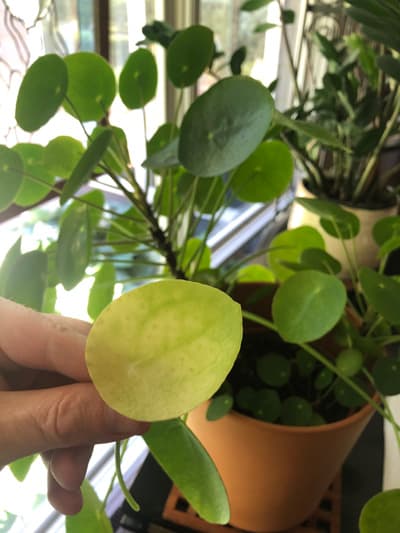
Finally, Pileas peperomioides that are in too much direct sun may also turn a yellow-ish green color. Simply move it to an area with less direct sun and it may correct the problem.
My whole plant is drooping! What happened?
When I get too busy with life and don't pay attention to my plants, this can happen. It can simply mean that your plant has completely dried out and is starting to wilt from stress.
Check the soil with your finger. Does it feel bone dry? Lift the plant up with your hands. Does it feel lighter than normal? Chances are you just need to give it a good drink of water.
When your potting mix gets bone dry, you may need to drench the soil a few times in order to ensure that you are thoroughly moistening the soil.
When this happens, the water will seem to go straight through and not moisten the soil much. Sometimes potting mixes that have gone too dry (especially peat-based mixes), will be difficult to re-wet so water it a few times in a row until the soil is thoroughly moistened.
Or maybe your plant is drooping and you find that the potting mix is still moist. You may have kept your plant wet for too long and may have started to have root rot.
Why do my leaves have long petioles?
These plants have naturally long petioles (the petiole is the long "stem" that is attached to each leaf.) If you find that the petioles are getting longer and longer, it's probably due to your plant not getting enough light.
Increase your light levels by moving your plant to a brighter location, and the new growth should be more compact.
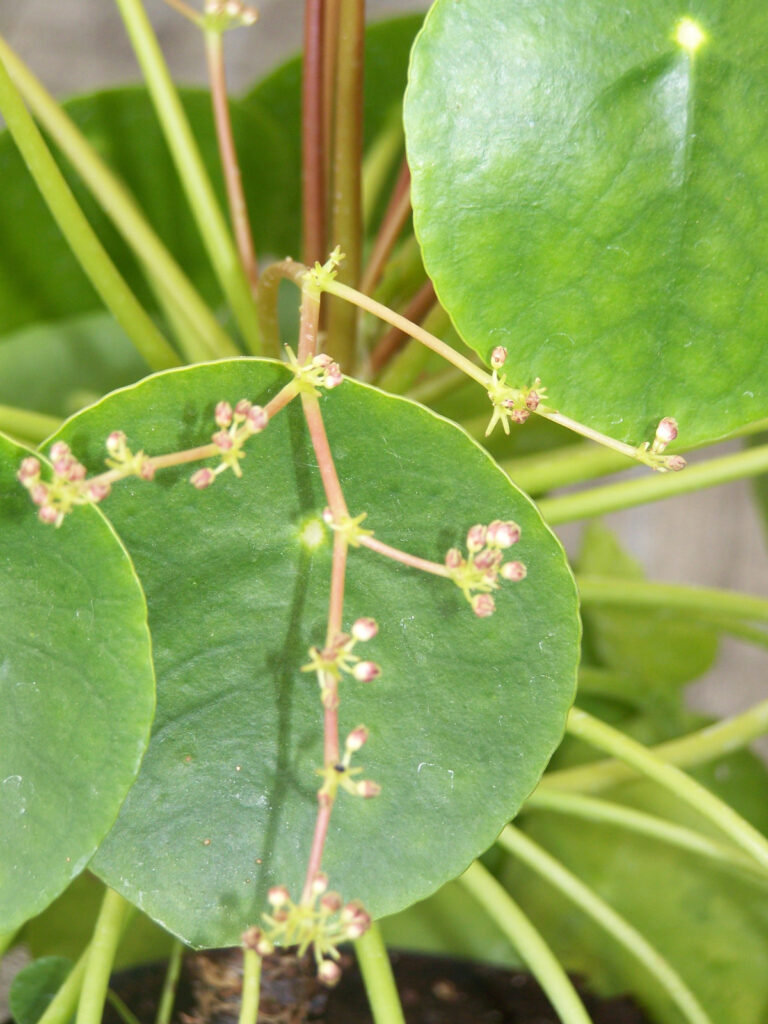
Does Pilea peperomioides bloom?
Yes it does! It's not super common for them to bloom indoors, but they do indeed bloom. The inflorescence has tiny white flowers.
What are all the bugs flying around my P. peperomioides?
They are likely fungus gnats which will thrive in potting mix that stays continually wet. Check out my blog post on how to eliminate fungus gnats.
It is not as simple as just placing some yellow sticky traps around your plants, so don't miss my post if you have been struggling with fungus gnats.
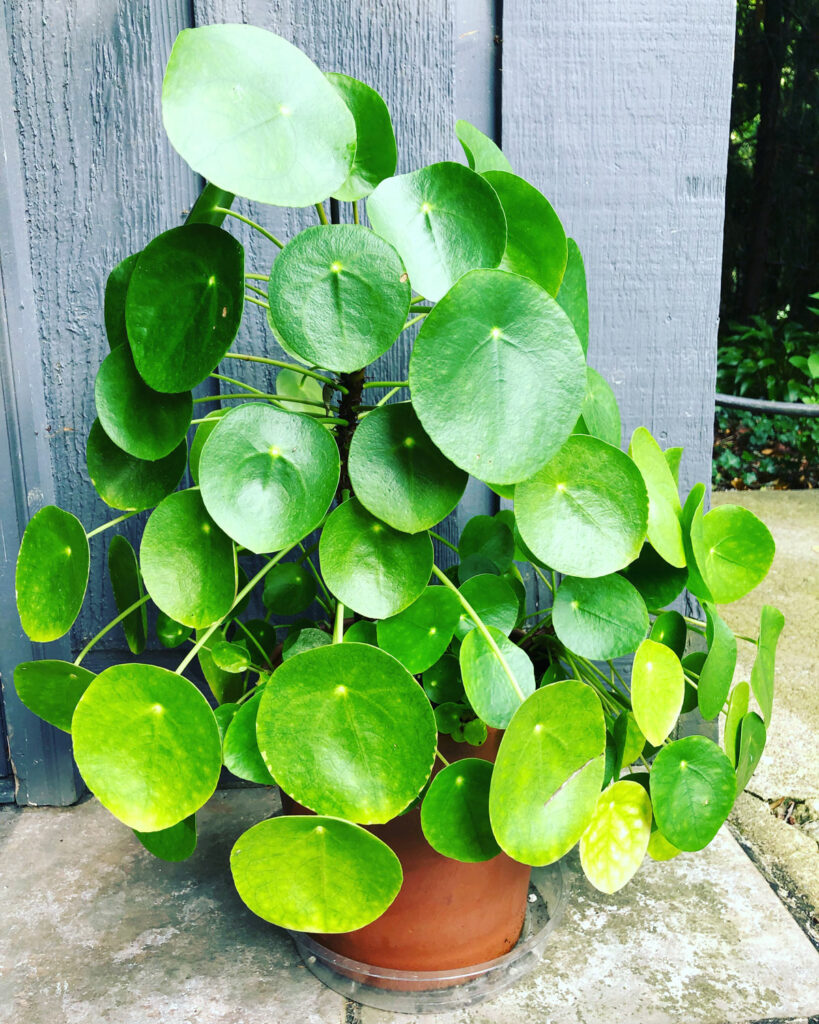
HOW TO GROW BIG PILEA PEPEROMIOIDES
This is one of the main questions that I get from many people. "How do you grow your Pilea peperomioides so big???"
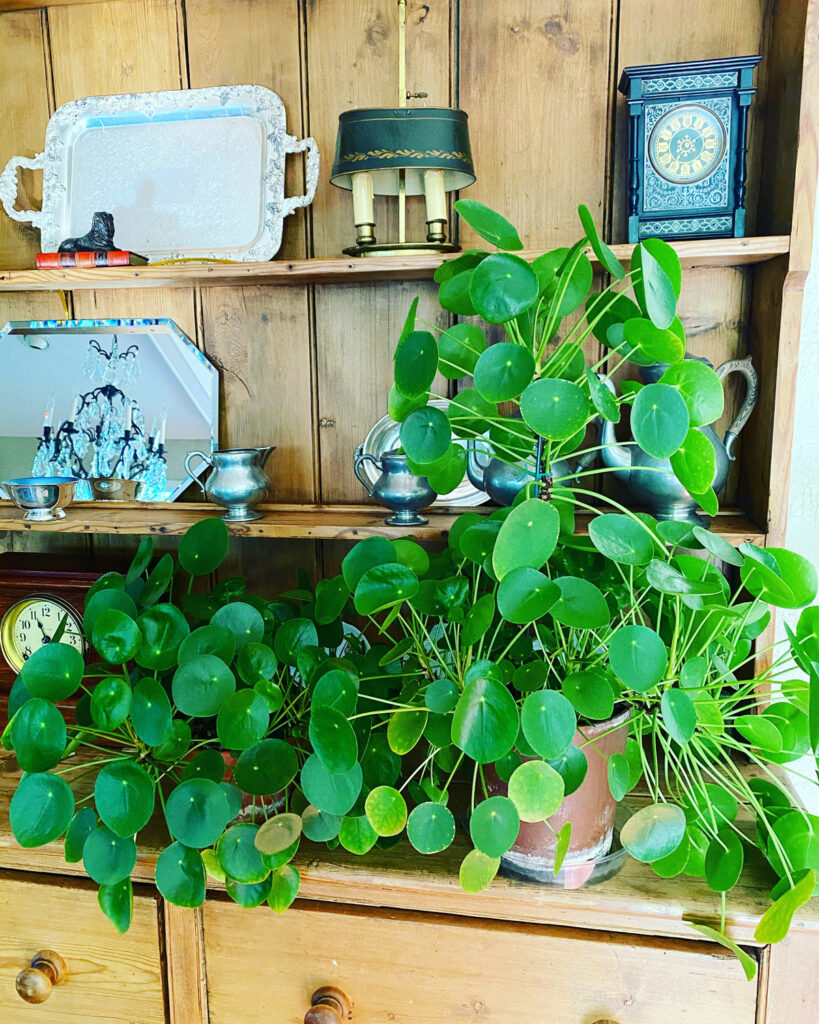
Pilea peperomiodes can actually get pretty tall. Check out the photo below of my plants.
The plant on the right is actually about 21 inches tall (from the soil level). If I'm counting the pot, it is 2 feet and 4 inches tall!
How do you get this plant to grow so big? There are no shortcuts. It is the result of consistent, unwavering care.
If you follow all the light, soil, and fertilizing recommendations in this post, you can have a big Pilea too!
The most critical aspect (aside from LIGHT of course), is special attention to the soil moisture. You want a happy medium. Completely dry soil will cause your plant's lower leaves to yellow and then it'll be pretty bare.
On the other hand, you don't want to keep it wet. You still want to allow the surface of your soil to dry out. Aim for 1 inch of the soil to dry out before watering. You will NOT be "overwatering" if you do this. If you can strike a good balance, you will achieve great results!
That's it folks! Phew! That was a lot of information. Hopefully this helps you care for your Pilea peperomioides better. Do you have a Pilea peperomioides? Do you have any more tips to share other than what you read in this post?
If you are obsessed with Pileas, there are many different kinds! You might like to grow Pilea glauca as well with its beautiful cascade of silvery leaves!
I had to cut off the top part of my leggy pilea plant and put it in water. Do I add a tiny bit of liquid plant food to the water or do I just put it in plain water? Also, how far from the window it used to sit in do I need to keep it?
Hi Lisa. Just put it in plain water. Don't add any fertilizer (remember, there are no roots to take the fertilizer up!). Place it right in front of a window that doesn't get any direct sun. A little sun is ok, but not much.
Hi Sarah, it really depends on each case! There is no rule of thumb and you will have to inspect your plant to determine if you need to right now. I'll refer you to a blog post that will help you determine when and if you should repot. You can always gently try and take the plant out of the pot and look at the roots to see if it is really pot bound. Here is my blog post that I recommend reading: https://www.ohiotropics.com/2017/12/31/how-to-repot-your-houseplant/
Hello, my pilea has brown spots on the leaves, it was already like that when I got it from an Etsy seller, but now it's getting worst. I don't think I see one leave that doesn't have some brown specks on it. Pls help.
I just got into Pileas a few weeks ago when I grabbed one randomly cause I loved the way it looked. However, I am a little worried about it. At first I thought it started to die and had something wrong with it and treated it with neem oil. It seems to have recovered and sprouting new growth. But, the lower leaves are cupping and I am not sure what that means and was hoping you could help.
Hi Derrick! What was wrong with the plant when you treated it with Neem oil? The cupping is sometimes due to inconsistent soil moisture. It's hard to say without giving me more information of your care routine. I would do your best to follow all my cultural tips for light, watering, soil, etc.
Hey when you deadheaded your primary pilea, what happened to the base? Did it start regrowing where it was cut or did it die? If it started regrowing, did it release apical dominance and grow multiple stems? Thanks!
Hi Taylor. I cut the base almost all the way down. I'm going to update the post this evening to show photos of what happened to the original plant. All the pups that were already there have gotten nice and full, and I just checked and there are 9 new pups forming at the base. 🙂
Hi there, thanks for the article! I have a big beautiful pilea with a ton of pups. However, I've noticed that in the past couple months many lower leaves have been turning yellow, then blotchy brown and feeling soft and wet before eventually falling off. I know that it's normal for lower leaves to fall off, but it seems to be happening at an alarming rate and I'm also seeing brown spots on newer leaves. I was worries that it was being overwatered but I leave it to get absolutely bone dry before giving it a drink. Any ideas? In terms of light, I have it about 6 feet from a west window but it's winter here in Canada so there is unfortunately very little light even in the best location.
Hi Allison! I would recommend placing your plant much closer to the window. As close as you can without it touching the window. Also, they don't like going completely bone dry. They will rapidly form yellowing and brown leaves like you mention when you do that. I would recommend just letting maybe the top quarter of the soil dry out, and then water. You will not be "overwatering" by doing this, but make sure that you also move your plant to higher light so that it will be able to use the water more quickly. You really need both for best results! Your plant should respond much better with this treatment. Keep me posted with your progress and good luck! I know the challenges of dark winters. Don't be afraid to give your houseplants direct sun indoors especially where you live. Even plants that are labeled as "low light" will respond very well in your location.
Agh thank you so much!!! And this whole time I thought I was just overwatering it. Great advice, I'll keep you posted!
Best,
Allison
You're very welcome Allison!
Hello! My pilea had issues with brown/black spots on the leaves (not on the edges, but one spot centrally and they’d eventually fall off). It was a small pup that had done well spring through fall, but these started happening in early winter. It previously had some curling on the top leaves, but otherwise healthy. I assumed it had to do with light since that’s the main thing that significantly changed, but I was wondering if you’ve ever experienced this? It’s been in a room with a west facing window, about 5 feet away so I don’t think it was getting much of a draft. I initially thought it may be pot bound since the pot was so small, but I took it out and the roots were small and almost brittle in pretty compacted soil. I changed out the soil but I think it was too late, as all of the leaves are now gone and I’m pretty sure it’s done for. However, I just got a new one that I want to do well! Let me know what you think.
Hi Shannon. I would recommend placing your plant right in front of a window. There is a huge reduction in light the further you get away from your window, even for just a few feet. If you can, place it within a foot of the window for best results. We have to look at things holistically when growing plants. When you increase light, the plant will use up water more quickly and the soil will dry out more quickly and these plants like this. But we have to balance things out. Try moving your plant within a foot of the window and then monitor the soil moisture. Wait until the top quarter or so of the potting mix is dry, and then water. This should do the trick and give it a little time for the plant to adjust. You should start seeing things improve with longer days coming now and more light.
Hi Raffaele, I just recently propagated some babies however I didn't rot them in water first. At the time of separation I was able to bring some roots, so I'm hoping that will be enough for them to take in the soil....what do you think?!?
Hi Erin! If you were able to retain some roots on the pups, then you did the right thing! You should be good to go. I would only place the pups in water if they didn't have any roots to begin with. Your end goal is roots so you did the right thing.
I bought my money plant as a pup and it's been growing beautifully for the past 8 months, I've already propagated two pups off of it and have given them a new home.
I feed it about once a month and it always has new growth with once a week watering. But the leaves look small to me - not the big saucer shape it use to be and it seems to be stretching.
It's on my very bright east window counter top that gets the morning and mid-day bright light. Any ideas?
What kind of fertilizer are you using? The light sounds like it's good. Any other changes over the past few months? Are the newer leaves not growing? It's hard to say without seeing a picture. Perhaps it is ready to be repotted into a bigger pot. When was the last time you repotted it? If it's constrained too much, the growth will slow down. Those are my thoughts for now without actually seeing a photo. Hopefully this helps Lori!
Hi...I bought my Pilea about a month ago.I repotted it into a rectangular shaped box as the original pot appeared to be a little too small for it.Unfortunately,the box has no drainage holes (I also placed it indoors) & I started to notice the leaves turning yellow & the new ones which were growing didn't appear healthy at all.I only water it when the soil is completely dried out.After going through various websites on Pilea care,I repotted it into smaller pot...with drainage holes,put it outside & now I am just hoping for the best!Was it doing badly because the box was too big(with no holes) & due to lack of sunlight?
If you had it in a dark area and in a pot with no drainage hole, it most likely contributed to your issues. These plants are easy to grow, but they need excellent drainage. I would never try growing these in pots without drainage holes. Planting it in a pot that is too big also complicates the issue. With lower light and a pot that's too big, the soil will take a longer time to dry out and it will cause a lot of problems for this plant. I hope it starts to do better now that you repotted it!
I have trouble with plant. I have kept it in the bathroom with limited western light. The small leaves in the center turn brown before they reached maturity. Help!
CM
Can you send me a photo (theohiotropics@gmail.com) and describe to me how you water and care for this plant? I will be able to help better with that information.


I had to cut off the top part of my leggy pilea plant and put it in water. Do I add a tiny bit of liquid plant food to the water or do I just put it in plain water? Also, how far from the window it used to sit in do I need to keep it?
Hi Lisa. Just put it in plain water. Don't add any fertilizer (remember, there are no roots to take the fertilizer up!). Place it right in front of a window that doesn't get any direct sun. A little sun is ok, but not much.
How often should you repot? I've had mine in the pot I received it in for a year and i'd hate to do damage because I was too late repotting!
Hi Sarah, it really depends on each case! There is no rule of thumb and you will have to inspect your plant to determine if you need to right now. I'll refer you to a blog post that will help you determine when and if you should repot. You can always gently try and take the plant out of the pot and look at the roots to see if it is really pot bound. Here is my blog post that I recommend reading: https://www.ohiotropics.com/2017/12/31/how-to-repot-your-houseplant/
Hello, my pilea has brown spots on the leaves, it was already like that when I got it from an Etsy seller, but now it's getting worst. I don't think I see one leave that doesn't have some brown specks on it. Pls help.
I would need to see photos to better help.
Do you have an Instagram account?
Hi Anne! Yes I do :-). It's @ohiotropics
Can I plant a bunch of pilea pups together in 1 pot?
Hi Nikki, yes absolutely!
I just got into Pileas a few weeks ago when I grabbed one randomly cause I loved the way it looked. However, I am a little worried about it. At first I thought it started to die and had something wrong with it and treated it with neem oil. It seems to have recovered and sprouting new growth. But, the lower leaves are cupping and I am not sure what that means and was hoping you could help.
Hi Derrick! What was wrong with the plant when you treated it with Neem oil? The cupping is sometimes due to inconsistent soil moisture. It's hard to say without giving me more information of your care routine. I would do your best to follow all my cultural tips for light, watering, soil, etc.
Hey when you deadheaded your primary pilea, what happened to the base? Did it start regrowing where it was cut or did it die? If it started regrowing, did it release apical dominance and grow multiple stems? Thanks!
Hi Taylor. I cut the base almost all the way down. I'm going to update the post this evening to show photos of what happened to the original plant. All the pups that were already there have gotten nice and full, and I just checked and there are 9 new pups forming at the base. 🙂
@Raffaele, woah that’s awesome. Alright I’m gonna do it...off with her head!
Hi there, thanks for the article! I have a big beautiful pilea with a ton of pups. However, I've noticed that in the past couple months many lower leaves have been turning yellow, then blotchy brown and feeling soft and wet before eventually falling off. I know that it's normal for lower leaves to fall off, but it seems to be happening at an alarming rate and I'm also seeing brown spots on newer leaves. I was worries that it was being overwatered but I leave it to get absolutely bone dry before giving it a drink. Any ideas? In terms of light, I have it about 6 feet from a west window but it's winter here in Canada so there is unfortunately very little light even in the best location.
Thanks so much!
Hi Allison! I would recommend placing your plant much closer to the window. As close as you can without it touching the window. Also, they don't like going completely bone dry. They will rapidly form yellowing and brown leaves like you mention when you do that. I would recommend just letting maybe the top quarter of the soil dry out, and then water. You will not be "overwatering" by doing this, but make sure that you also move your plant to higher light so that it will be able to use the water more quickly. You really need both for best results! Your plant should respond much better with this treatment. Keep me posted with your progress and good luck! I know the challenges of dark winters. Don't be afraid to give your houseplants direct sun indoors especially where you live. Even plants that are labeled as "low light" will respond very well in your location.
Agh thank you so much!!! And this whole time I thought I was just overwatering it. Great advice, I'll keep you posted!
Best,
Allison
You're very welcome Allison!
Hello! My pilea had issues with brown/black spots on the leaves (not on the edges, but one spot centrally and they’d eventually fall off). It was a small pup that had done well spring through fall, but these started happening in early winter. It previously had some curling on the top leaves, but otherwise healthy. I assumed it had to do with light since that’s the main thing that significantly changed, but I was wondering if you’ve ever experienced this? It’s been in a room with a west facing window, about 5 feet away so I don’t think it was getting much of a draft. I initially thought it may be pot bound since the pot was so small, but I took it out and the roots were small and almost brittle in pretty compacted soil. I changed out the soil but I think it was too late, as all of the leaves are now gone and I’m pretty sure it’s done for. However, I just got a new one that I want to do well! Let me know what you think.
Hi Shannon. I would recommend placing your plant right in front of a window. There is a huge reduction in light the further you get away from your window, even for just a few feet. If you can, place it within a foot of the window for best results. We have to look at things holistically when growing plants. When you increase light, the plant will use up water more quickly and the soil will dry out more quickly and these plants like this. But we have to balance things out. Try moving your plant within a foot of the window and then monitor the soil moisture. Wait until the top quarter or so of the potting mix is dry, and then water. This should do the trick and give it a little time for the plant to adjust. You should start seeing things improve with longer days coming now and more light.
@Shannon, maybe over fertilizing? Similar happened to me. I grew in miracle gro based soil for my base, but then also fertilized… burned the roots.. 🙁
Thank you so much for this well written and I informative article. Can you email it to me so I can save it. Thank you so much. Lynn
You're welcome Lynn! Unfortunately, I don't have it in a document. You can probably just print it out from the website.
Hi Raffaele, I just recently propagated some babies however I didn't rot them in water first. At the time of separation I was able to bring some roots, so I'm hoping that will be enough for them to take in the soil....what do you think?!?
Hi Erin! If you were able to retain some roots on the pups, then you did the right thing! You should be good to go. I would only place the pups in water if they didn't have any roots to begin with. Your end goal is roots so you did the right thing.
I bought my money plant as a pup and it's been growing beautifully for the past 8 months, I've already propagated two pups off of it and have given them a new home.
I feed it about once a month and it always has new growth with once a week watering. But the leaves look small to me - not the big saucer shape it use to be and it seems to be stretching.
It's on my very bright east window counter top that gets the morning and mid-day bright light. Any ideas?
What kind of fertilizer are you using? The light sounds like it's good. Any other changes over the past few months? Are the newer leaves not growing? It's hard to say without seeing a picture. Perhaps it is ready to be repotted into a bigger pot. When was the last time you repotted it? If it's constrained too much, the growth will slow down. Those are my thoughts for now without actually seeing a photo. Hopefully this helps Lori!
Thanks for the quick reply????....I also found your write up on Pilea care very useful & easy to understand.????
Hi...I bought my Pilea about a month ago.I repotted it into a rectangular shaped box as the original pot appeared to be a little too small for it.Unfortunately,the box has no drainage holes (I also placed it indoors) & I started to notice the leaves turning yellow & the new ones which were growing didn't appear healthy at all.I only water it when the soil is completely dried out.After going through various websites on Pilea care,I repotted it into smaller pot...with drainage holes,put it outside & now I am just hoping for the best!Was it doing badly because the box was too big(with no holes) & due to lack of sunlight?
If you had it in a dark area and in a pot with no drainage hole, it most likely contributed to your issues. These plants are easy to grow, but they need excellent drainage. I would never try growing these in pots without drainage holes. Planting it in a pot that is too big also complicates the issue. With lower light and a pot that's too big, the soil will take a longer time to dry out and it will cause a lot of problems for this plant. I hope it starts to do better now that you repotted it!
Hello. Have you any idea why my plant keeps losing its leaves. It has bright light and is watered as you suggest.
Regards
Has your plant maybe experienced sudden cold drafts or changes in temperature?
I have trouble with plant. I have kept it in the bathroom with limited western light. The small leaves in the center turn brown before they reached maturity. Help!
CM
Can you send me a photo (theohiotropics@gmail.com) and describe to me how you water and care for this plant? I will be able to help better with that information.
Thank you for the great article on Pilea growth and care. Extremely informative.
Glad you enjoyed it Rosaline!