Growing a pineapple plant indoors is so easy to do simply from a grocery store pineapple! Whether you want to root a pineapple in water or in soil, there are a few steps that you need to take in order to be successful.
Follow these simple steps, and you too can propagate your own pineapple to grow and fruit in your own home! There are so many cool kitchen gardening projects that you can do! This one is perhaps my favorite.
Would you like to save this post?
Enter your email, and I will send this link straight to you!
Many years ago, I grew a pineapple at home from a grocery store fruit that I bought, and I was able to get it to fruit in due time. The plants can get quite large with good care, so make sure you have the room and sunny conditions for best results.
The Pineapple plant, Ananas comosus, is actually a bromeliad. Many of us are familiar with plants in the bromeliad family such as Tillandsia (air plants) or even Aechmea fasciata (Urn Plant), both of which are epiphytic (they grow on trees).
Pineapple plants, on the other hand are terrestrial growers, meaning that they grow in the ground.
Here are the steps to propagate your own pineapple. I will also teach you a trick in order to get your pineapple plant to bloom and produce your own homegrown fruit! Let's get started!
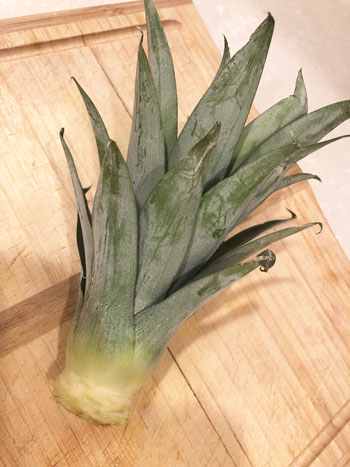
First, you'll need to purchase a nice pineapple from the grocery store. Pick one that preferably has a light sweet smell to it.
Most importantly, choose a pineapple whose leaves look nice and fresh and green. If half the leaves are brown and dry, don't purchase it as your chances of success will be minimized.
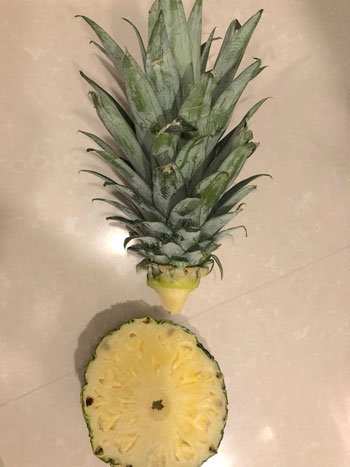
Step 2: Cut the Pineapple Top Off
Next I'd like you to cut the top of the pineapple top off. Take about an inch off of the actual fruit. You'll need this because I have a tip on how you can EASILY peel and cut your fruit!
Step 3: Cut Your Pineapple Up
You're not just going to cut the top off to grow a plant right? You're also going to enjoy eating your pineapple I hope!
I discovered an amazing and inexpensive pineapple slicer. It peels, cores, and slices a whole pineapple in a matter of seconds!
I was skeptical at first, but I was absolutely sold after the first time I used it! You can purchase an inexpensive pineapple corer on Amazon.
Simply cut the top of the pineapple off, snap the handle to the corer, and keep twisting the blade into the pineapple until you reach the bottom. Then jiggle it around a little and pull up.
You will end up with a perfectly spiraled pineapple and no more time-consuming, messy, manual peeling. I will NEVER go back to using just a knife anymore. In fact, this makes it so easy that I now enjoy pineapple much more frequently than I used to!
It only has two parts, is made of easy to clean stainless steel, and I simply store it in its box. It is WELL worth the very inexpensive investment. You can even get creative and make a fruit bowl out of the emptied pineapple shell!
Ok, now back to growing pineapples. I wanted to share this gadget because it is one the most useful kitchen gadgets ever invented.
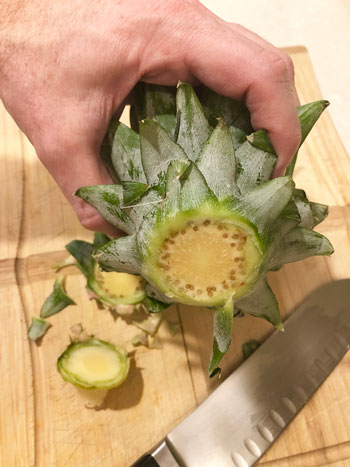
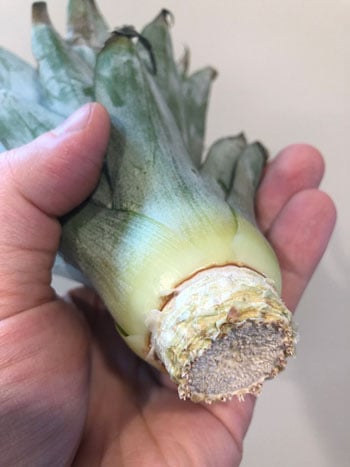
Step 4: Prepare the Pineapple Top
Next, I grabbed the pineapple top by the base of the leaves in one hand, and with the other hand I grabbed the part of the fruit that I cut off. Then I twisted the top off.
You can now manually take a knife and peel and eat the fruit that is left. The reason we needed to do this was in order to use the pineapple slicer.
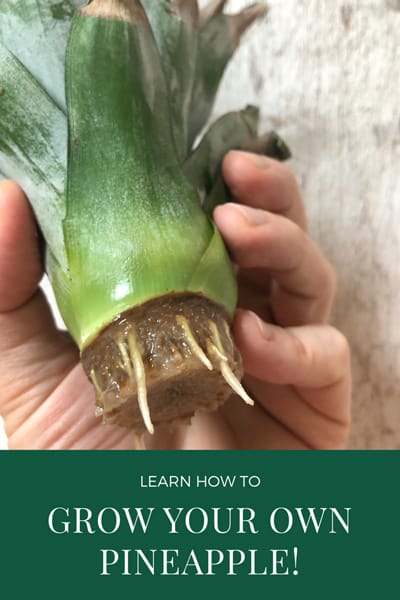
We're not done yet. Now, you're going to take the leafy top and make one thin slice at a time until you reveal the little knobs that you see in the photo below. These are where the roots will grow.
At this point, remove a few of the base leaves. This will make it easier to plant, and also so you won't have any leaves under the soil line once you plant it in soil, or under water if you choose to water propagate.
Step 5: Dry Your Pineapple Top
This step is very important so make sure you don't skip this step! I've heard many people complaining that their pineapple top rotted and never grew.
Simply let your pineapple top dry somewhere for a week. I placed mine at the top of a plant stand in my sunroom. It was out of the way of any direct sun while it dried.
Take a look at how nicely the base dried. This will help it not rot!
Step 6: Root Your Pineapple in Water
When I grew my first pineapple years ago, I actually just placed it in a pot of soil after I dried the top.
If you would rather propagate it in soil, simply dip the base of your dried pineapple in water, and then dip into a rooting hormone to increase your chances, and then plant in soil. More on this topic later.
There is usually no right or wrong when it comes to water propagation vs. soil propagation. I believe that whatever works is the right way!
I tend to prefer water propagation in many cases because it allows me to see the roots and I know I have been successful.
Let's continue with water propagation.
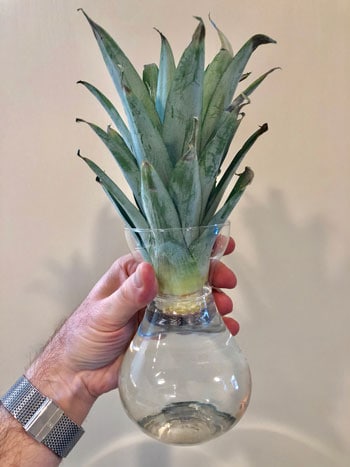
I simply took a hyacinth vase to place the pineapple top in. I originally purchased the hyacinth vase to force hyacinths into bloom, but it is perfect for propagation!
No extra support is needed and the pineapple top can rest nicely in the vase. If you don't want to use a hyacinth vase, just make sure that the base of the pineapple top isn't touching the bottom of whatever propagation vessel you are using. A jar will work perfectly too.
I just love the hyacinth vase because it makes it very easy, and I use them a lot to propagate many plants. If you don't have a hyacinth vase, they are wonderful for propagating pineapples, avocados, and even cuttings of Pothos or whatever else you are propagating.
As far as the water level in the vase goes, I barely covered the base of the pineapple top as you can see from the photo. Just keep an eye on it so that the very bottom of the pineapple top is underwater. Place it in an area that has bright indirect light, but hold off on too much direct sun for now.
Be sure to change the water in your vase every few days so the water stays fresh and doesn't go funky on you. If you don't do this, it may increase the chances of rotting. I would say minimum once a week, if not twice a week.
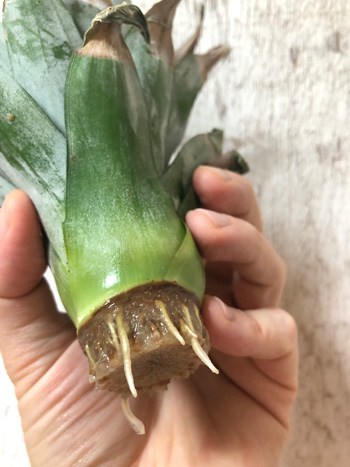
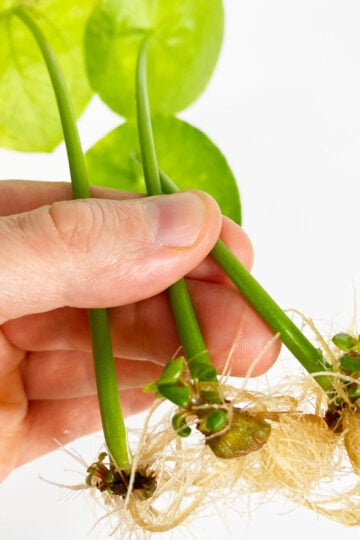
In less than one month, my pineapple has already made roots. I noticed the roots about a month after placing the pineapple top in water, and some of them were already quite long.
Which obviously means that the roots had already appeared a few days earlier. I'll estimate that it took about 3 weeks to start rooting. Not bad!
Take a look at the photo below:
Pineapple Top Roots
What I noticed was that the outside of the base of the pineapple was a little mushy, so I gently removed the soft parts with my finger by gently brushing downward.
Once your pineapple has the beginnings of roots growing, you should plant it right into soil. Don't wait too long. I'm going to wait until the roots are maybe ½ inch to an inch long, and will pot them right up into soil.
Bromeliads don't have large root systems, so do not plant them in large pots. Especially when you are first planting them into soil.
Any good houseplant soil will be just fine, so use whatever mix you have on hand. They aren't too fussy as long as you have a well drained soil.
I would recommend adding some perlite to your potting mix. This will make your soil drain deliciously well.
Step 8: Growing Your Pineapple Plant
Once your plant is showing signs of good growth, be sure to give it as much sun as you can give it indoors. Pineapples are sun-loving plants. Unless you live in the tropics, I would recommend that you give your plant as much sun as you can indoors.
When I grew a pineapple plant years ago, I took it outside for the summer, and then brought it back indoors.
Be sure to harden your plant off if you decide to summer them outdoors, which I highly recommend. This is extremely important so that your leaves don't burn!
I would recommend using an organic fertilizer and skip the chemical fertilizers. Especially since your plant will be fruiting, so I like to use organic products when I grow anything edible.
This is a fantastic fertilizer that I love using for veggies and anything edible that I'm growing, and I also use these as a part of my fertilizer regime with my ornamental and potted plants.
Be sure to also wet the leaves with the fish emulsion and seaweed fertilizer too. Bromeliads also love this type of foliar fertilization!
As far as watering, my "standard" rule of thumb applies. Wait until the top inch or so of the soil is dry, and then water your plant thoroughly. Simple.
Beware as you grow your pineapple plant though because the leaves can be quite sharp and jagged! The plants can also get quite large!
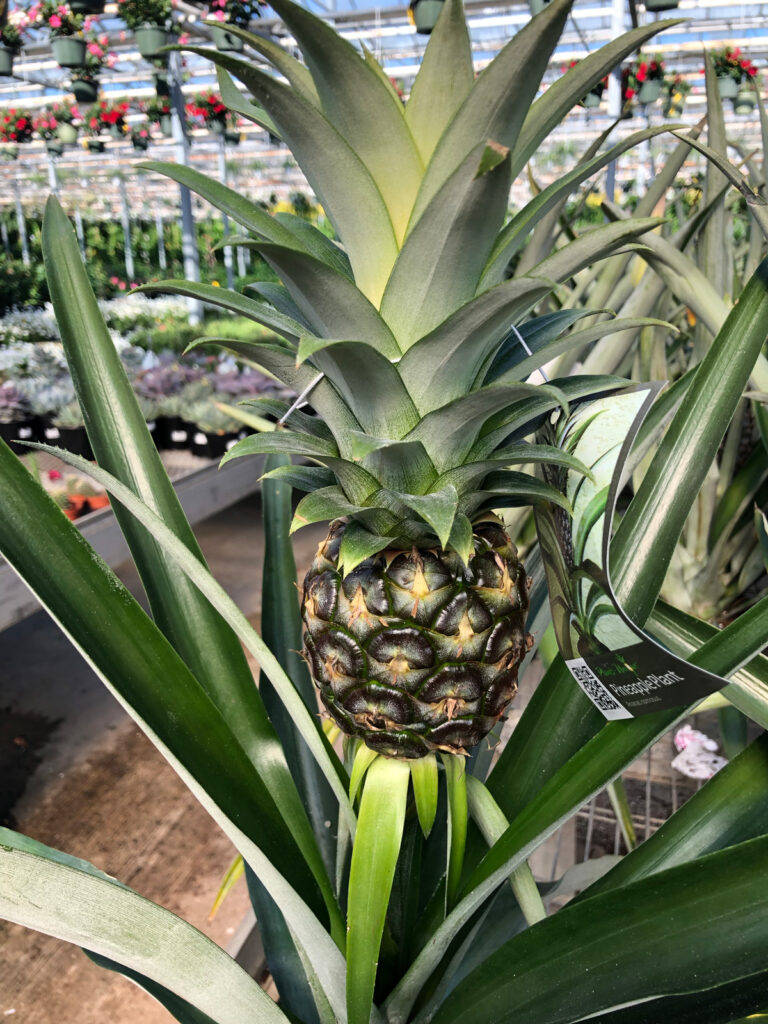
As far as fruiting goes, it can take 2-3 years or more, depending on your conditions. The more sun that they get, the better.
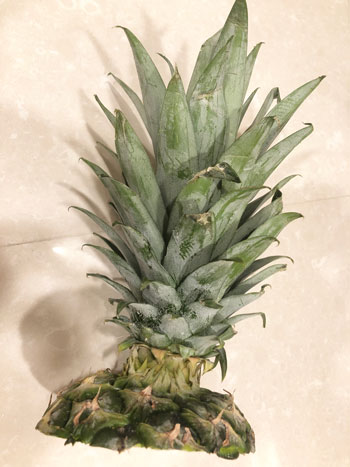
Here is what a pineapple growing on a plant actually looks like.
If you get sick of waiting for your pineapple to bloom...I have a trick.
Step 9: Force Your Pineapple to Bloom (optional!)
If you are sick of waiting for your plant to bloom and your plant has gotten quite large, there is a trick that you can use that will help any bromeliad to be forced into bloom.
The bigger the let your plant get though, the better. It will also help result in a larger fruit.
Find a clear, plastic bag that your plant will fit in. Place two apples in the bag along with the plant, and tie everything up to make it airtight. Leave everything out of direct sun while you are doing this.
Leave the apples and the plant in the bag for a few days, but no longer than about a week or so. What happens is that the apples will give off ethylene gas as they ripen and this forces your bromeliad into blooming!
This trick applies to any bromeliad, and not just pineapple plants.
After a few days, take the plant back out and place it back in front of its sunny window.
In the next several weeks or so, your plant should be growing a flower stalk, on top of which will eventually hold a baby pineapple plant.
If you are fascinated with bromeliads like I am, a good resource to look into are the various plant societies. They are a great way to get good care information and to meet other plant crazies.
Are there any other ways to propagate pineapple? Actually yes! Once your plant has flowered and produced fruit, the mother plant will slowly die off (this is what happens with all bromeliads).
However, before the mother plant dies off, it will produce pups, and you can easily separate these to continue growing. Check out this great blog post I found on how to grow pineapple plants from offsets, pups or suckers.
If you live in a tropical area and wish to grow pineapples in the ground, check out this interesting post on growing pineapples.
I helped my brother set up the pineapple top he was wanting to propagate so that it dries out. Piney the pineapple will be in good hands with my green thumbs.
Thanks to you, I have 5 pineapple plants, at different stages of growth, in my front yard here in Florida. The oldest has a small fruit now .. About 6-inches, including the top. How do I know when it's ready to harvest?
I have about ten pineapple plants growing. I just cut the tops of ( leaving about and inch on the bottom. I stuck them right into soil. They rooted and have grown really big! I place them outside in the summer.
They’ve been growing now for about 7 1/2 years. I just got a flower on one!
I’ve tried the apple thing twice. Not sure why it finally bloomed but it so beautiful! Btw. I live in west Michigan!
Thanks for sharing Lynn. That's amazing! You must have good amount of space because they get quite large. I'm wondering if maybe the plant wasn't mature enough when you did the apple trick?
I purchased the description below soil for my rooting pineapple top. What do you think about my choice? My thinking it mentioned soil for Bromeliads. Love your article. Very informative and easy to understand. I'm hoping here in SE Wisconsin I'll get a fruit.
Orchid Soil Premium All Purpose Blend | Large 2.2 Quarts | Ready to Use for Orchids, Bromeliads, Epiphytic Plants | Lava, Calcined Clay and Pinebark
Hi Peter! I just took a quick look at a listing for that soil online. I actually think it would be fine for your pineapple. But it's concerning that they say that this mix is good for all orchids! It would not be good for orchids that are epiphytes (moth orchids, etc) because the texture is not coarse enough. Most bromeliads are epiphytes, but pineapples grow in the ground, so from the photos, it looks like it would be good!
I started a top in water and several weeks have passed. No roots yet but I noticed new growth in the center. Any idea on how to get roots to grow or is it ok to put in the soil?
Hi Steve! Do you have your pineapple in front of a window? If it's not, I encourage you to place it right in front of a window, even with some sun while its rooting. Once it is rooted, give it the sunniest window you've got. You could place it right into potting mix now if you'd like, or just wait until roots start growing so you can be sure it has gotten a start. Hope this helps a bit!
I love this! I started my pineapple a year ago, after visiting my sister in Texas. I am tickled to say they my plant is growing wonderfully, sadly my sis lost hers. Love it! Thank you!
We had a few pineapple plants by chance a few years ago. My husband threw the tops out in the yard after my attempt to get roots failed. I was pleasantly surprised when I discovered they had taken root. I have to add that I live in Florida, so it’s very easy to grow just about anything here. Thanks for the post!
I have always wanted to try this. What a good science experiment for kids as well. I am intrigued by the apple tip. Will this cause air plants to bloom too?
Yes, that would make a fantastic science experiment for kids! What a great idea. I have never tried the apple method for air plants, however they are in the Bromeliad plant family (Bromeliaceae) so it should work! As long as the plants are mature enough to flower. For best results, be sure that it is of blooming size and is receiving enough light. Air plants should bloom easily on their own, but if you have a stubborn one, you can try this method.


I helped my brother set up the pineapple top he was wanting to propagate so that it dries out. Piney the pineapple will be in good hands with my green thumbs.
Piney! Love the name 🙂
Thanks to you, I have 5 pineapple plants, at different stages of growth, in my front yard here in Florida. The oldest has a small fruit now .. About 6-inches, including the top. How do I know when it's ready to harvest?
You're welcome! The pineapple will turn yellowish and may start to smell sweet. It will also give a little when you press on the fruit.
I have about ten pineapple plants growing. I just cut the tops of ( leaving about and inch on the bottom. I stuck them right into soil. They rooted and have grown really big! I place them outside in the summer.
They’ve been growing now for about 7 1/2 years. I just got a flower on one!
I’ve tried the apple thing twice. Not sure why it finally bloomed but it so beautiful! Btw. I live in west Michigan!
Thanks for sharing Lynn. That's amazing! You must have good amount of space because they get quite large. I'm wondering if maybe the plant wasn't mature enough when you did the apple trick?
I purchased the description below soil for my rooting pineapple top. What do you think about my choice? My thinking it mentioned soil for Bromeliads. Love your article. Very informative and easy to understand. I'm hoping here in SE Wisconsin I'll get a fruit.
Orchid Soil Premium All Purpose Blend | Large 2.2 Quarts | Ready to Use for Orchids, Bromeliads, Epiphytic Plants | Lava, Calcined Clay and Pinebark
Hi Peter! I just took a quick look at a listing for that soil online. I actually think it would be fine for your pineapple. But it's concerning that they say that this mix is good for all orchids! It would not be good for orchids that are epiphytes (moth orchids, etc) because the texture is not coarse enough. Most bromeliads are epiphytes, but pineapples grow in the ground, so from the photos, it looks like it would be good!
Thank you and shared ,mine has rooted going for dirt lol. Anything on Dragon fruit I have
4 seasons here Thanks again.
Hi Diana! I've never grown dragon fruit, so I can't speak from personal experience with that plant. It's a really amazing plant though! 🙂
I started a top in water and several weeks have passed. No roots yet but I noticed new growth in the center. Any idea on how to get roots to grow or is it ok to put in the soil?
Hi Steve! Do you have your pineapple in front of a window? If it's not, I encourage you to place it right in front of a window, even with some sun while its rooting. Once it is rooted, give it the sunniest window you've got. You could place it right into potting mix now if you'd like, or just wait until roots start growing so you can be sure it has gotten a start. Hope this helps a bit!
I love this! I started my pineapple a year ago, after visiting my sister in Texas. I am tickled to say they my plant is growing wonderfully, sadly my sis lost hers. Love it! Thank you!
Glad you enjoyed the post! 🙂
thank you ohiotropics for giving me wonderful information
I carnt buy a pineapple with any top leaves
We had a few pineapple plants by chance a few years ago. My husband threw the tops out in the yard after my attempt to get roots failed. I was pleasantly surprised when I discovered they had taken root. I have to add that I live in Florida, so it’s very easy to grow just about anything here. Thanks for the post!
Glad you enjoyed the post. I'm jealous of people in climates like Florida! You're very lucky 🙂
very nice information for growing pineapple at home
Thank you, I'm glad you enjoyed it!
I have always wanted to try this. What a good science experiment for kids as well. I am intrigued by the apple tip. Will this cause air plants to bloom too?
Yes, that would make a fantastic science experiment for kids! What a great idea. I have never tried the apple method for air plants, however they are in the Bromeliad plant family (Bromeliaceae) so it should work! As long as the plants are mature enough to flower. For best results, be sure that it is of blooming size and is receiving enough light. Air plants should bloom easily on their own, but if you have a stubborn one, you can try this method.