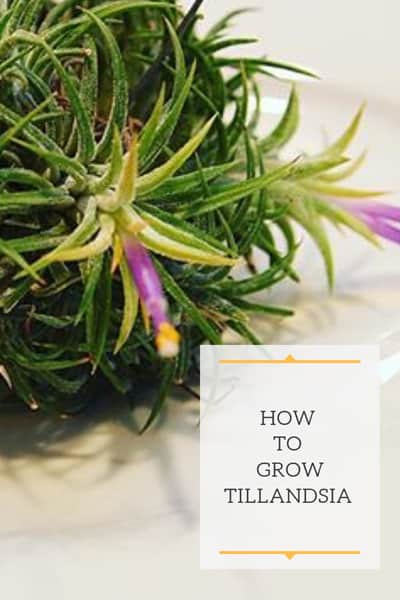
Tillandsia are such a fascinating groups of plants! They're immediately interesting and eye catching because they don't grow in soil. You'll see them loosely placed on top of a table in garden centers, or they are sold in decorative holders. There are no pots and no soil! Keep reading to learn how to take care of this unique genus of plants.
Would you like to save this post?
Enter your email, and I will send this link straight to you!
In order to understand the basics of growing air plants, let's take a look first at where and how air plants, or Tillandsia, grow in nature.
Air plants belong to the genus Tillandsia, and within that genus, there are over 650 species!
Most Tillandsias are epiphytes which means that they grow on other plants, such as on trees or branches. They don't grow in soil in the ground like most plants that we are used to.
Their roots mainly serve the purpose of anchoring themselves to another plant. It is solely a means to attach themselves and they are NOT parasitic, nor do they derive any water or nutrients from their host plant.
Tillandsia actually belong to the Bromeliaceae (Bromeliad) family of plants. If you love air plants, you probably will love my blog post on growing Bromeliads.
Their natural habitat can vary from rainforests, mountains and even deserts mainly throughout Central and South America.
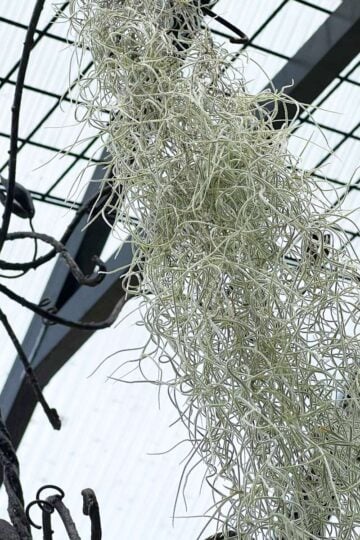
In general, the Tillandsias with thinner leaves probably come from areas that receive quite a bit of rain.
Tillandsias that have thicker leaves are most likely from regions that experience much less rain, such as Tillandsia xerographica which is one of my favorites Tillandsias.
Since air plants purchased at a garden center are often not labeled with the species, this is helpful in directing you to on how often to water them!
Light for Tillandsia
Light should be your number one concern when growing any plant. Tillandsias are no exception.
Most Tillandsia in nature are exposed to bright filtered light since they are epiphytic and grow on other plants or trees. They may get some sun, but it is filtered sun. In the home, what does this translate to?
Well first of all, don't even think about placing your Tillandsias in a bowl on a table that is away from any window. Actually, I did do this over the holidays this past winter for my Tillandsia centerpiece that I created for a holiday dinner, but it was only for 1 day.
They promptly went back to their growing location the next day.
I personally grow mine in an Eastern window. This provides some morning sun, but it is gentle enough so that the Tillandsia won't burn.
Place your plants within 2 or 3 feet at the most of a window, as long as they are not touching the window. The closer the better because the intensity of the light will drastically decrease the further you are from a window.
North windows will probably work as well, provided that there are no big obstructions outdoors, such as trees. An Eastern exposure is probably better.
West and South would work as well, but many Tillandsias will burn if they receive too much sun. In these cases, you may need to filter the sun with a sheer curtain or blinds.
How to Water Tillandsia
Despite the name "air plant," Tillandsia can not survive on just the air in your home! Tillandsias still need to be watered, but since they don't grow in soil, your method of watering these plants will be a little different than you are used to!
There are 3 main methods of watering your Tillandsias. First let me tell you what will NOT work. A light misting here and there, that does not completely wet your entire plant, will not be sufficient water.
Do not do this. Instead, here are 3 methods that you can choose from to water your Tillandsias:
Tillandsia Watering Methods
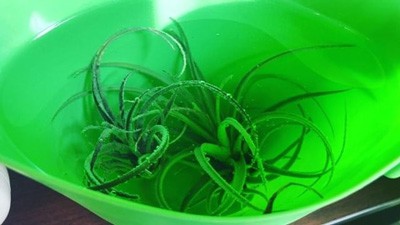
Method 1: My preferred method is soaking the plants in water. Take a bowl of water, fill it with tepid water, and place your Tillandsias in and let them soak for a good 15-30 minutes.
I normally don't like to tell people how often to water plants, but for Tillandsias, I can say that I soak most of mine once a week. Of course this goes for loose Tillandsias that are not mounted on anything.
The main exception for me is my Tillandsia xerographica. Since it comes from a semi-arid ecosystem, it doesn't need as much water. I soak this one about every other week.
Method 2: Another way to water your Tillandsias is soak the plant while holding it under a running faucet until every leaf is wet. If you use this method, you'll probably need to do it a couple times per week.
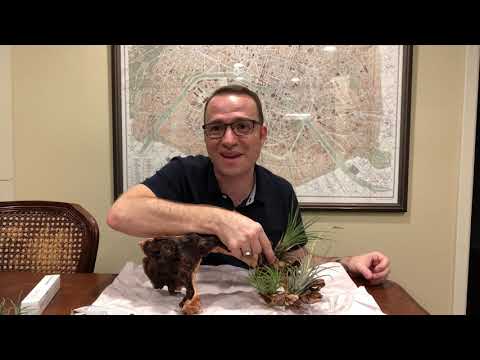
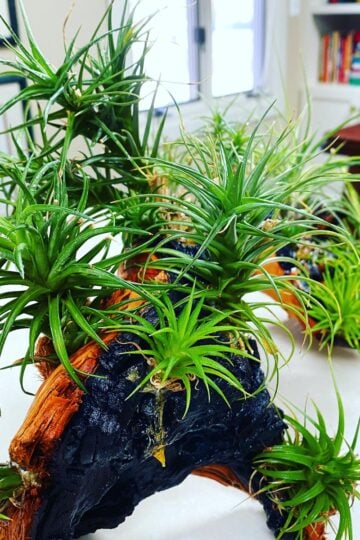
I like to use this method for Tillandsias that I mounted on a piece of grape vine, like I show in the photo below.
If you would like to learn how I mounted the Tillandsias above, check out my YouTube video below! I take you step by step through this whole project!
Method 3: Finally, you can mist your Tillandsia until all the leaves are wet and the plant is dripping. Similar to Method 2 above, you would need to do this a couple times per week as well.
Whatever method you use, please heed this warning:
After you water your Tillandsia, it is important to gently shake off any excess water so it does not rot!
What I like to do with mine after watering is I'll take each individual plant, turn it upside down and gently shake any excess water away. Then I'll lay them on a kitchen towel to let them dry.
After they are mostly dry, I'll place them back by their window.
If your Tillandsias are blooming, just be careful not to soak the flowers because you will decrease their lifespan, so you may have to make some adjustments.
For a more detailed explanation, check out my blog post on watering air plants. There are many intricacies involved and things to understand.
Air Plant Fertilizer
It is certainly not absolutely necessary to fertilize your Tillandsias, but if you do, it will result in a healthier plant, better flower production, and also encourage pups to grow.
I certainly don't have a regular fertilization schedule. I'll fertilize whenever I remember or feel like it, except in the dead of winter. The fertilizer helps to keep your tillandsias vigorous and also encourage more pups to grow so you can propagate more plants!
On average, I probably fertilize about once a month or so and add the fertilizer to the water that I soak the plants in. You can follow the fertilizer instructions on frequency, or see what works best for you.
Temperature for Air Plants
Tillandsias prefer temperatures of 50F (10C) to 90F (32C). But remember, the warmer it is and the more light they get, the more water they will use up and need.
Tillandsia Pups
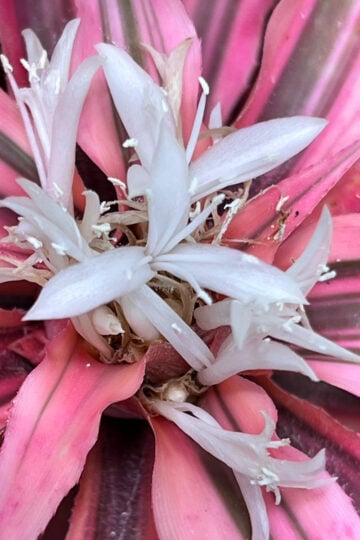
Tillandsias, like any plants in the Bromeliaceae family, will only flower once. After they flower, they will slowly decline and die.
But before they die on you, they will grow pups at the base and you will have new plants! At this point, you can do one of two things:
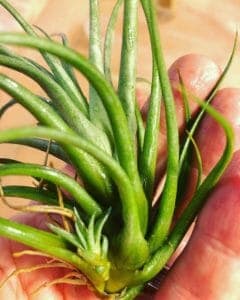
You can leave the pups attached to the mother plant and have it grow as a clump. It may grow one or multiple pups.
You can carefully separate the pups from the mother Tillandsia once they are at least ⅓ to ½ the size of the mother, and then grow it as a single specimen. Take a look at the little Tillandsia pup growing at the base of the mother plant below.
Check out my blog post on air plant flowers to learn more about them.
How to Revive an Air Plant
If your air plant has rotted, there is really nothing you can do to save it. At best, if there are multiple air plants attached together, remove any of the rotted ones and separate any of the remaining ones that are still alive.
Remember, every time you water an air plant, you MUST shake excess water out in order to avoid rotting. Be sure to follow my watering recommendations in the previous section and you should be ok!
On the other hand, if you have any Tillandsia that are just dried out, but not dead, you can easily revive them.
You'll need to give it a longer soak in water. Don't worry about the rules that you may have read elsewhere that scare you into soaking air plants. I soak mine all the time and they thrive. (Just don't forget to shake excess water out when you're done!)
For an air plant that has suffered dehydration, place it in a bowl of tepid or room temperature water, and let it soak for a few hours. Even overnight. Just don't forget to take it out the next day!
After it's long soak, shake the excess water, and place it back in its growing location.
Keep an eye on it. You may want to repeat this method every 7-10 days or so until you see an improvement. Then you can do your routine standard watering as I outlined in the 3 methods I previously described.
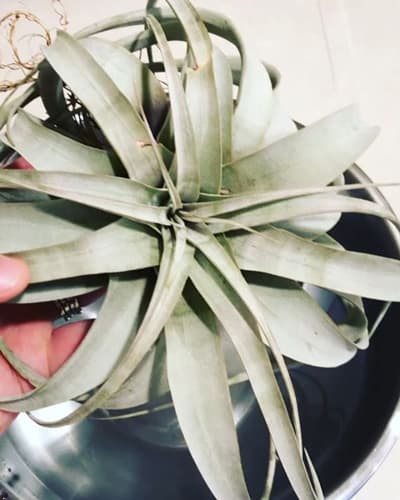
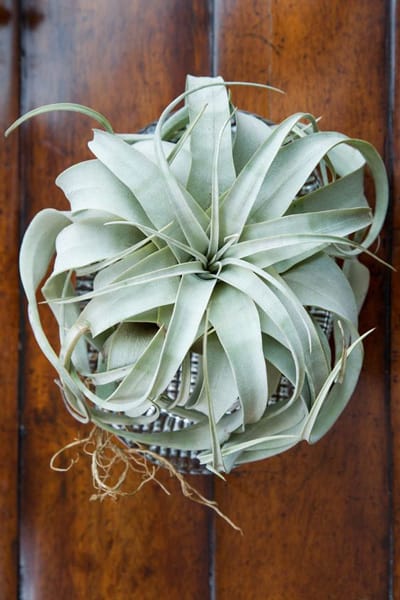
Tillandsia Xerographica
This is one of my favorite Tillandsias! I like it because it is larger than most Tillandsia.
This Tillandsia actually comes from more arid climates, so you can get away with much less frequent watering!
As I mentioned in the beginning of this post, the Tillandsias that have thicker leaves are more than likely from drier regions, and thus they can be watered much less frequently.
I often go weeks without watering my Tillandsia xerographica. You'll know when it needs water because the leaves will get more and more curly. Just don't forget to water it though!
It is one of the easier going Tillandsias, but it does enjoy more light than most Tillandsias. A little morning sunshine will serve it well.
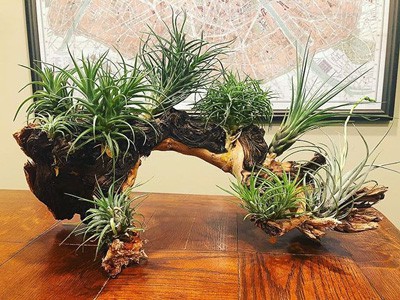
Displaying Your Tillandsias
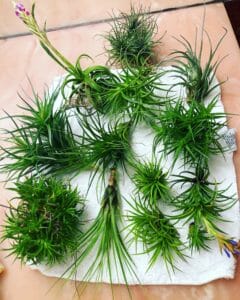
One of the fun parts of growing Tillandsias, since they don't grow in a pot of soil, is that you can be creative in how you display them!
You can purchase special Tillandsia holders of all sorts, or you can simply display them in a bowl or dish, or with nothing at all. I have some placed in little ceramic hands, and others I have set gently in a pot (with no soil of course...).
You can also glue your Tillandsia like I did on the piece of grapevine. You can also use driftwood, or any object really!
Hopefully this post has shed light on how to grow Tillandsia indoors.
Do you have any Tillandsias? Comment below if you have any questions! And don't miss my blog post on the easiest air plant varieties to grow in your home.
I've had my xerographica since March this year and have been following your recommendations. However, I've had to remove several leaves because of singular large brown spots on them and dried or brown tips extending toward the main plant about an inch or more.
The remaining plant has curled (but I don't think overly curled?) leaves with some faded tips. One or two leaves have singular small brown spots, but nothing like the leaves I removed. There's no webbing and the plant otherwise retains its sage tones. It gets indirect light as I moved it away from my patio area since it looked like it was getting sun burn. I switched its watering schedule to every third day because it felt a bit crispy. But it still has the spot and dried tips issues. What do I need to change?
Thanks for any/all help you may have. I've never kept a plant alive this long before (very brown thumb...) so the fact it's lived this long is a blessing anyway!
I'm not sure about crazy glue. I won't know if it would be safe for the plant, but I'm not 100% sure. Use floral glue if you can. I got my grapevine at a pet shop in the reptile section. There should be different types of drift wood, roots, etc. for you to pick from.
I have no idea if my plant is alive or dead. How do I know? It is not green nor brown. The leaves have brown at the tips. The leaves seem silver or frosted. If you know what I mean. I grow a lot of potted plants with success and was trying this because it came in a cute container.
I have been growing these 3 month now and they keep dying. I soak approx. 15 min.a week and lightly mist a couple times in between. What am I doing wrong?
It’s a covered patio. If it rains then they night get some blown on them. It doesn’t rain every day. I have them in a clear plastic bowl that I got from a salad at the grocery store. I put holes in it and stuck them in there. It is hanging on a support on the patio column.
Since it's outdoors and it rains, you may be ok leaving them alone. Especially since you live in Florida and is humid there. I can't tell you exactly how often to water them outdoors because it all depends on how much water they get from rain and from humidity in the air. I would just monitor them closely. If they start to look dry and not as vibrant, then you can water them. Hope this helps!
I just got 3 Tillandsias in the mail. I want to keep them on my patio that gets morning sun and afternoon shade. I’m in Orlando, Fl . How often should I soak them and for how long?
It really depends and is hard to say. Are they exposed to the sky? Would they get rained on? With the humidity in Florida and potential rain, you may not even have to water them at all unless you're going through a dry spell. If you can provide more details, I can try and be more specific 🙂
Is is ok to let the glue to cover or at least touch the root system when mounting in a base such as driftwood? (?)
Secondly, I made a beautiful display on driftwood but after a couple of months some of the plants dried out and some of the plants stayed healthy. We’re they different species requiring varying degrees of moisture. (?)
Would it be ok to water the mounted display in the sink under the faucet? In this case to be sure the inside of plant doesn’t get moldy, I would need to drip dry by turning the whole driftwood upside down and rest it on a towel on the counter(?)
Yes, it is OK to have the glue cover part of the roots. They mainly just use them to anchor onto a support anyway. As far as your display, it's hard to say without seeing a photo. But they may have been different species with different requirements, or perhaps maybe you didn't water some of them as well as others. Yes it would be fine to water the mounted display in the sink under a faucet. This is how I water my mounted Tillandsias. Just turn it upside down and gently shake excess water out and let it dry on a towel.
I have a thing for antiques including old iron and odd metal decorative items. Do you think they would react badly to any iron or metal. For example, I have an iron oil lamp wall mount I think would look pretty sweet one on it. I know succulent don't like copper so I just wonder if any one has has any experiences with air plants.
Hi Alice, I'm not sure if the airplant will react to the metal. However, I think as long as the air plant isn't wet while it's on the iron or metal, it should be ok.
I have a bloomed stock growing in the middle of mine do I cut it off or wait till it falls off
Hi Millie. If the flowers are done, you can cut the flower stalk off carefully.
This article has encouraged me to not give up on keeping air plants. I just recently suffered 2 tillandsia fatalities after what I considered 2yrs of success , I believe they just didn’t get a chance to completely dry out after soaking, but now I shall forge ahead and try one more time! Thanks for the tips!


")


Will a mother xerographica die after blooming?
Hi Karen! Yes, any Tillandsia will start a process of slowing dying after they bloom, but they should produce pups before they die.
I've had my xerographica since March this year and have been following your recommendations. However, I've had to remove several leaves because of singular large brown spots on them and dried or brown tips extending toward the main plant about an inch or more.
The remaining plant has curled (but I don't think overly curled?) leaves with some faded tips. One or two leaves have singular small brown spots, but nothing like the leaves I removed. There's no webbing and the plant otherwise retains its sage tones. It gets indirect light as I moved it away from my patio area since it looked like it was getting sun burn. I switched its watering schedule to every third day because it felt a bit crispy. But it still has the spot and dried tips issues. What do I need to change?
Thanks for any/all help you may have. I've never kept a plant alive this long before (very brown thumb...) so the fact it's lived this long is a blessing anyway!
Hi Lexy! It would be helpful for me to see photos. Are you on Instagram? If so, please DM me some photos. My account is ohiotropics.
Hi i m so glad to read all i need to know about growing airplants. I m from Malaysia, tropical country.
Recently i order some Tillandsia n upon arrival it's very dry up. Thank you for all the tips you have given here. Now i know what to do.
You're very welcome!
can we use 'crazy glue' for this purpose?
where can I get similar wooden thing for mounting?
I'm not sure about crazy glue. I won't know if it would be safe for the plant, but I'm not 100% sure. Use floral glue if you can. I got my grapevine at a pet shop in the reptile section. There should be different types of drift wood, roots, etc. for you to pick from.
I have no idea if my plant is alive or dead. How do I know? It is not green nor brown. The leaves have brown at the tips. The leaves seem silver or frosted. If you know what I mean. I grow a lot of potted plants with success and was trying this because it came in a cute container.
If they're dried up and dead, they will be very brittle. The silvery color is normal. You can email me a photo if you'd like and I can try and help.
I have been growing these 3 month now and they keep dying. I soak approx. 15 min.a week and lightly mist a couple times in between. What am I doing wrong?
Hi Linda. I need more details to help you. Are you following everything I've discussed in the blog post? And how are they dying? Are they rotting?
thank you ohiotropics for giving me wonderful information
It’s a covered patio. If it rains then they night get some blown on them. It doesn’t rain every day. I have them in a clear plastic bowl that I got from a salad at the grocery store. I put holes in it and stuck them in there. It is hanging on a support on the patio column.
Since it's outdoors and it rains, you may be ok leaving them alone. Especially since you live in Florida and is humid there. I can't tell you exactly how often to water them outdoors because it all depends on how much water they get from rain and from humidity in the air. I would just monitor them closely. If they start to look dry and not as vibrant, then you can water them. Hope this helps!
I just got 3 Tillandsias in the mail. I want to keep them on my patio that gets morning sun and afternoon shade. I’m in Orlando, Fl . How often should I soak them and for how long?
It really depends and is hard to say. Are they exposed to the sky? Would they get rained on? With the humidity in Florida and potential rain, you may not even have to water them at all unless you're going through a dry spell. If you can provide more details, I can try and be more specific 🙂
Thanks for this website i learn a lot, i actually owned 1 tillandsia and planning to propagate more.
You're welcome Cristina! I'm happy that you are enjoying my site ????
Is is ok to let the glue to cover or at least touch the root system when mounting in a base such as driftwood? (?)
Secondly, I made a beautiful display on driftwood but after a couple of months some of the plants dried out and some of the plants stayed healthy. We’re they different species requiring varying degrees of moisture. (?)
Would it be ok to water the mounted display in the sink under the faucet? In this case to be sure the inside of plant doesn’t get moldy, I would need to drip dry by turning the whole driftwood upside down and rest it on a towel on the counter(?)
Yes, it is OK to have the glue cover part of the roots. They mainly just use them to anchor onto a support anyway. As far as your display, it's hard to say without seeing a photo. But they may have been different species with different requirements, or perhaps maybe you didn't water some of them as well as others. Yes it would be fine to water the mounted display in the sink under a faucet. This is how I water my mounted Tillandsias. Just turn it upside down and gently shake excess water out and let it dry on a towel.
I have a thing for antiques including old iron and odd metal decorative items. Do you think they would react badly to any iron or metal. For example, I have an iron oil lamp wall mount I think would look pretty sweet one on it. I know succulent don't like copper so I just wonder if any one has has any experiences with air plants.
Hi Alice, I'm not sure if the airplant will react to the metal. However, I think as long as the air plant isn't wet while it's on the iron or metal, it should be ok.
Yes! It's true they will give you pups and the fun continues! Hoping to mount a few on some driftwood from Lake Superior!
What a great idea! I've thought of mounting some myself too! It's annoying to have many loose Tillandsias! Ha!
I have a bloomed stock growing in the middle of mine do I cut it off or wait till it falls off
Hi Millie. If the flowers are done, you can cut the flower stalk off carefully.
This article has encouraged me to not give up on keeping air plants. I just recently suffered 2 tillandsia fatalities after what I considered 2yrs of success , I believe they just didn’t get a chance to completely dry out after soaking, but now I shall forge ahead and try one more time! Thanks for the tips!
I'm glad to help! All you need to do is understand what happened, and try again! And it sounds like you identified what the cause was in your case.