There are numerous ways to propagate ZZ plants, but in this post, I will show you step-by-step how you can propagate this tough houseplant with just leaves. You heard me. Just the leaves! The steps are super simple, and all you need is patience!
I'll show you the process that I used and how you can propagate the leaves in both water and soil, as well as the pros and cons of both. Are you ready for a fun project?
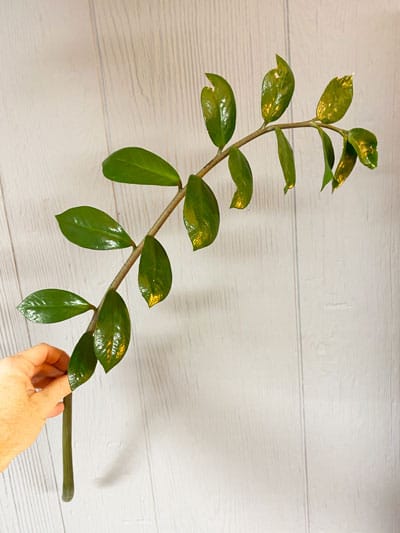
First, I cut off an entire stalk off of my plant. There was one particular stalk on my plant that was leaning down low and getting in the way, so I simply cut it off. Make sure that you choose one with healthy leaves for best results.
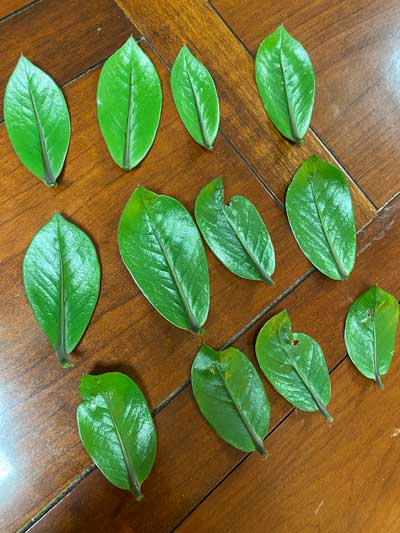
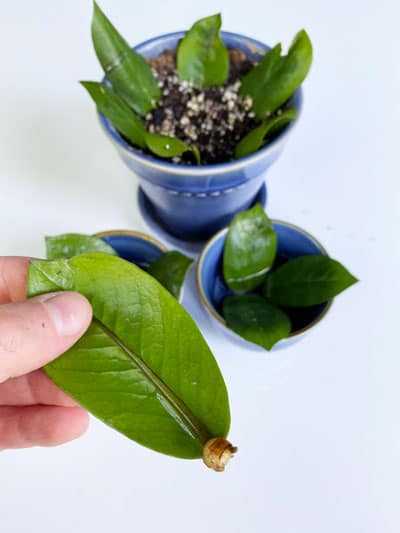
Next, I simply took a pair of scissors and cut off each leaf.
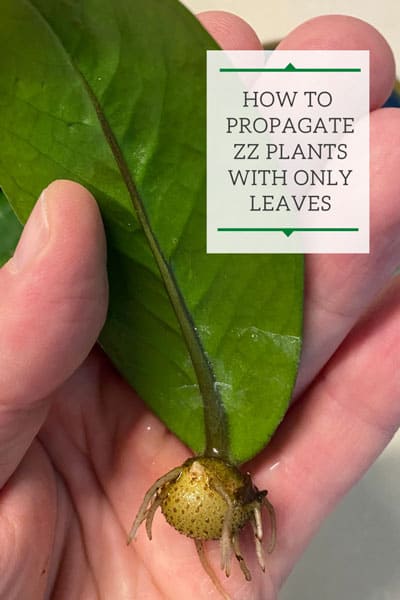
The interesting part about propagating ZZ plant leaves is that you don't have to worry where exactly you cut the leaf off. The leaves will produce rhizomes and new plants regardless.
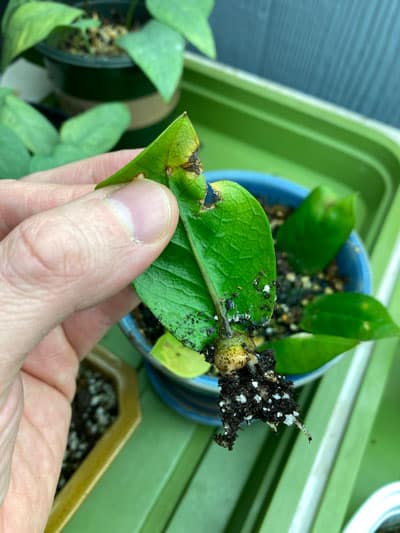
You can see in the photo above that that I left some petiole (the skinny stalk at the base of the leaves) on some leaves, and on others, I cut it closer to the leaf itself. All the leaves shown in the photo above produced rhizomes and roots!
There is no need to allow these leaves to air dry and callous over. You can start propagating right away.
At this point, you can choose water propagation or soil propagation. I will show you both methods.
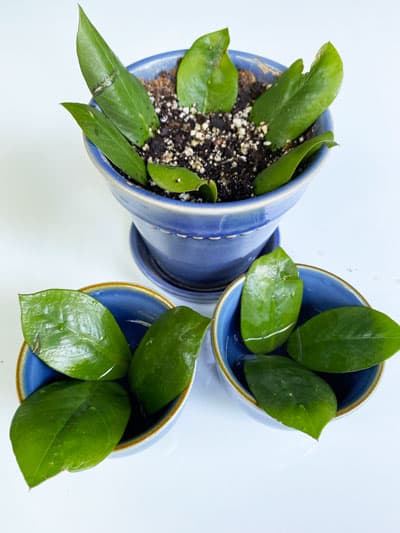
Soil propagation (top) and water propagation (bottom)
ZZ PLANT LEAF PROPAGATION IN WATER
It's always a good idea to take multiple cuttings because sometimes you never know what will happen. All of my leaves shown in this post actually produced rhizomes and are on their way to producing plants.
Simply place your leaves (technically, they are leaflets) as shown in the photo above in a container with maybe half an inch of water or so. I used 2 little tea cups shown at the bottom of the photo, but you can use any container where the leaves will be resting securely.
Keep an eye on the water level and make sure that it doesn't dry up on you! Otherwise you will delay the process, and potentially dry up the leaves and then your project will be over. 🙂
I would try to change the water once a week or so and also wash the container out with dish soap and warm water to make sure everything is clean.
I kept my leaves in front of an Eastern facing window for a while, and then I moved them under grow lights on my light stand where I have numerous propagation projects going.
Leaf with rhizome less than 2 months after placing in water
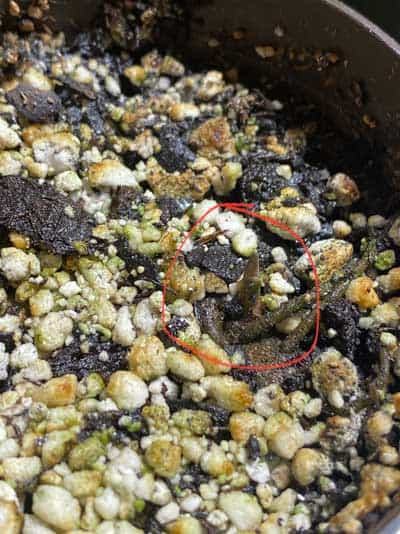
I wasn't checking my leaves often enough to notice when I first started to see the rhizomes growing, but in the photo above, this was less than 2 months after the leaves first went into water. You can see the rhizome forming at the base of the leaf.
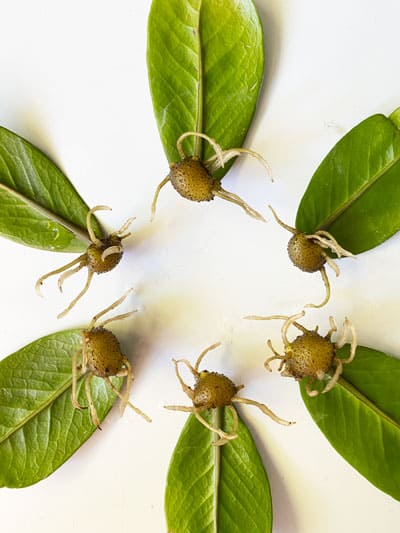
Four months after placing them in water, here are what my leaves look like. Take a look at the beautiful rhizomes, and roots starting to grow!
Water propagation of ZZ plant leaves
I will be watching them closely to see when they start to produce new shoots. I will likely place all 6 leaf cuttings into the same pot and will update this post so you can see the continued progress of the developing plants.
Enter your email, and I will send this link straight to you!
ZZ PLANT LEAF PROPAGATION IN SOIL
I also experimented with soil propagation, and it seemed to work just as well, but was a little trickier, and I'll explain what I mean shortly.
Simply insert each ZZ plant leaf as shown in the photo above into a small pot of soil. I inserted each leaf about ½ to ¾ inches into the soil. Just enough so that the leaves are stable and aren't wobbling around. For the soil mixture, I used half potting soil and half perlite.
Once you have your leaves in, give your pot a drink of water and place it under grow lights or in front of a window as I described in the previous section.
Water again when the surface feels dry and continue to monitor. Try not and let the soil go completely dry, especially for longer periods of your leaves will dry up. Keep the pot on the moister end, but I still allowed the surface to dry before watering again.
This method for me, although it works perfectly well, wasn't as satisfying because I am a visual person and love to watch the progress of the growing rhizomes! I also let the soil dry out too long a couple times and I think it slowed the process down a bit.
Here is one of the leaves that I pulled out of the soil. You can see the rhizome and some roots starting to grow. At this point, it was about 4 months from the time I initially placed the leaves into soil.
FACTORS AFFECTING PROPAGATION TIME
As you've seen, this process takes a while and my leaf cuttings still haven't grown any new plants, but they will and I will update this post with new photos when that happens.
To speed the process up significantly, keeping your ZZ plant propagations in warm conditions of 76-90F (both daytime and night time), according to Purdue University, produces much faster results.
One way to easily achieve these conditions is to use a heating mat meant specifically to be used for seed starting and cuttings. It will save a lot of time, especially if you are impatient, and produce better results!
UPDATE ON ZZ PLANT PROPAGATION PROJECT
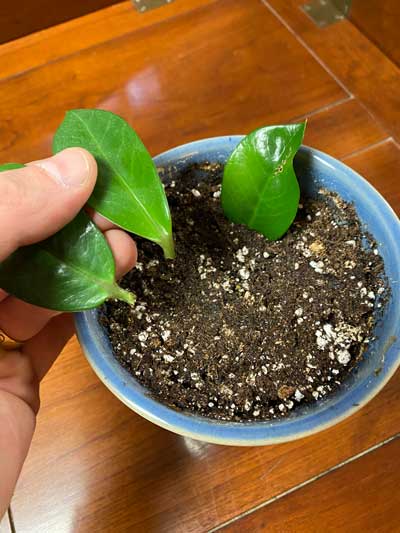
After planting the water propagated leaves in potting mix, I placed them on the heating mat. I used two small pots and planted 3 leaves in each. I think I had left them in water for too long, because the leaves started to yellow.
Looking back, I should have placed them in potting mix much earlier, however, all of them had previously developed rhizomes in water and they continued to grow despite losing the leaves.
I left the leaves that I had in soil propagation from the start OFF of the heating mat to compare. Eight months into propagation, this pot still had no shoots.
The very first shoot that I noticed growing happened with one of the two pots I placed on the heating mat that were started in water, developed rhizomes, and then transferred to potting mix and placed on a heating mat. From start to finish, it was about 8 months! This is certainly not a project for the impatient.
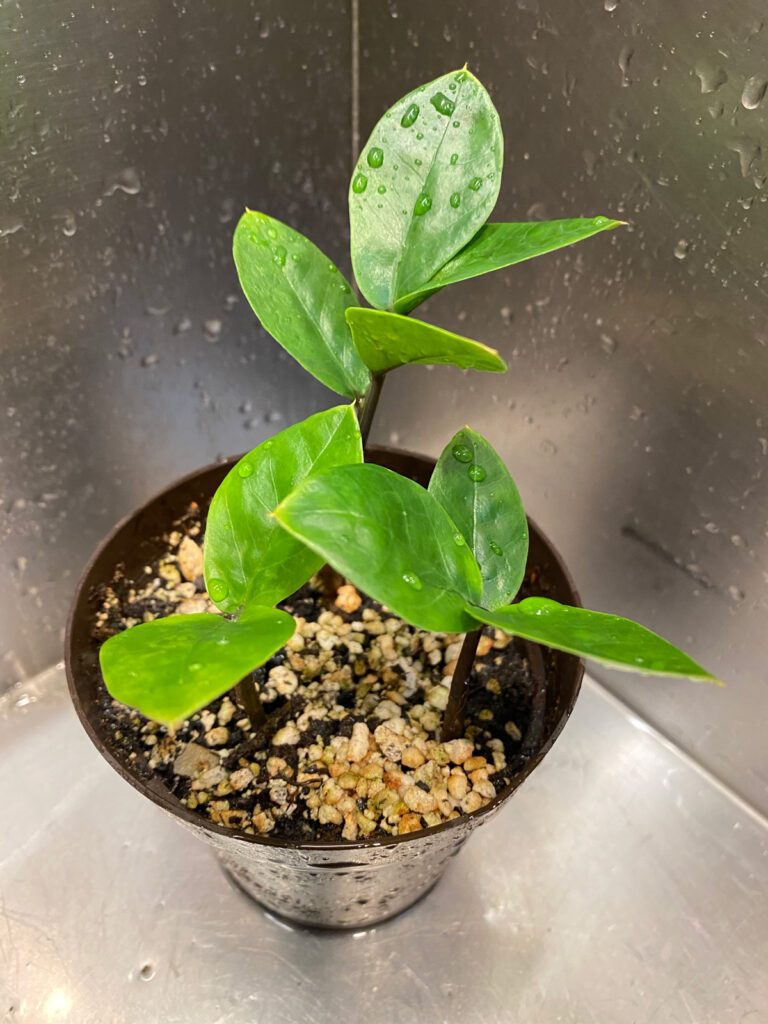
ZZ Plant Shoot
If I had used the heating mat from the very beginning, I'm sure that the first shoot would have appeared much more quickly. I highly recommend a heating mat for all propagation projects, but especially for ones like ZZ plant that take a very long time to develop. You will be pleasantly surprised at the difference it makes.
Two more months after the previous photo, here is what it looks now!
Plants resulting from water propagation of 3 single ZZ Plant leaves
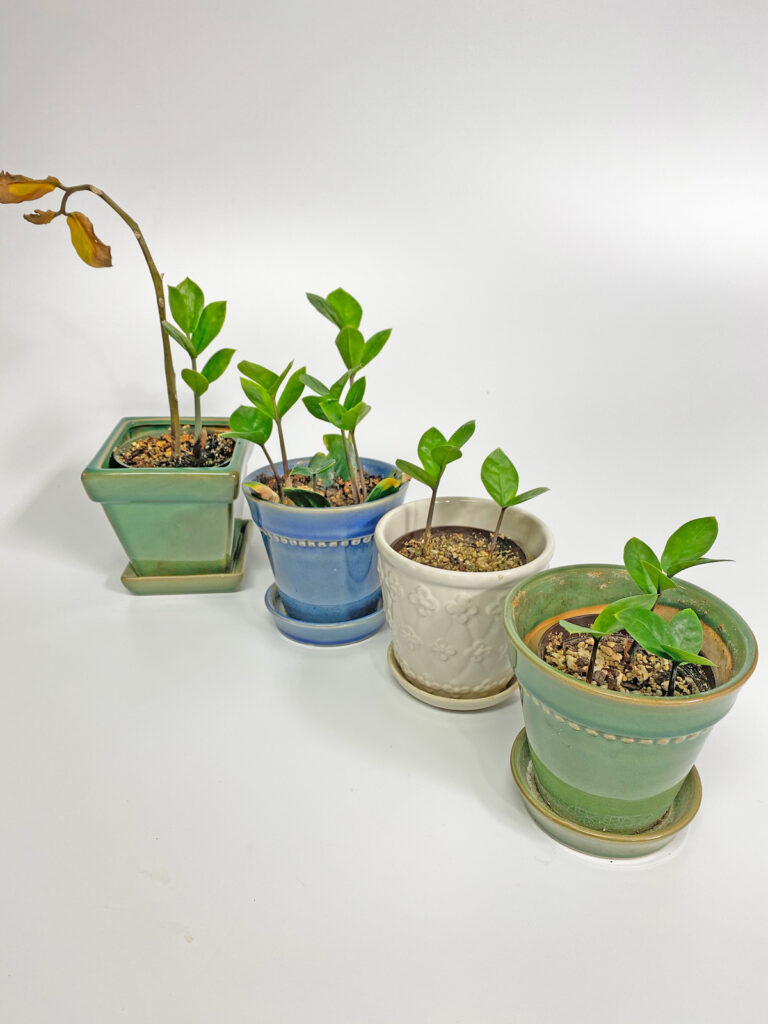
Finally, here is the entire ZZ Plant propagation family!
Far left: Propagation from the stalk. I rooted this in water first, and then transferred to potting mix when it has roots. You can see the original stalk has dried out, and the new plant is starting to grow. 2nd pot from the left: These are the leaves that were placed into potting mix from the start. 2 pots on the right: These were the water propagated leaves that were placed into potting mix after rhizomes appeared (original leaves expired)
After you're done propagating and your cuttings are growing plants, be sure to check out my ZZ Plant Care blog post for general care tips!
ZZ PLANT PROPAGATION COMMON QUESTIONS
How long does it take to propagate ZZ plants?
It is a SLOW process, but your conditions can greatly affect the speed at which you get plants. If you can maintain good conditions, you can generally get your propagation material to root within 2 months. Using a heating mat and having a warm environment will greatly speed up the time. It will take several months before actual plants start growing.
What different ways can you use to propagate ZZ plants?
If you have a plant with multiple growths, you can take the plant out of the pot and divide it at the roots. This is the quickest method by far. You can also take single leaf cuttings and also the stems themselves and root them in either water or potting mix.
Why are my ZZ plant cuttings rotting or turning yellow while propagating in water?
Be sure to maintain very clean propagation vessels and change your water frequently to keep it fresh and clean and to replenish oxygen. Once your ZZ plant propagations in water have roots (whether you started off with leaves or a stem itself), go ahead and plant in potting mix. You can even wait for a rhizome to form, but don't wait too long. If you leave water propagated ZZ plants in water for too long, they may eventually turn yellow and rot.
Have you tried ZZ plant leaf propagation yet? It's fun to try, especially with different ZZ plant varieties.
Hi, I’ve tried numerous times to propagate my zz from
Leaves & the you always end up soggy & mushy, never w any roots. Pls help!! What am I doing wrong?
Hi Raffaele,
Thanks for your blog - I've learned a lot from you. I have a question(s) about water propagating ZZ stems in water. I have a few from my dads plant that he sent me from FL. He sent both leaves and stems. The leaves are fine and chilling out nicely in H2o, but the stems are in H2o are rotting. I have a few in one vase. Could it be that they're too emerged in water, should it just be the tips? Maybe too crowded? Maybe not enough water changing? They're in a western window, but a building is right next door, so not the brightest of light. Would it make more sense to put them in individual mini vases? Also, could I put them in soil before they have roots? Sorry for all of the questions... 🙂
If the stems are rotting, take the stem out of water and cut off the rotten part. I would cut into the healthy part of the stem too a little bit. Then let the stem air dry for a couple of days to allow the cut to callous over and dry. Then go ahead and put it in water again. That should do the trick.
Hi! Great info on zz propagation. I found a zz leaf on the floor when I was shopping. Did not have a zz plant before. I grabbed it & placed it in a peice of styrofoam & into the fishtank it went. It took forever to grow roots, probably at least 2 months. I think the temp from the fishtank is what really helped it along. I'm going to wait until the roots get at least an inch long before transferring to soil. I have a variety of props in the tank & all of them seem to sprout quicker than the ones that are in a cup of water elsewhere. Thanks for the info & hope mine helps!
Nicole ☺
Hi Nicole! That sounds like a fun little project! I'm sure it will work wonders 🙂 The conditions really sound conducive to good growth. Keep me posted!
I started ZZ leafs in water last June 2022. They rooted and in Oct 22 I moved them to 4" pots. They have nice rhizomes but no stalks. They are in my greenhouse. I guess I'll put them on heat mats. Any other suggestions?
Thanks John
Thank you for share the propagation of a variety of plants. I learned a lot from you.I love to have plants in my home now thanks to you I will have Z plant all around.
Thank you
I have five ZZ stems from my daughters plant. The roots are starting to develop. When I put the stems into soil, will the stem die? Could all the stems go in the same pot, or should they go into separate pots?
If you're consistent with your care, they will survive. They'll proceed to throw out new growth from the roots though fairly quickly. You can put them all in the same pot if you'd like, otherwise it may take too long to get a full specimen if you pot them up individually. It's just a personal preference.
I learned a lot from you . I kept my zz plant outside and they died but the leaves seems to be ok . I should have cut the leaves and propagate it . This for the info .?


")

Hi, I’ve tried numerous times to propagate my zz from
Leaves & the you always end up soggy & mushy, never w any roots. Pls help!! What am I doing wrong?
Are you doing anything differently from what I documented in the post? Are you changing the water frequently?
Hi Raffaele,
Thanks for your blog - I've learned a lot from you. I have a question(s) about water propagating ZZ stems in water. I have a few from my dads plant that he sent me from FL. He sent both leaves and stems. The leaves are fine and chilling out nicely in H2o, but the stems are in H2o are rotting. I have a few in one vase. Could it be that they're too emerged in water, should it just be the tips? Maybe too crowded? Maybe not enough water changing? They're in a western window, but a building is right next door, so not the brightest of light. Would it make more sense to put them in individual mini vases? Also, could I put them in soil before they have roots? Sorry for all of the questions... 🙂
Thanks a ton!
If the stems are rotting, take the stem out of water and cut off the rotten part. I would cut into the healthy part of the stem too a little bit. Then let the stem air dry for a couple of days to allow the cut to callous over and dry. Then go ahead and put it in water again. That should do the trick.
@Raffaele Di Lallo,
Will give it a try - thank you!!!
Hi! Great info on zz propagation. I found a zz leaf on the floor when I was shopping. Did not have a zz plant before. I grabbed it & placed it in a peice of styrofoam & into the fishtank it went. It took forever to grow roots, probably at least 2 months. I think the temp from the fishtank is what really helped it along. I'm going to wait until the roots get at least an inch long before transferring to soil. I have a variety of props in the tank & all of them seem to sprout quicker than the ones that are in a cup of water elsewhere. Thanks for the info & hope mine helps!
Nicole ☺
Hi Nicole! That sounds like a fun little project! I'm sure it will work wonders 🙂 The conditions really sound conducive to good growth. Keep me posted!
@Nicole, Great idea! I have a 20-gallon-tall aquarium I want to get set up again. This will be a great combo!
Super démonstration de multiplication avec simplement des feuilles ! Bravo ! 😀
je t'en prie 🙂
I started ZZ leafs in water last June 2022. They rooted and in Oct 22 I moved them to 4" pots. They have nice rhizomes but no stalks. They are in my greenhouse. I guess I'll put them on heat mats. Any other suggestions?
Thanks John
Other than routine watering, try the heat mat for sure. Have you been fertilizing? If not, go ahead and start. It's definitely a trial of patience 🙂
Thank you for share the propagation of a variety of plants. I learned a lot from you.I love to have plants in my home now thanks to you I will have Z plant all around.
Thank you
Glad you enjoyed the post Lily! Good luck with the propagation 🙂
I have five ZZ stems from my daughters plant. The roots are starting to develop. When I put the stems into soil, will the stem die? Could all the stems go in the same pot, or should they go into separate pots?
If you're consistent with your care, they will survive. They'll proceed to throw out new growth from the roots though fairly quickly. You can put them all in the same pot if you'd like, otherwise it may take too long to get a full specimen if you pot them up individually. It's just a personal preference.
I learned a lot from you . I kept my zz plant outside and they died but the leaves seems to be ok . I should have cut the leaves and propagate it . This for the info .?
HI Cristina. If the leaves are green and healthy, you can use them to propagate. :-). I was a little confused because you said it died?