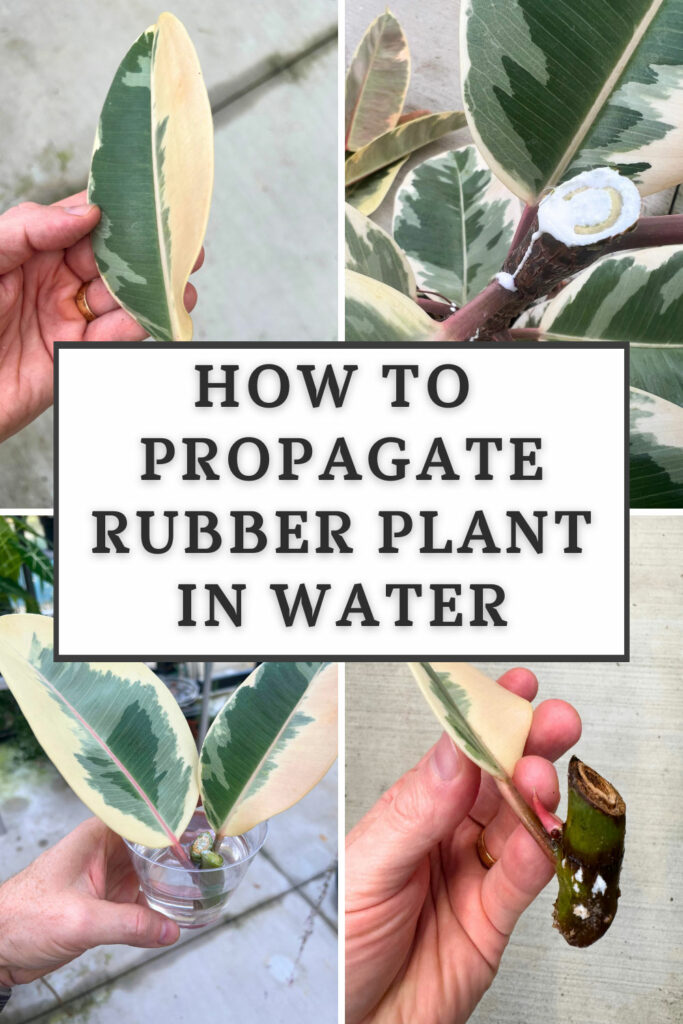
Propagating rubber plants is actually quite simple, but there are some important pieces of information to know otherwise it will not work. Keep reading to learn everything you need to know, and I'll show you some helpful pictures along the way in this step-by-step guide.
There are quite a few ways that you can propagate rubber plants (Ficus elastica), but the water propagation method may be the easiest, especially for the beginner, so I will solely focus on this method for this post.
You may also wish to experiment with air layering and soil propagation in the future. All of these methods will result in a new plant, and it's fun to try different methods.
Table of Contents
HOW TO PROPAGATE RUBBER PLANT IN WATER
Regardless of the rubber plant type you have, you can use this water method for propagation. You can really propagate at any time of year, but the best time to do it is during the growing season.
Early spring through late summer works well. However, if you have enough light (either in a greenhouse or if you're growing plants under lights year round), you can safely do it anytime!
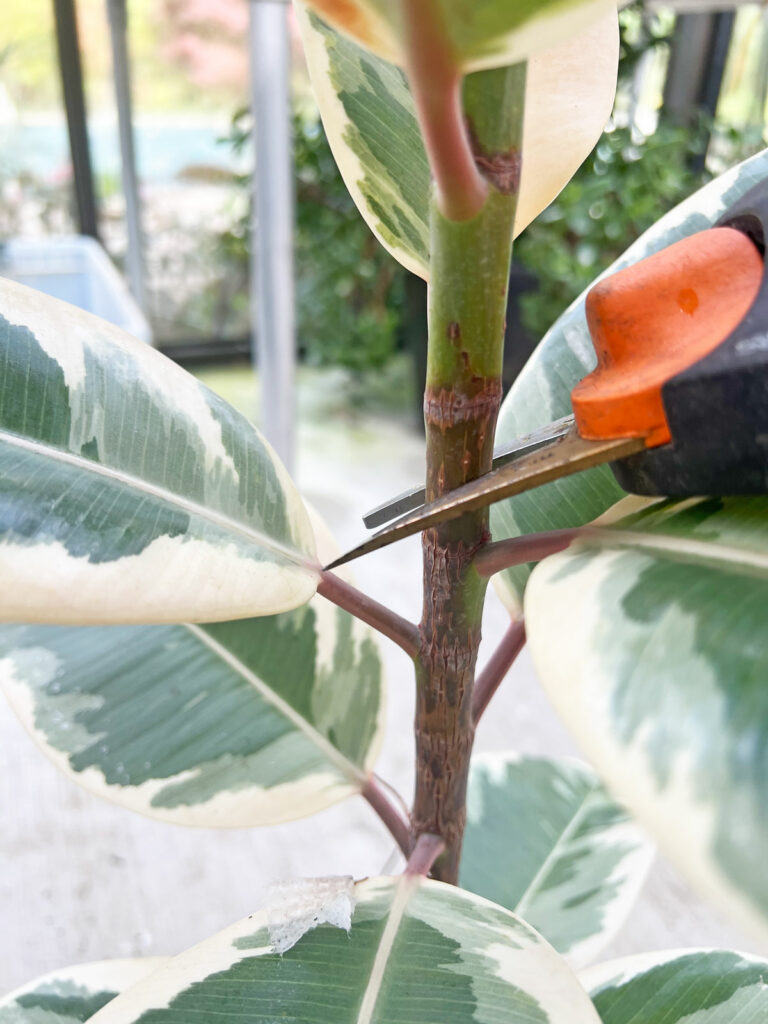
1. Make Your Rubber Plant Cuttings
The first step is to get a nice pair of sharp pruners, or a sharp knife, and make your cuttings. Wipe down your tools with isopropyl alcohol to sterilize them right before you make cuttings. By taking cuttings of your rubber tree, you're also helping your mother plant branch out more and become more bushy.
So not only can you get a new rubber plant out of all this, but you're also helping your original rubber plant branch out and become fuller.
This is particularly helpful if you have a rubber plant that only has one trunk.
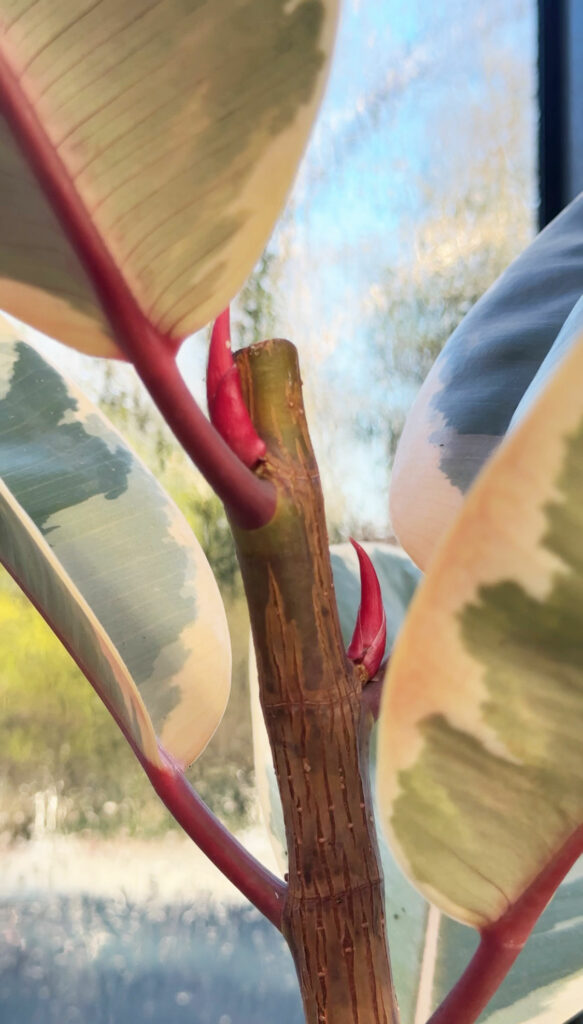
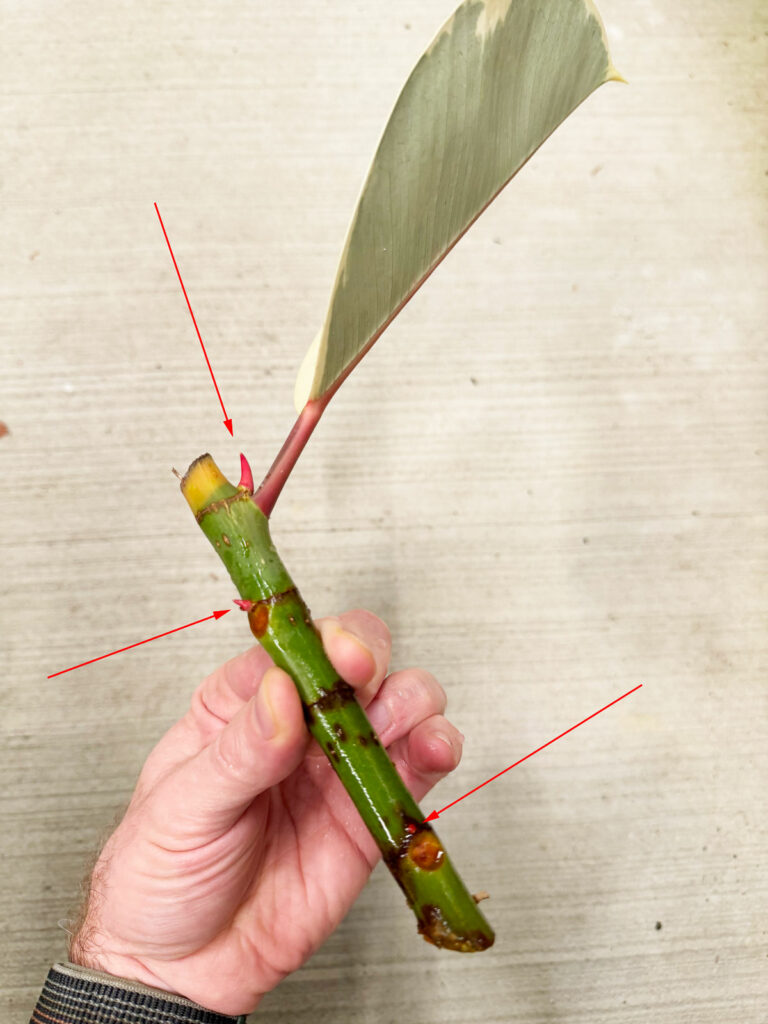
So if you do want your rubber plant to branch out, you'll simply want to cut the branch wherever you want it to branch out. Take a look at this mother plant below. You can see exactly where it was cut on top. And you can clearly see two areas of new growth! Those reddish buds are new branches starting to grow.
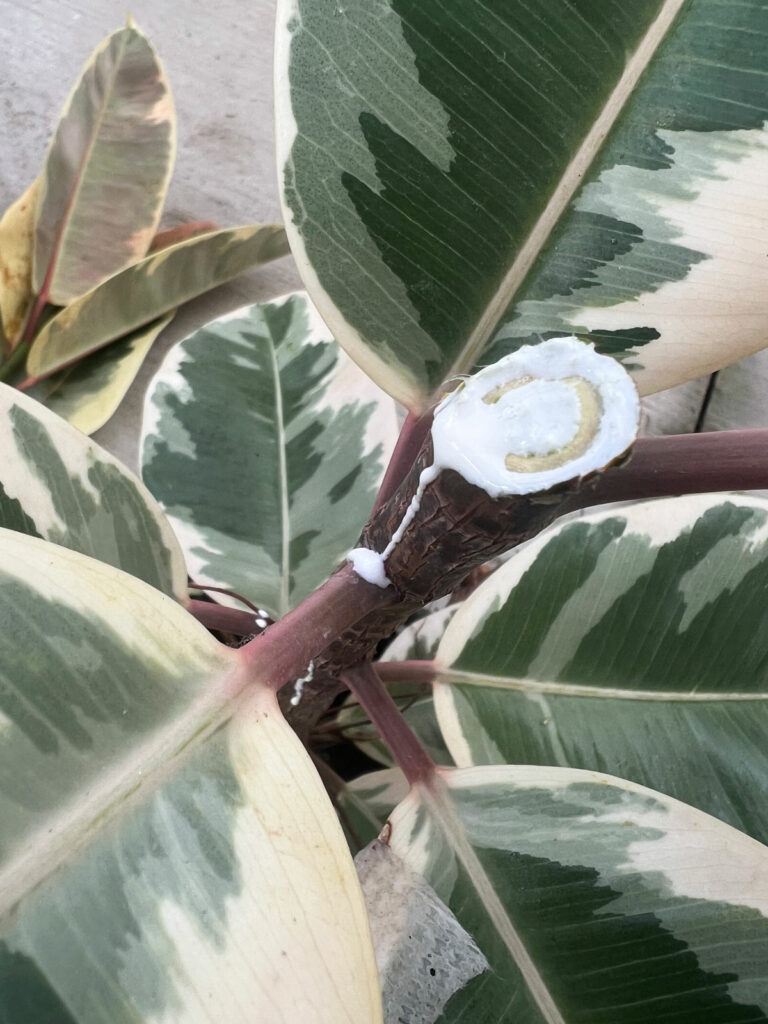
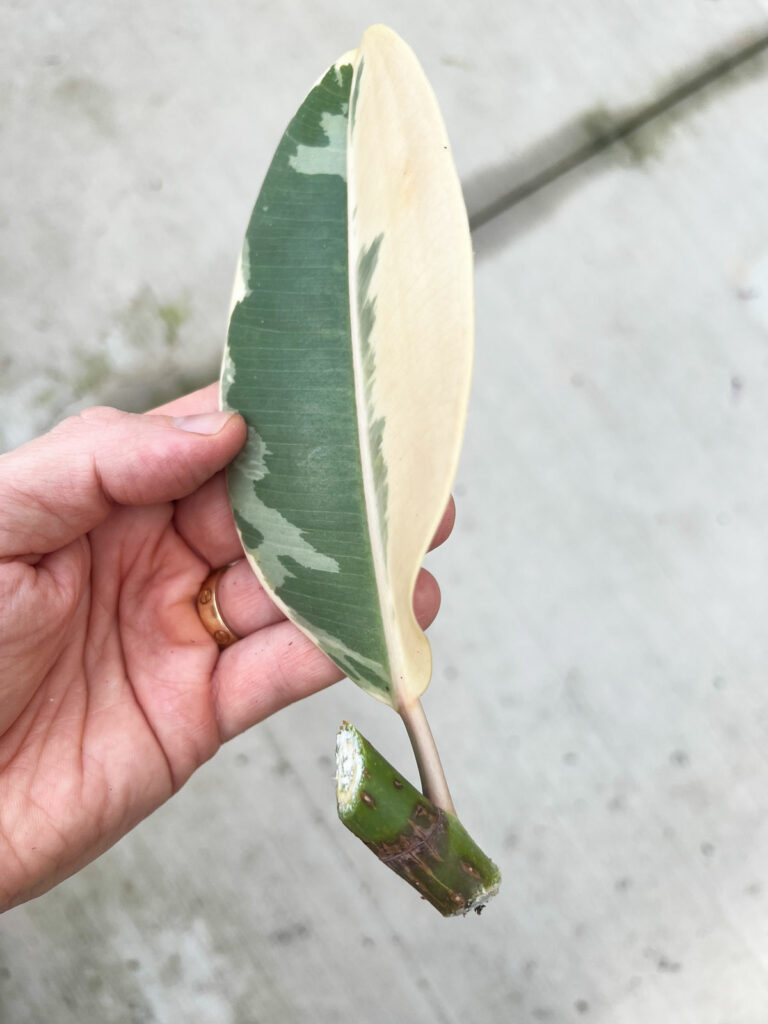
Select a healthy stem and cut the branch right above a leaf (maybe ½ inch to an inch above the leaf). Keep in mind that as soon as you make your cut, the stem will start to ooze out a white, milky sap. You may want to wear protective gloves because the white sap can cause skin irritation.
If you've touched the sap with your bare skin, be sure to wash up with soap and water.
The white sap will start to drip quickly, so I like to have a damp paper towel or damp cloth handy to clean it up before it dries.
Next, if the part that you cut off is rather large, you can make multiple cuttings. In fact, you can even make cuttings that consist of a single leaf, but the leaf needs to have part of the branch/stem attached.
If you just cut a single leaf and don't include part of the branch or stem, your cutting will grow roots, but it will not develop into a plant.
Take a look at the cutting below. You can make multiple cuttings like this. You need to include a leaf node in each cutting in order for it to result in a new plant. The node is simply the area where the leaf and petiole grow out of the branch.
Now, your cuttings can also have more than one leaf, but make sure that the cutting doesn't have a ton of leaves. Two or three leaves is plenty.
Once you've made your cuttings, it would be a good idea to let them sit and air dry for a few minutes. Wait until the white sap has stopped "bleeding" before proceeding to the next step.
2. Place Rubber Tree Cuttings in Water
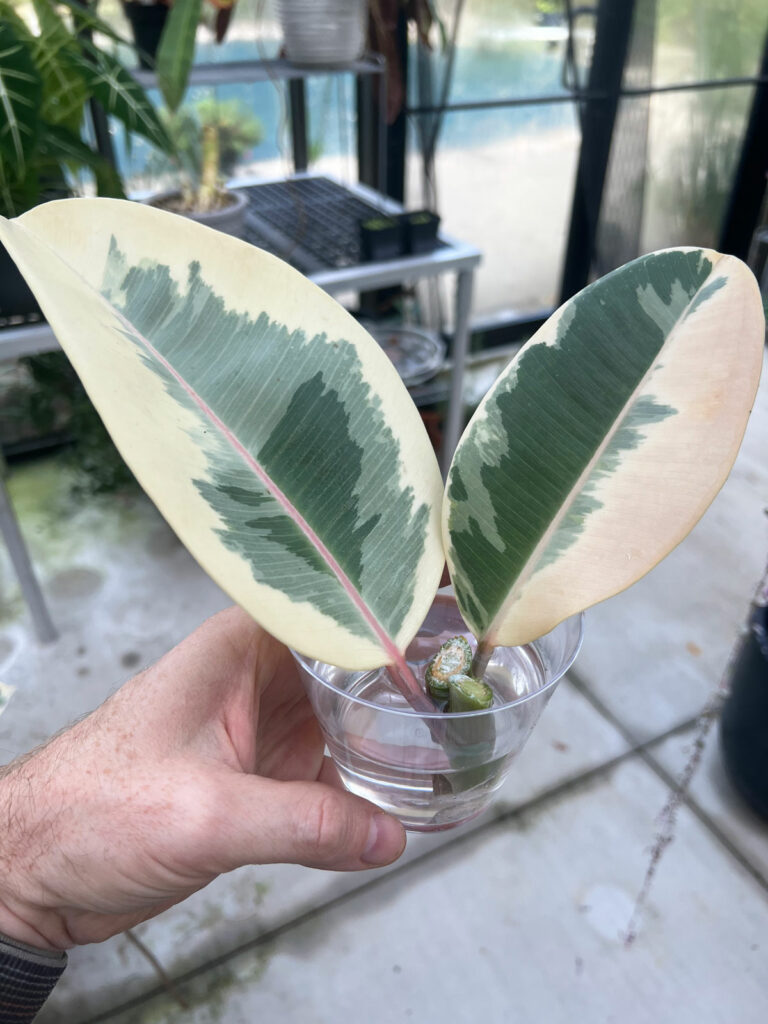
Next, you'll want to place your stem cuttings in a cup or glass jar and add some water. Tap water is perfectly fine to use. It's OK to have both cut ends of the stem under water. If you have a longer cutting, just make sure the bottom couple inches (at least) is underwater.
Would you like to save this post?
Enter your email, and I will send this link straight to you!
When I rooted the cuttings shown in this post, I actually noticed new branches starting to form before the roots started to grow. This is perfectly normal and you may also observe the same thing.
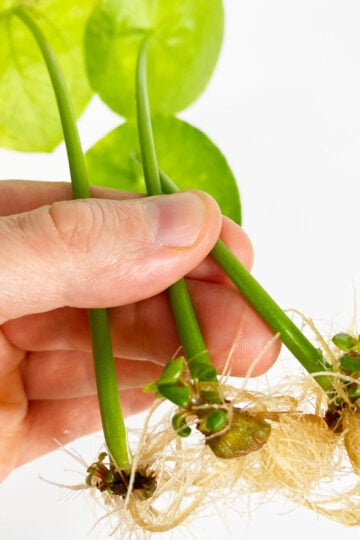
I didn't notice roots starting to form until about 3-4 weeks. The roots will look a little different than you are used to. The new roots will look like irregular, white stubs, and at first glance, they will almost look like mealybugs! But the longer you wait, they will start to grow more and look like normal roots.
Notice the reddish new growth starting, as well as the start of new, white roots
Be sure to change the water frequently, particularly in the beginning of the rooting process. Change the water at least once or twice a week, or even more frequently if the water looks dirty or cloudy. If the water looks clean, it's OK to just top off the water level. Just make sure it doesn't completely dry up!
Place your cuttings in a nice warm spot with plenty of light. Right in front of a window is great, and even some direct sun is fine, particularly if you have a window that has morning sun. Don't place your cuttings in a dark corner because it will minimize your chances of success or greatly delay the rooting process.
Here is another cutting I made and started to root. I included a much larger piece of branch versus the other cuttings. Notice that there are 3 new growths starting where the red arrows are.
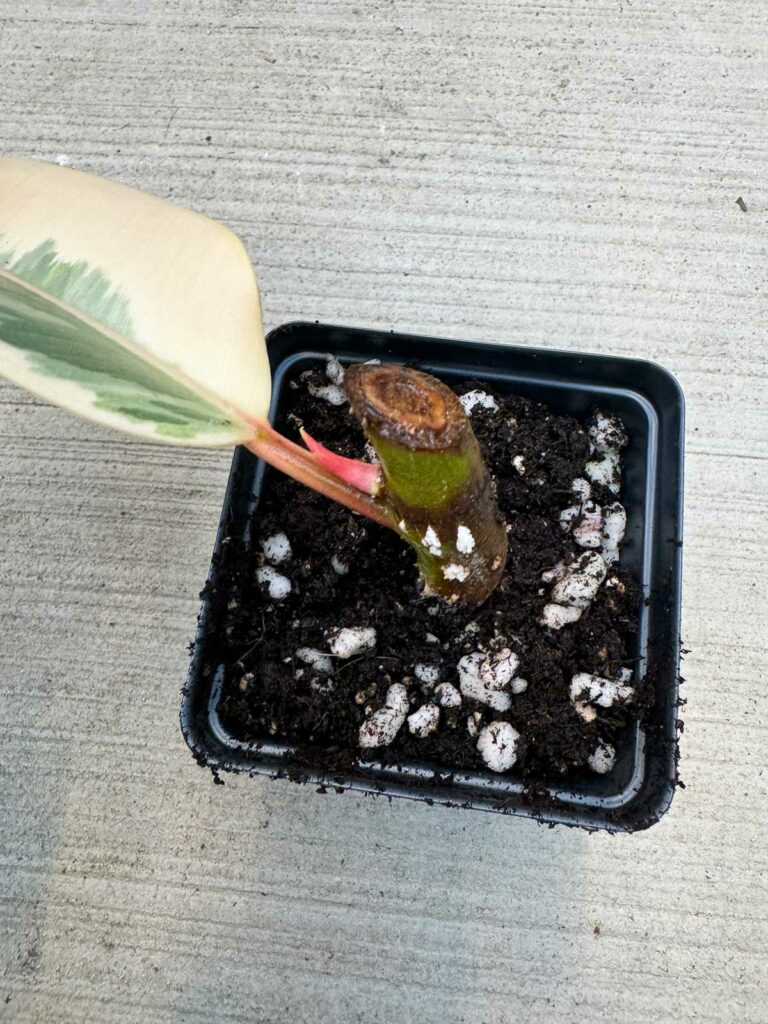
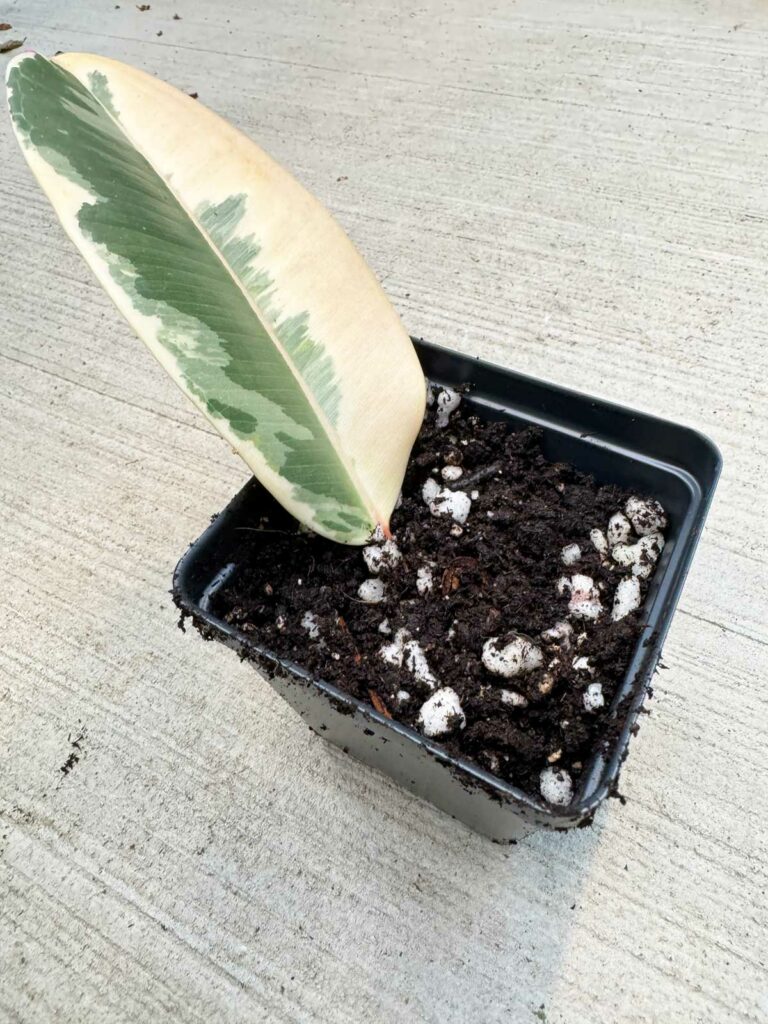
Once you notice roots starting to grow, you can go ahead and pot up each cutting in a small pot. You can wait until the roots are about ½ an inch to an inch long and give each cutting its own pot. I would recommend a 4-inch diameter pot to start with.
If your cutting has small reddish branches forming like you've seen in this post, it is OK if it is buried under the soil line, particularly if you took a single node cutting with only a very small portion of branch.
Here is the cutting before I inserted it into a small pot of soil. It already has the start of roots, and you can see the reddish branch starting to form.
And here is the cutting after I planted it in the soil. You can see that the new reddish growth is right under the soil line. Soon, it will emerge from the soil line and the roots will continue to develop.
Once the plant gets established and is root-bound, you can give it a larger pot. Check out my post for best soil for rubber plants where I give you 3 excellent options to help ensure you have healthy plants!
Water when the surface of the soil feels dry. Do not let the soil completely dry out as this will hinder rooting and early development of your plant.
If you've enjoyed this post, you may also enjoy my other rubber plant related posts so you can ensure that your plant is well cared for:
For the best chance of success, if you can, I always recommend making more than one cutting when propagating any indoor plants in case one doesn't take.
Have you tried to propagate rubber plants in water? Comment below. I'd love to hear!
Cross your fingers! I just chopped my plant in half. I hopefully will have 9 new plants! I know 100% success is asking for a lot but I am thinking positive! Great instructions as I have read multiple sources before making the big chop!
Cut my rubber plant in half August 15th. It had been too high and growing. Trying to propagate the top cut half in water. While white stubs have appeared, the leaves are folding in and some are yellowing. Can planting in soil be the answer now to save the leaves? Since reading your posts, I've changed water to distilled water, and moved it to morning light exposure. Thanks for your info. You seem to anticipate and answer my questions as I read.
It may still lose the leaves, but it will recover, especially as it is growing roots. I would just allow the leave to yellow and fall off on its own. You can plant it in soil now, especially since the roots are starting to appear. Over time, as the roots keep growing, the plant will grow new leaves and it sounds like it will shed the current ones. You should be just fine.
I really love the way you explain everything. Very easy to follow. I had success water propagating my Ficus tineke last summer. The bottom of the plant was starting to suffer. I am unsure if I purchased an unwell plant to begin with. I did not want to lose plant so I took cuttings before I lost entire plant. I did purchase another one and this one seems to be doing much better. My baby prop has 5 leaves now plus a new baby leaf ready to come out. Thank you for such great articles. Gave me the reassurance I needed to know I am doing the best I can for my rubber plants. Thanks, also, for the great lesson in air layering. I learned a lot!
Wow, this is really neat. All I have ever done is air layer with spaghnum moss. On occassion, I will stil the stem in the soil, sometimes it takes sometimes not. Right now I am trying to air layer my rubber tree but it is such a slow process. Lucky if I get roots in 6-8 weeks. I will try this now.
Thanks for the tip. I love propagating and this is a new way.


Cross your fingers! I just chopped my plant in half. I hopefully will have 9 new plants! I know 100% success is asking for a lot but I am thinking positive! Great instructions as I have read multiple sources before making the big chop!
Glad you enjoyed the instructions! Good luck! 🙂
Cut my rubber plant in half August 15th. It had been too high and growing. Trying to propagate the top cut half in water. While white stubs have appeared, the leaves are folding in and some are yellowing. Can planting in soil be the answer now to save the leaves? Since reading your posts, I've changed water to distilled water, and moved it to morning light exposure. Thanks for your info. You seem to anticipate and answer my questions as I read.
It may still lose the leaves, but it will recover, especially as it is growing roots. I would just allow the leave to yellow and fall off on its own. You can plant it in soil now, especially since the roots are starting to appear. Over time, as the roots keep growing, the plant will grow new leaves and it sounds like it will shed the current ones. You should be just fine.
I really love the way you explain everything. Very easy to follow. I had success water propagating my Ficus tineke last summer. The bottom of the plant was starting to suffer. I am unsure if I purchased an unwell plant to begin with. I did not want to lose plant so I took cuttings before I lost entire plant. I did purchase another one and this one seems to be doing much better. My baby prop has 5 leaves now plus a new baby leaf ready to come out. Thank you for such great articles. Gave me the reassurance I needed to know I am doing the best I can for my rubber plants. Thanks, also, for the great lesson in air layering. I learned a lot!
Glad you are enjoying my posts Lori!
Wonderful detailed step by step guide
Thanks heaps Raffaele!
Glad you enjoyed it Ian!
Wow, this is really neat. All I have ever done is air layer with spaghnum moss. On occassion, I will stil the stem in the soil, sometimes it takes sometimes not. Right now I am trying to air layer my rubber tree but it is such a slow process. Lucky if I get roots in 6-8 weeks. I will try this now.
Thanks for the tip. I love propagating and this is a new way.
Good luck Sheri! 🙂