Many people get scared or confused over repotting their houseplants. It doesn't have to be scary, and if your houseplant needs to be repotted, it will set it up for considerable growth. Many people wonder about the following:
How do I know when my houseplant needs repotting?
How do I know what time of year to repot?
How exactly DO I repot my plant?
So let's get to it! I have some informative how-to pictures in the last half of this post, but please keep reading all of the following important information in the meantime.
There are various ways to tell if your houseplant needs repotting. You could be seeing one or more of the following:
You see a lot of roots coming out of the drainage hole
There is no more soil at the surface. Instead, you'll see a hard mat of roots.
If you slip the plant out of its pot, the rootball is all in one piece and there doesn't seem to be much soil left.
Your plant may seem unusually large for its pot. You may also have noticed that it has either stopped growing, or is starting to suffer.
You may notice that your soil is drying out very quickly despite frequent watering.
If you can't remember the last time that you repotted your houseplant, it may be time!
What Time of Year Should I Repot My Houseplant?
The conventional wisdom on repotting is to not do it in the middle of the winter or when the houseplant isn't actively growing. I will go ahead and only partially agree with this.
In my opinion, there is nothing wrong with repotting a houseplant in the middle of winter if you need to. It's not ideal, but I've certainly done that if I've felt like it or if it was a potting emergency!
If it's not urgent though, it's better to wait until until the plant starts to resume active growth in the springtime.
The other thing to remember is that if you are growing your plants under grow lights year round, and they're always growing, you can repot at any time. They don't know it's winter!
How to Repot a Houseplant
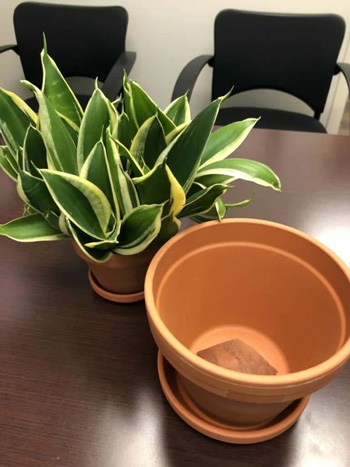
There are many options when you are repotting your houseplant. What kind of pot should you use? There are many pot types and each has pros and cons. Terracotta? Plastic pot? Glazed ceramic? What size should the pot be?
Step 1: Choosing a New Pot
Depending on your plant's growing needs, you need to determine the type of pot to use. If you have a water-loving plant, it may not be a good idea to plant it in a terra cotta pot. It will dry out much too quickly.
Conversely, if you have a plant that needs to dry out more, it may not be a good idea to plant it in a plastic pot, especially if you go heavy with the watering can...If you tend to "overwater" in general, it may be a good idea to go with terra cotta pots.
It all depends on your watering habits, and what your houseplant requires to grow! You could also plant into an inexpensive plastic pot and then slip it into a more decorative pot. It's all personal preference.
As far as size, you typically will want to use just the next size up from where you are. For example, if you have a 4 inch diameter pot, go up to a 6 inch pot, but no bigger. The reason is because many plants like to be somewhat potbound.
In addition, you don't want to pick a pot so disproportionately large to the root ball that the soil will stay too wet and eventually cause issues, like root rot, for your plant.
Step 2: Take Your Houseplant Out of its Old Pot
Depending on the size and other factors, sometimes the plant will come out of the pot if you gently pull it upwards. If it doesn't come easily out of the pot, I sometimes use a knife to slide around the inside of the pot in order to loosen the rootball.
If there are many matted roots coming out of the drainage hole at the bottom, you may need to just cut those off so that you can slide the plant out of the pot.
Don't worry about cutting those roots off, especially if the houseplant is healthy. Sometimes, you may want to lean the pot over if it makes it easier to slip the plant out of the pot.
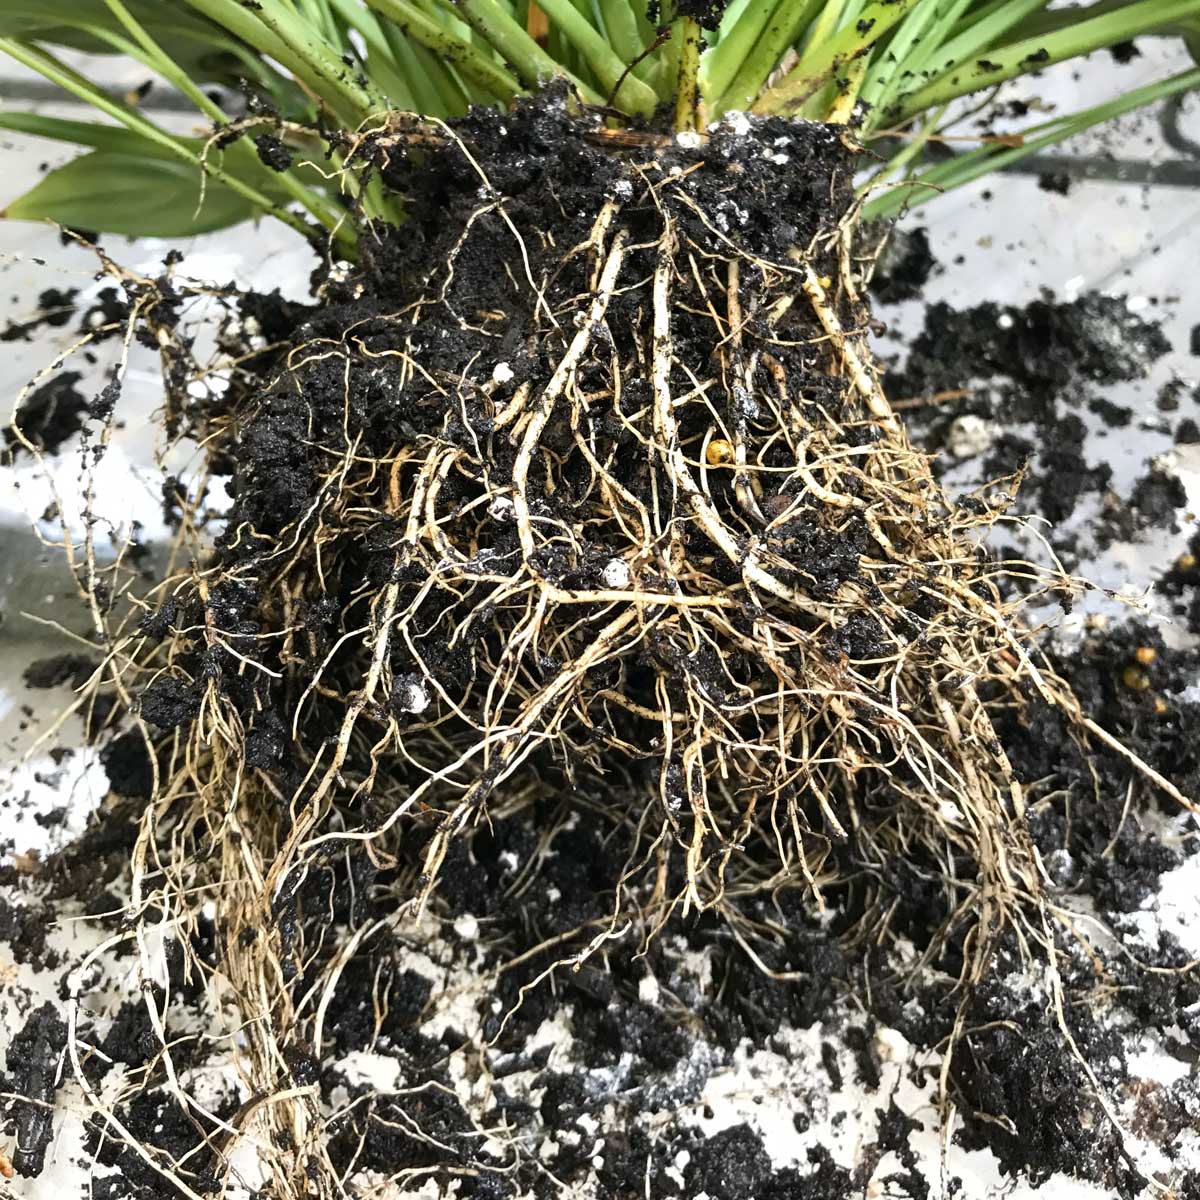
After you've taken your plant out of the pot, it's a good idea to GENTLY loosen the rootball a little bit. Use both hands and try to pry the bottom of the rootball gently apart a little bit. This is important especially if your plant is really root-bound.
Loosening the roots a little bit encourages the roots to grow into the soil in the new pot a little more easily. Otherwise they may stay wound tightly even after repotting into the larger pot.
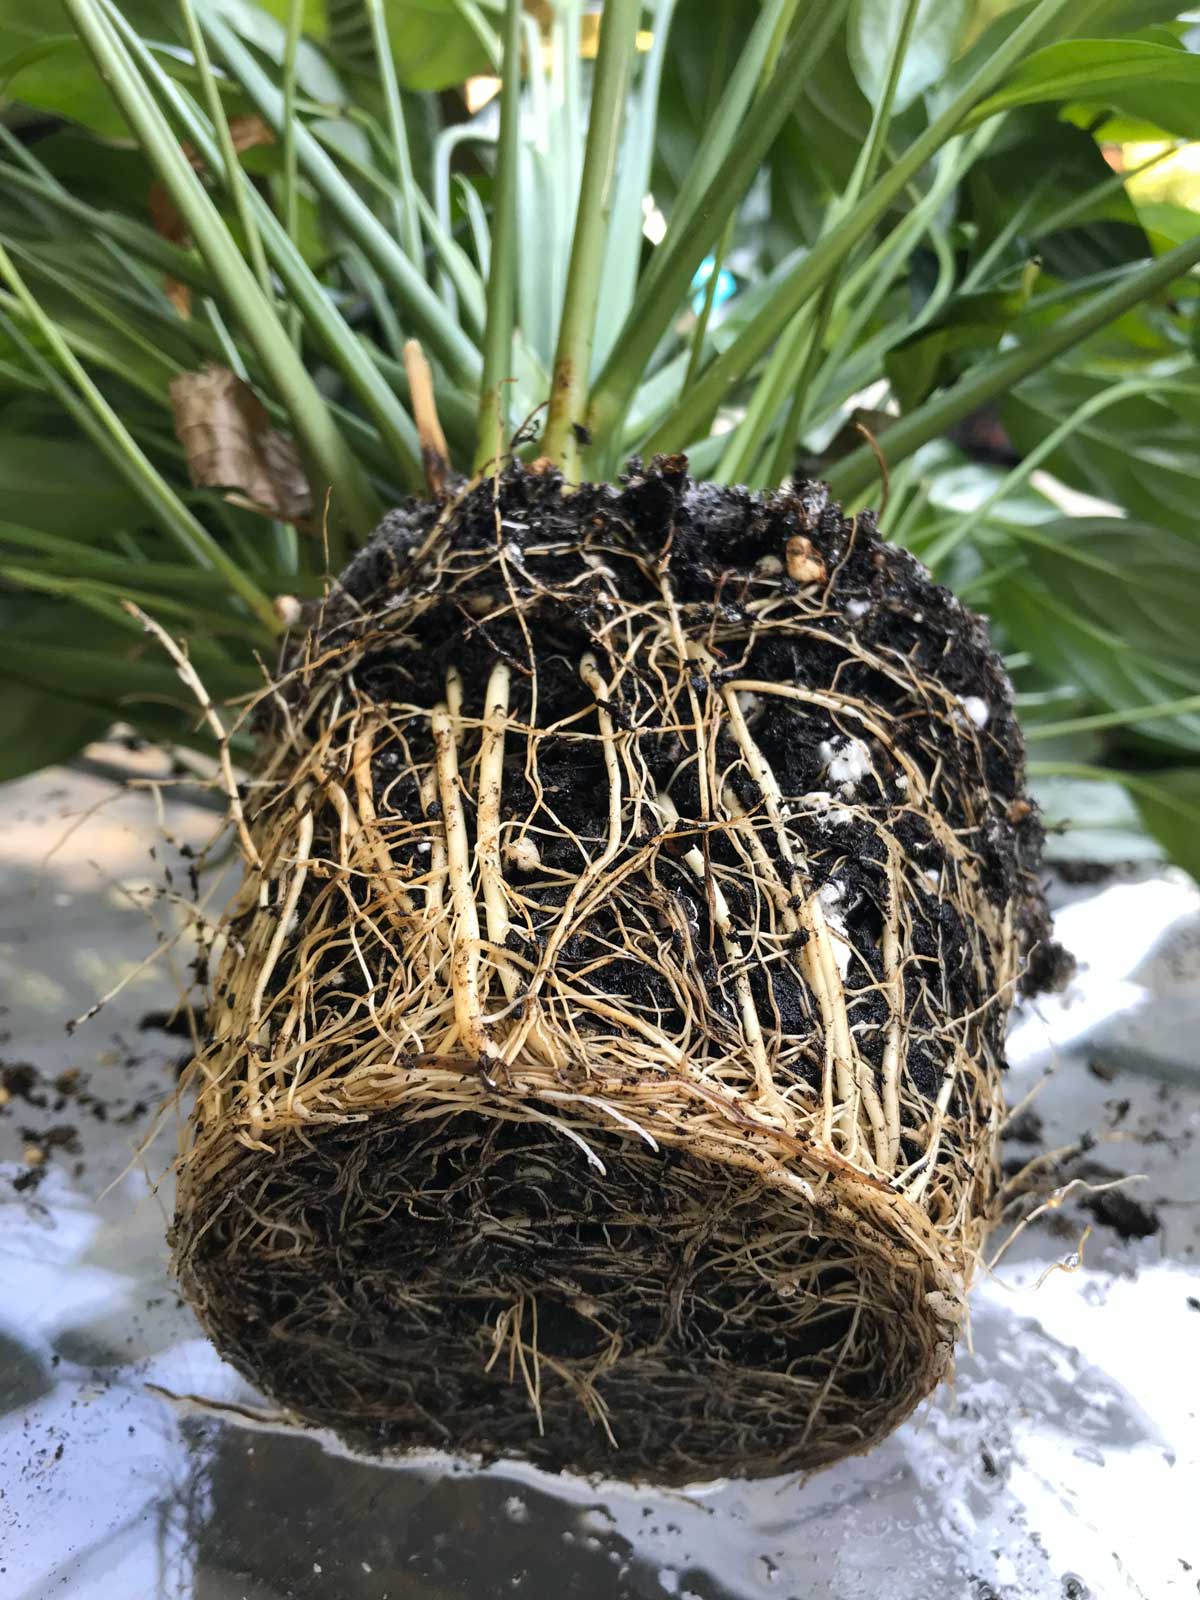
Here is an example with a peace lily I repotted. Here is the "before". You can see that it is pretty root-bound.
Would you like to save this post?
Enter your email, and I will send this link straight to you!
And here is after loosening the root ball. After it is placed into a pot, the plant will grow much better since the roots have been freed up.
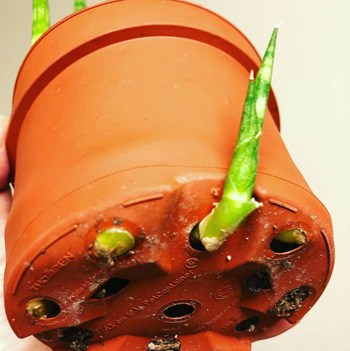
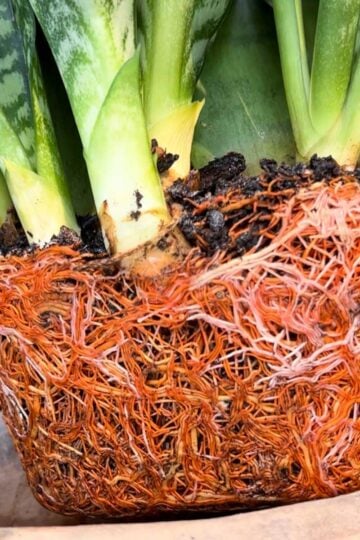
In the next case below, I had to actually take scissors and cut the plastic pot off of my Sansevieria cylindrica. There was a pup growing out of the drainage hole, so there was no other option.
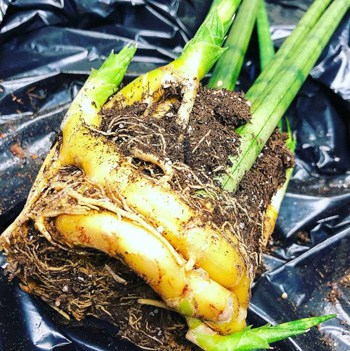
Take a look at the roots once I cut the pot off! Those big, fleshy, beautiful roots!
Step 3: Place the Plant in its New Pot
The next thing that I like to do is to place a broken piece of a clay pot at the bottom of the new pot, covering the drainage hole. Some people use a mesh screen. Regardless what you choose, it'll help contain the soil in the pot so it doesn't escape when you water.
I've been using broken clay pots my whole life, so I continue to use that method. If I break any terra cotta pots, or have damaged ceramic pots, I simply save them and use them to crock the bottom of my pots.
After you cover the drainage hole, place a little soil into the bottom of the pot. Then place your plant that you've taken out of the old pot, and place it in the new pot.
You'll want to ensure that you place the plant at about the same depth that it was planted before. Also, you'll want the soil line to be a little below the top of the actual pot. This is so that when you water, there will be a reservoir and you won't be washing soil away.
After your plant placement seems correct, it is time to fill the rest of the pot with fresh soil. You can use your hands, a little scoop, or any other creative methods that you can think of.
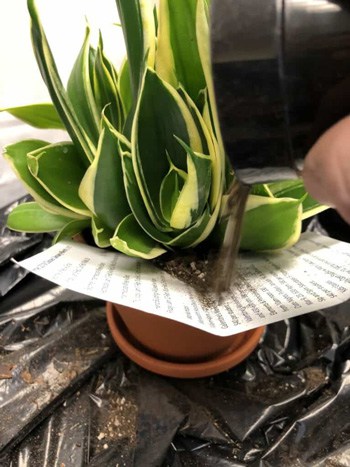
In the photo below, there wasn't much room to work with, so I took a stiff piece of paper (from junkmail!) and used it to guide soil into the pot.
You'll want to gently press any soil down that you place into the pot. The reason is because you want to ensure that the root ball is in firm contact with the soil and that you don't have any big air pockets.
This will ensure good root growth. Don't pack the soil with all your might though! Just gently but firmly.
In cases where I have more room to work with (unlike the tight working conditions I had in the photo above!), I sometimes pre-moisten the soil before I add it to the new pot.
The reason I do this is that sometimes the new soil mix is so dry that it takes a while to wet out adequately. To do this, take some fresh potting soil and put some in a pot that has drainage holes. Then water it and let it soak through until the potting mix is thoroughly moistened.
Sometimes the water will sit on top for a while and will take a while to penetrate. Once it is pre-moistened though, it'll be much easier to work with, and it'll make watering your plant so much easier because the water will penetrate the soil quickly instead of sitting on the surface for a while.
This will ensure that once you pot your plant up, the soil is thoroughly moistened and you're giving your newly potted plant a good start in its new pot.
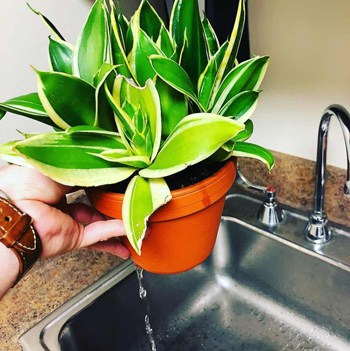
Step 4: Water Your Houseplant
After you're done repotting, the last step is to water your plant. The way that I always teach people to water their plants is to water THOROUGHLY.
Some people will sometimes give a plant a little water at a time and do this frequently. This is not what I recommend. As a general rule of thumb, it's best to thoroughly soak the soil and have less frequent watering sessions, than to add small amount of water frequently.
I will tend to take quite a few of my plants to the sink and give them a thorough watering and let all the water drain away, and then place the plant back in its growing location.
I recommend this watering method even for succulents like Sansevieria and others. Some people may think "oh it's a cactus" or "oh it's a succulent" and only put a tiny bit of water at a time. If you are doing so, you are doing a disservice to your plant.
You may be only getting the top part of the roots wet but not the bottom areas. Even though you "watered it," your plant may appear that it is dehydrating and be dying a slow death because there may be dry pockets of soil. And the roots in those dry pockets will die, and your plant will suffer.
So give your plant a thorough soaking, let the water drain and you are done! In most cases, you will then wait until the surface of the soil is dry to the touch before you water again. I can not emphasize these watering tips enough.
If you can't move the plant to the sink because it is too big or awkward to move, just make sure that the plant does not sit in water in the saucer. You'll want to drain that water away.
If you allow a plant to sit in water for extended periods of time, the roots will eventually rot and you will kill the plant. One trick I've used in the past is to use a turkey baster to remove that water for plants that are too big or awkward to move.
I hope you have more confidence in repotting after reading this blog post, and happy repotting!
This may sound like a silly question but is there ever a stopping point to re-potting? I mean, plants will continue to get bigger so does that mean one day my pothos (or any other plant) is going to be in a gigantic floor pot? And what if I want to maintain a certain size--just prune it?
Hi Kristi! That is not a silly question at all. At some point, it is no longer practical to keep going up in pot size. If you want to maintain a certain size, you can prune your plant. There is also such a thing as root pruning. This is where you can trim a small portion of the roots and then repot into the same pot. This will spur new root growth. And when you root prune a bit, it's also a good idea to trim some of the plant itself too. Hope this helps a bit.
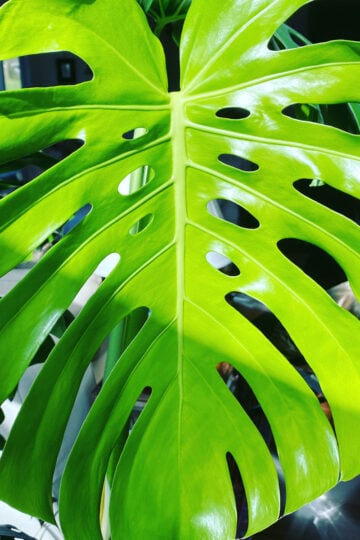
Hi, we have a five year old monstera / cheeseplant the type that has no holes, at the moment it has three leaves, one is dark green and is about hand (palm) size and looks healthy ( at the moment!) one that is a little bit bigger and is going yellow at the tip, and the last and biggest leaf has a yellow thickness of about two inches around the bottom edge. The room it's in has a north facing window which is bright but not sunny, it is also protected from too much light as it is away from the window in a recess by the chimney breast, The darkest leaf is at the back of the plant. When the plant is very dry I give it a good soak in the sink in tepid water and then drain it. We have never fed it. I first thought it could be red spider mite, but couldn't see any evidence. Well after all that, Cheers and Thankyou, Marilyn.
Hi Marilyn, I would have to see a photo to get a better idea of your plant's growing conditions, but from the sounds of it, it's probably not receiving enough light. If it's a Monstera deliciosa, the juvenile leaves don't have holes, but over time as the plant grows and ages, the newer leaves will start to emerge with holes and slits in them. If you'd like, you can message me through the contact form on my website. Please include all care details, and when I respond, you can attach a photo of the plant in its exact growing spot (and also showing the window so I can judge the distance). Where do you live? Are you in the northern hemisphere? If so, that location is probably too dim since north-facing windows don't have any direct sun at all indoors, and if you move it further away, the light intensity decreases substantially very quickly.
I’m somewhat new to knowing how to use Pinterest but I’m learning my way around trying to learn how to care for my sickly little peace lily?. I literally sat down before heading to Home Depot just to try & see what I need to do in efforts to save it/repot and your article came up!!! Sooooo informative!!! I was really nervous about repotting right now(winter)it but your article/blog has shedded so much light in such a short time I think I can do it now!! The presentation is absolutely amazing!! I can’t wait to read more! The fact that you took the time to carefully explain every single thing...whew...I’m excited to read more!!
Sincerely,
A New Struggling Plant Mommy of 7?
Glad you enjoyed the post :-). It's generally a good idea to not repot in the Winter, but if your plant is very potbound and is drying out very quickly in between watering, you will probably be OK doing it now. If it can wait, it's better in Spring.
In many houseplant books, I've seen instructions to wait two weeks before watering after re-potting a succulent or cactus. Is this good advice or does it only apply to re-potting succulents for the purpose of treating root rot?
Hi Amanda! I've never done this before and have gotten by perfectly fine :-). The most important piece of advice I have for succulent repotting though (this goes for any plant, but especially for succulents) is to only go one size higher than what it was in before. For example go from a 4 inch pot to a 5 inch pot. At the MOST to a 6 inch. Otherwise if you go too big, the soil takes too long to dry out. A really well drained soil is a must for succulents. I like to add pumice to my succulent mixes I buy to increase drainage. Hope this helps!
awesome articles Raffaele, though i started gardening 2 weeks ago as a hobby, i repotted all my about 75 plants in mix of cocopeat n normal soil with ratio of 50:50 n some vermicompost. all my plants are growing well. its beginning of spring here in north india. now i m going to propagate succulents from leaves following ur method. i have already started. i m sure i will get new succulents. very nice articles.
Wow!!!! Loving your blog! So much good info and presented so well ! simple and easy to absorb, I learned so much and even debunked some of my previous beliefs about loving my leafy Littles, thank you SO much! Can’t wait to follow you ! Great work ?
This is truly helpful. A handful of good tips!
Though not the ideal season, I am going to put my new propagated Monsteria into pot this weekend!
Thank you!
So informative.... thank you! I'm eager for Spring to arrive so I can follow these precise steps. Also, I thought my sansevieria was looking pretty good until I saw your example. Mine has a flower that surprised and delighted me but yours... it's so luscious!
Thank you so much! Let me know if there are any other topics that you'd want to learn more about. I love hearing from my readers and I want to write on topics that would actually be useful to my readers 🙂 Good luck with repotting!


")

")
This may sound like a silly question but is there ever a stopping point to re-potting? I mean, plants will continue to get bigger so does that mean one day my pothos (or any other plant) is going to be in a gigantic floor pot? And what if I want to maintain a certain size--just prune it?
Hi Kristi! That is not a silly question at all. At some point, it is no longer practical to keep going up in pot size. If you want to maintain a certain size, you can prune your plant. There is also such a thing as root pruning. This is where you can trim a small portion of the roots and then repot into the same pot. This will spur new root growth. And when you root prune a bit, it's also a good idea to trim some of the plant itself too. Hope this helps a bit.
Proper growing medium for most houseplants.
It really varies depending on the type of plant. If you search for a specific plant on my site, I give recommendations for a soil mix for that plant.
Hi, we have a five year old monstera / cheeseplant the type that has no holes, at the moment it has three leaves, one is dark green and is about hand (palm) size and looks healthy ( at the moment!) one that is a little bit bigger and is going yellow at the tip, and the last and biggest leaf has a yellow thickness of about two inches around the bottom edge. The room it's in has a north facing window which is bright but not sunny, it is also protected from too much light as it is away from the window in a recess by the chimney breast, The darkest leaf is at the back of the plant. When the plant is very dry I give it a good soak in the sink in tepid water and then drain it. We have never fed it. I first thought it could be red spider mite, but couldn't see any evidence. Well after all that, Cheers and Thankyou, Marilyn.
Hi Marilyn, I would have to see a photo to get a better idea of your plant's growing conditions, but from the sounds of it, it's probably not receiving enough light. If it's a Monstera deliciosa, the juvenile leaves don't have holes, but over time as the plant grows and ages, the newer leaves will start to emerge with holes and slits in them. If you'd like, you can message me through the contact form on my website. Please include all care details, and when I respond, you can attach a photo of the plant in its exact growing spot (and also showing the window so I can judge the distance). Where do you live? Are you in the northern hemisphere? If so, that location is probably too dim since north-facing windows don't have any direct sun at all indoors, and if you move it further away, the light intensity decreases substantially very quickly.
I’m somewhat new to knowing how to use Pinterest but I’m learning my way around trying to learn how to care for my sickly little peace lily?. I literally sat down before heading to Home Depot just to try & see what I need to do in efforts to save it/repot and your article came up!!! Sooooo informative!!! I was really nervous about repotting right now(winter)it but your article/blog has shedded so much light in such a short time I think I can do it now!! The presentation is absolutely amazing!! I can’t wait to read more! The fact that you took the time to carefully explain every single thing...whew...I’m excited to read more!!
Sincerely,
A New Struggling Plant Mommy of 7?
Glad you enjoyed the post :-). It's generally a good idea to not repot in the Winter, but if your plant is very potbound and is drying out very quickly in between watering, you will probably be OK doing it now. If it can wait, it's better in Spring.
In many houseplant books, I've seen instructions to wait two weeks before watering after re-potting a succulent or cactus. Is this good advice or does it only apply to re-potting succulents for the purpose of treating root rot?
Hi Amanda! I've never done this before and have gotten by perfectly fine :-). The most important piece of advice I have for succulent repotting though (this goes for any plant, but especially for succulents) is to only go one size higher than what it was in before. For example go from a 4 inch pot to a 5 inch pot. At the MOST to a 6 inch. Otherwise if you go too big, the soil takes too long to dry out. A really well drained soil is a must for succulents. I like to add pumice to my succulent mixes I buy to increase drainage. Hope this helps!
Hello!
Should I repot my plant after receiving it in the mail?
awesome articles Raffaele, though i started gardening 2 weeks ago as a hobby, i repotted all my about 75 plants in mix of cocopeat n normal soil with ratio of 50:50 n some vermicompost. all my plants are growing well. its beginning of spring here in north india. now i m going to propagate succulents from leaves following ur method. i have already started. i m sure i will get new succulents. very nice articles.
I'm glad you're enjoying my blog Aman! Good luck with all your plants! :-). It's such a rewarding hobby.
Fantastic article, fantastic blog!! Thank you for sharing. This article made me want to repot plants that don’t even need it!!
You're very welcome Tamala!
Wow!!!! Loving your blog! So much good info and presented so well ! simple and easy to absorb, I learned so much and even debunked some of my previous beliefs about loving my leafy Littles, thank you SO much! Can’t wait to follow you ! Great work ?
Thanks Grace, and it makes me very happy that you are enjoying my blog!
This is truly helpful. A handful of good tips!
Though not the ideal season, I am going to put my new propagated Monsteria into pot this weekend!
Thank you!
You're very welcome Xiuxian! I'm glad you found it helpful.
So informative.... thank you! I'm eager for Spring to arrive so I can follow these precise steps. Also, I thought my sansevieria was looking pretty good until I saw your example. Mine has a flower that surprised and delighted me but yours... it's so luscious!
Thank you so much! Let me know if there are any other topics that you'd want to learn more about. I love hearing from my readers and I want to write on topics that would actually be useful to my readers 🙂 Good luck with repotting!