Plant propagation is a fun and rewarding way to learn about your plants, and it also helps to increase your collection while minimizing cost! You can use it to create more plants for yourself, or to share as gifts with friends and family. Not to mention, it is really fun to do! There are so many ways to propagate houseplants, all depending on the type of plant that you have. Snake plant propagation by leaf cuttings is fun and easy to do.
Would you like to save this post?
Enter your email, and I will send this link straight to you!
Table of Contents
Sansevieria Propagation in Soil
You can propagate various types of plants by division, air layering, leaf cuttings, stem cuttings, etc. Not to mention water propagation versus soil propagation.
In this article, I will focus on propagating Sansevieria with leaf cuttings in soil.
I will also update this post regularly to show the progress of the cuttings. So if you are not subscribed to my blog, make sure to subscribe by email to stay up to date!
When I first posted this topic as an Instagram story (you can find me @ohiotropics on Instagram where I post photos and houseplant tips daily), there were a lot of questions. So I decided to document the process in this post.
Taking a Leaf Cutting
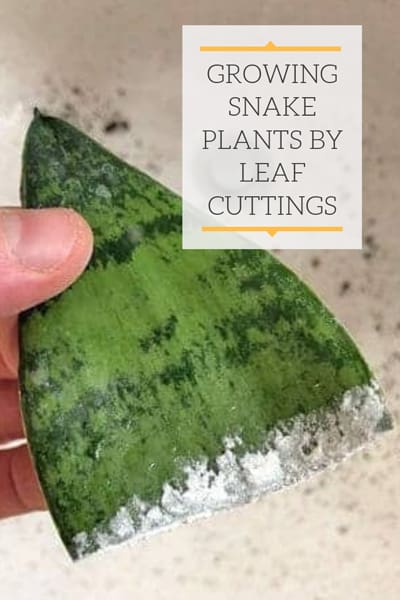
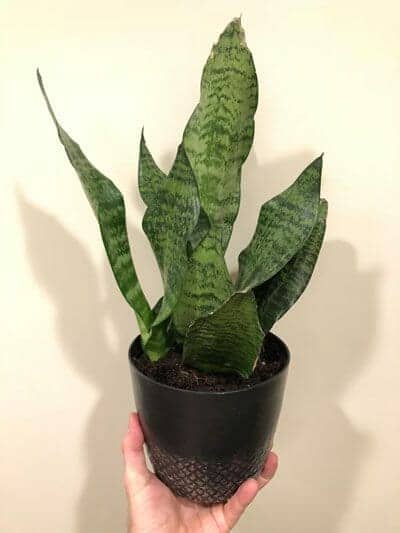
The first thing you'll need to do is a choose a leaf from your Sansevieria to cut off and propagate. I have several Sansevieria plants, but I wanted to propagate one in particular.
I found a beautiful specimen on a clearance rack for $5. It looked like it had suffered some abuse and had some leaves that were damaged. Right off the bat, I decided that I should cut the ugly leaves off and propagate them.
Normally for succulents, I recommend letting the cuttings dry out for a few days to allow the cut to callous over and dry. This prevents rotting.
In the case of Sansevieria, since the leaves really aren't particularly juicy, you are OK to skip this step. You can still allow the callouses to form if you'd like.
Critical Steps for Sansevieria Leaf Cuttings
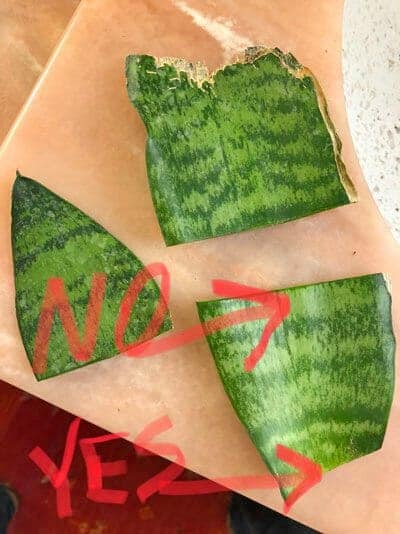
Be sure you read this section carefully. I've included a diagram as well to visually show it since it can be confusing to explain with just words.
First choose the leaf you want to propagate and cut it off with a pair of sharp scissors. Next, you will cut that leaf into a few segments. You'll want each segment to be at least 2-3 inches long or so.
The critical part to follow is that as you cut the leaf segments, you need to keep track of the part of the leaf segment that was closest to the soil. You can NOT turn the leaf segment upside down and then insert that into the soil. It will NOT root.
If you are worried that you will mix them up, cut a little notch on the corner of the leaf segment so that you know which end to insert into the soil.
Look closely at the photo above. The area labeled "yes" is where I made the first cut on the leaf. You can not turn this segment upside down and insert it into the soil for propagation!
The same goes for all the other segments that you cut on the same leaf. The leaf segment needs to remain in the same orientation as it was originally growing on the plant.
So the part of the leaf segment that was originally closest to the pot will be the end that you will insert into the soil for propagation.
Notice that I also cut another leaf segment from the same leaf. Similarly, the bottom of that leaf segment will be the end that I will insert into the soil.
I chose this leaf because it was ugly and damaged when I purchased the plant, so I figured I'd cut it off to improve the appearance of the original plant, and also to propagate!
Propagating Variegated Sansevieria
Please note that if you have a variegated Sansevieria, the leaf cutting propagation method will NOT result in variegated plants. It will revert to the non-variegated version of the plant.
Some varieties of Sansevieria have yellow or whitish stripes on the leaf margins. In these cases, if you want more variegated plants, you'll need to divide the original plant.
When you use this leaf segment method to propagate, the resulting plants will be plain green. In my case, this is not a variegated plant so my resulting Sansevieria children should be the same as the parent plant.
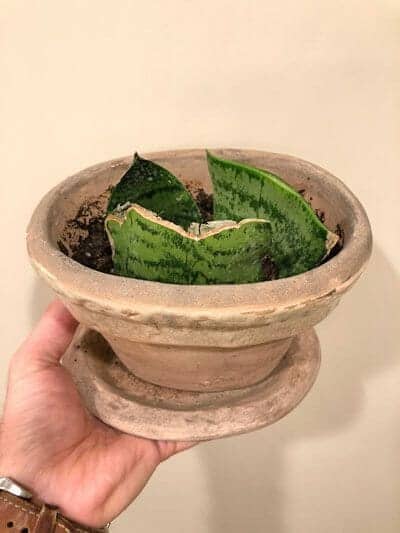
After You Have Cut Your Leaf Segments
After you have followed the steps above, it is almost time to place them into soil. A have a few product recommendations (see below) that I love using and can be found on Amazon. Follow these steps:
Dip the end of each leaf segment into water, and then into rooting hormone. You don't HAVE to use a rooting hormone, but it will GREATLY speed up the process!
Fill a pot with soil and water thoroughly first in order to pre-moisten the soil before inserting the leaf segments into it. A succulent/cactus soil mix will work best.
I really like Hoffman Organic Cactus & Succulent Soil Mix (links to Amazon). I use it for propagation purposes and anytime I repot any cacti or succulents. In addition to this soil mix, I like to mix in a little perlite or ¼" pumice for additional porosity and drainage.
A good rule of thumb would be to use about 2 to 3 parts of soil mix and 1 part perlite or pumice. Pumice has the added benefit of not floating to the top of the soil when you water.
I like to add perlite or pumice to all my houseplant soil blends, not just for Sansevieria! You will love what it does! I use perlite more for leafy tropicals and pumice for succulents and plants that like to dry out well in between watering.
If you're looking for an amazing potting mix that you can use straight out of the bag for your snake plant, check out the Tropical Succulent Soil Blend from Oh Happy Plants. This is an amazing mix and you will get 10% off at checkout automatically if you use my link.
Insert the appropriate end of each leaf segment into the soil, maybe ½ inch to ¾ inches into the soil.
Now it's time to wait for Sansevieria babies to emerge! Place the pot in an area with bright indirect light, and even a little direct sun is fine!
Wait until the soil is nearly dry before watering again thoroughly.
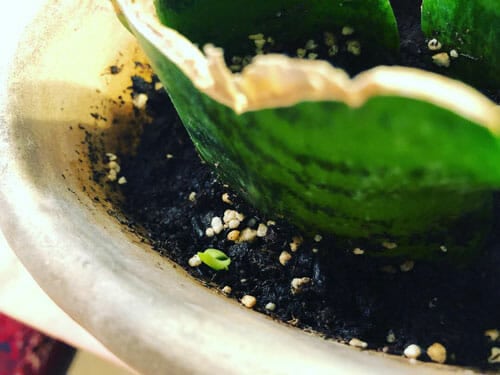
Keep an eye out for new growth in the ensuing weeks and months.
The time that it takes can vary drastically...but for me, it took 7 ½ months for a pup to finally emerge! It is a true test of patience!
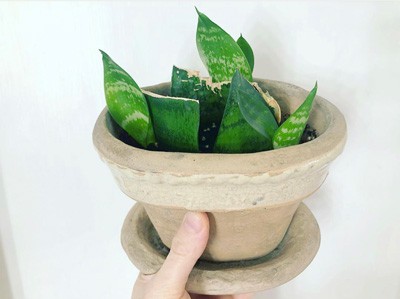
And a few months later, all of the leaves have grown new pups.
You can also root Sansevieria in water. This is actually a quicker method and I wrote a blog post on water propagation of snake plants. Although soil propagation takes longer, it is a bit less maintenance.
Once your plants are growing, just follow standard snake plant care. A potting mix of Hoffman Organic Cactus & Succulent Soil Mix with a little perlite or pumice added for additional porosity and drainage will go a long way in growing beautiful Sansenvieria!
Have you every propagated Sansevieria? Comment below!
Am I doing something wrong? I’ve propagated a cutting exactly like this blog and it won’t root. It’s been propagating for like 3 months and no roots. The plant itself isn’t rotting or anything. It’s just sitting in water. It won’t root and I’m stumped.
As long as it's green, give it more time. Sometimes they can take a really long time. 3 months may be a little longer than normal, but it's not unusual. Where do you have your cuttings?
I'm so happy you posted progress photos! I have been wondering what to do with a single leaf my mom gave me. She said to propagate but I didn't know what cutting it would do. Now I know! PUPS WILL EMERGE!! <3
I watered a bit and will do as you said. I moved it too. Patience for me is no problem.. i look forward to the result.
Thank you so much
Have a great night
Hi...
I have tried everyting I have seen and read and all of my cuttings died so now I am making one final attempt in a mix of cactus potting soil with perlite and the soil seems very light. However I am so scared to water them. What is a good rule of thumb for watering. Also they are on a shelf with no direct light. I will move them to a bright spot..west facing window but not in direct light. I need help with the watering part
Thank you so much
Hi Kathy. I basically watered it initially and then let it dry out almost completely. And then repeated the process. No need to be scared! I had no issues at all with rotting. Definitely move it to a brighter spot like you said.
Thanks for your response! I’m using miracle grow cactus potting mix. I am not positive they are rotting, it is just a guess since the bottom portion of the left is getting softer and a darker green. I am not sure what I am doing wrong, this time I thought by using the cactus potting soil mix it would work. I have photos of the leaves in the pot, I am not sure what I am doing wrong exactly
Thanks for your response! I’m using miracle grow cactus potting mix. I am not positive they are rotting, it is just a guess since the bottom portion of the left is getting softer and a darker green. I am not sure what I am doing wrong, this time I thought by using the cactus potting soil mix it would work.
Hello! I’ve been having and issue with my cuttings that I have tried to propagate in soil. After a week of having them cut, calloused, and dipped in rooting hormone the cuttings seem to be either rotting or something else. Is there a way to salvage them possibly by cutting off the softer discolored section and trying the water rooting method? Any help that you can provide is greatly appreciate!
Hi Joseph. Yes, if they are rotting, you can make a new cut on each cutting and start over again. What kind of soil are you using? Water propagation will work as well.
I've actually done this with a whole 'leaf' cut at the base, then stuck into a little globe of gravel, with a little water in it... it didn't rot and it grew just fine, threw out new leaves within a month or so.
Some people just gently pry them off the leaf that it grew from, but I just leave mine attached. They will eventually wither away as the plant grows and it's less stress on the plant.
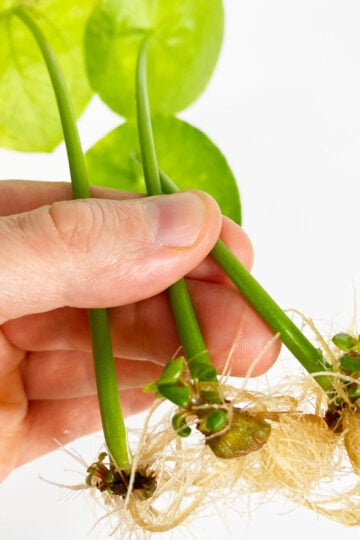
I tried sanseveria propagation using water and it is over a month now but still I could not see rootings. How will long will it take for rootings to show?
@rcdilallo@gmail.com, 1st time my water propagated leave cutting rooted after 1 week. I leave it at my verandah where all the grownup snake plants are. It also have 2 pups after I transfered to soil.
Hi Dawn! You can leave it as is. It will do no harm. If it bothers you aesthetically though, you could take the cutting out of the soil and gently separate the leaf cutting and the pup.
Does this work with other varieties of sansevieria? I have some cuttings of S. rhodesiana as well as S. ehrenbergii. The original plants had rotted due to overwatering but I was able to save some leaves without rot.
I haven't tried those specific species, however I believe it should work on all of them! The only thing to keep in mind is if the plant is variegated, the resulting plants from leaf propagation will not be variegated. It's worth a try though so give it a shot! Just be prepared to wait a very long time and have patience.
Have you ever tried splitting the leaf vertically? I’m interested because I have a Moonshine and want babies and wondered if I could increase the number of cuttings from one leaf. I’m trying it both ways as an experiment. But just did it so it will be awhile before I know results. And do ‘moonshine’ sansevieria come true from leaf cuttings?
I've never tried splitting the leaf vertically. I would think it should still work, but the surface area is still the same, so I wouldn't expect more pups. You can still get multiple pups regardless. As far as if the Moonshine variety comes true from leaf cuttings, I'm not sure! I know for a fact that any variegated varieties will not come true. I'm curious to see how your experiment plays out!
@Randall Labolle, I just acquired a Moonshine leaf which broke from a plant and want to try propagating it. Could you update to inform those of us curious about the results thus far?
@Ohio Tropics, do you reckon there’s any prospect for propagation for a leaf that broke off from the original plant? The leaf I have seems to have dried out a bit already. It would probably otherwise have been discarded, but I’m hopeful to see if it will respond to propagation. It’s unknown when the leaf broke. The edge is definitely calloused, but the entire leaf also has curled inward lengthwise. As you wrote about leaf selection, I feel hopeful as your leaf seemed quite battered, although it was still attached to the plant prior to cutting.
I want to attempt water propagation and have already read your blog post on this. Should I make a fresh cut and let that callous over first, or just stick it in water and see what happens?
Thanks for these very informative blogs. The photos of the progress and steps to take are definitely very helpful.
Hello from across the globe, by the way. I’m in The Netherlands, happily isolated due to the CoVid-19 measures. And tending to the plants around the house, enjoying the start of the growing season and being able to see it from close up. =)
Hello Bas! Thanks for commenting, and yes it's worth a shot to propagate the leaf that broke off! You can make multiple segments if you'd like! You will get more pups that way. It's hard to say without seeing the leaf, but you have nothing to lose. Go ahead and try it out. You can take another healthy leaf off your plant and propagate that too if you'd like.
Hello! In this post you mentioned there would be updates, but I'm unable to find anything more recent for your snake plants. Would you please give an update re: your propagated snake plant leaves? Thanks so much. 🙂
The soil should not be kept moist at all when you are rooting. It should be kept on the dry side. Your cuttings may have rotted? I like to use a soil blend for cacti and succulents. I also will sometimes add coarse sand to it as well.
Yes the same just without using the hormons, they wilted slowly and became yellow with time. one of them even wilted and became yellow after months not immediatly and when I checked for roots after they wilted there was no root.


Am I doing something wrong? I’ve propagated a cutting exactly like this blog and it won’t root. It’s been propagating for like 3 months and no roots. The plant itself isn’t rotting or anything. It’s just sitting in water. It won’t root and I’m stumped.
As long as it's green, give it more time. Sometimes they can take a really long time. 3 months may be a little longer than normal, but it's not unusual. Where do you have your cuttings?
I'm so happy you posted progress photos! I have been wondering what to do with a single leaf my mom gave me. She said to propagate but I didn't know what cutting it would do. Now I know! PUPS WILL EMERGE!! <3
Hi Eugenia! I'm glad you found the post helpful. It's definitely a fun process to observe!
I watered a bit and will do as you said. I moved it too. Patience for me is no problem.. i look forward to the result.
Thank you so much
Have a great night
Hi...
I have tried everyting I have seen and read and all of my cuttings died so now I am making one final attempt in a mix of cactus potting soil with perlite and the soil seems very light. However I am so scared to water them. What is a good rule of thumb for watering. Also they are on a shelf with no direct light. I will move them to a bright spot..west facing window but not in direct light. I need help with the watering part
Thank you so much
Hi Kathy. I basically watered it initially and then let it dry out almost completely. And then repeated the process. No need to be scared! I had no issues at all with rotting. Definitely move it to a brighter spot like you said.
Thanks for your response! I’m using miracle grow cactus potting mix. I am not positive they are rotting, it is just a guess since the bottom portion of the left is getting softer and a darker green. I am not sure what I am doing wrong, this time I thought by using the cactus potting soil mix it would work. I have photos of the leaves in the pot, I am not sure what I am doing wrong exactly
If you'd like to email me the photos, I can take a look. theohiotropics@gmail.com
Thank you very much! I appreciate it!
Thanks for your response! I’m using miracle grow cactus potting mix. I am not positive they are rotting, it is just a guess since the bottom portion of the left is getting softer and a darker green. I am not sure what I am doing wrong, this time I thought by using the cactus potting soil mix it would work.
Hello! I’ve been having and issue with my cuttings that I have tried to propagate in soil. After a week of having them cut, calloused, and dipped in rooting hormone the cuttings seem to be either rotting or something else. Is there a way to salvage them possibly by cutting off the softer discolored section and trying the water rooting method? Any help that you can provide is greatly appreciate!
Hi Joseph. Yes, if they are rotting, you can make a new cut on each cutting and start over again. What kind of soil are you using? Water propagation will work as well.
I've actually done this with a whole 'leaf' cut at the base, then stuck into a little globe of gravel, with a little water in it... it didn't rot and it grew just fine, threw out new leaves within a month or so.
Hi Gayla. Thanks for sharing your experience. There are always multiple ways you can accomplish things!
Once you get a pup, do you remove the original cutting from the soil? And if yes, how?
Some people just gently pry them off the leaf that it grew from, but I just leave mine attached. They will eventually wither away as the plant grows and it's less stress on the plant.
I tried sanseveria propagation using water and it is over a month now but still I could not see rootings. How will long will it take for rootings to show?
Hi Chris! It can take a couple months for roots to show in water, if not even longer. Have patience and be sure to change the water frequently.
@rcdilallo@gmail.com, 1st time my water propagated leave cutting rooted after 1 week. I leave it at my verandah where all the grownup snake plants are. It also have 2 pups after I transfered to soil.
Very nice! 1 week is super fast!!! That may be the quickest I've heard so far!
Once you get a pup, do you remove the original cutting from the soil? And if yes, how?
Hi Dawn! You can leave it as is. It will do no harm. If it bothers you aesthetically though, you could take the cutting out of the soil and gently separate the leaf cutting and the pup.
Does this work with other varieties of sansevieria? I have some cuttings of S. rhodesiana as well as S. ehrenbergii. The original plants had rotted due to overwatering but I was able to save some leaves without rot.
I haven't tried those specific species, however I believe it should work on all of them! The only thing to keep in mind is if the plant is variegated, the resulting plants from leaf propagation will not be variegated. It's worth a try though so give it a shot! Just be prepared to wait a very long time and have patience.
Have you ever tried splitting the leaf vertically? I’m interested because I have a Moonshine and want babies and wondered if I could increase the number of cuttings from one leaf. I’m trying it both ways as an experiment. But just did it so it will be awhile before I know results. And do ‘moonshine’ sansevieria come true from leaf cuttings?
I've never tried splitting the leaf vertically. I would think it should still work, but the surface area is still the same, so I wouldn't expect more pups. You can still get multiple pups regardless. As far as if the Moonshine variety comes true from leaf cuttings, I'm not sure! I know for a fact that any variegated varieties will not come true. I'm curious to see how your experiment plays out!
@Randall Labolle, I just acquired a Moonshine leaf which broke from a plant and want to try propagating it. Could you update to inform those of us curious about the results thus far?
@Ohio Tropics, do you reckon there’s any prospect for propagation for a leaf that broke off from the original plant? The leaf I have seems to have dried out a bit already. It would probably otherwise have been discarded, but I’m hopeful to see if it will respond to propagation. It’s unknown when the leaf broke. The edge is definitely calloused, but the entire leaf also has curled inward lengthwise. As you wrote about leaf selection, I feel hopeful as your leaf seemed quite battered, although it was still attached to the plant prior to cutting.
I want to attempt water propagation and have already read your blog post on this. Should I make a fresh cut and let that callous over first, or just stick it in water and see what happens?
Thanks for these very informative blogs. The photos of the progress and steps to take are definitely very helpful.
Hello from across the globe, by the way. I’m in The Netherlands, happily isolated due to the CoVid-19 measures. And tending to the plants around the house, enjoying the start of the growing season and being able to see it from close up. =)
Hello Bas! Thanks for commenting, and yes it's worth a shot to propagate the leaf that broke off! You can make multiple segments if you'd like! You will get more pups that way. It's hard to say without seeing the leaf, but you have nothing to lose. Go ahead and try it out. You can take another healthy leaf off your plant and propagate that too if you'd like.
Hello! In this post you mentioned there would be updates, but I'm unable to find anything more recent for your snake plants. Would you please give an update re: your propagated snake plant leaves? Thanks so much. 🙂
There are no updates yet. This process is very slow and can take many months, so when there is some growth I will update the post 🙂
What kind of mixture do you use for potting soil? I’ve tried this before but it did not work, I was thinking because the soil wouldn’t really dry out?
The soil should not be kept moist at all when you are rooting. It should be kept on the dry side. Your cuttings may have rotted? I like to use a soil blend for cacti and succulents. I also will sometimes add coarse sand to it as well.
I did just like you mentioned just without the hormone but it did not work unfortuntly 🙁 and I still cant tell why so!
Sorry to hear that! Did you follow everything as I described in the post? Any differences?
Yes the same just without using the hormons, they wilted slowly and became yellow with time. one of them even wilted and became yellow after months not immediatly and when I checked for roots after they wilted there was no root.