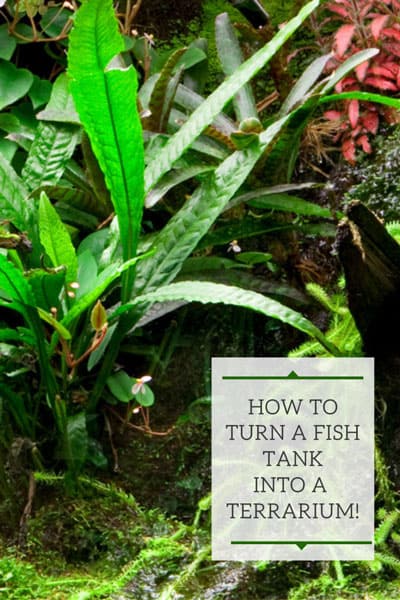
Have you been wanting to make a terrarium but are overwhelmed and not sure exactly how to do it? I will show you exactly how I created a thriving, stunningly beautiful terrarium out of a glass fish tank.
It is really rewarding to create your own enclosed, mini ecosystem. And your plants will LOVE it!
Let me show you how I created my aquarium terrarium in 9 simple steps.
Would you like to save this post?
Enter your email, and I will send this link straight to you!
Whether you have an existing aquarium or fish tank that has been collecting dust, or you went out and bought a new one like I did, they make perfect terrariums!
You can really use any size glass aquarium. You're only limited by your imagination, space, and the size of your plants!
My aquarium's dimensions are 30.625 inches long, 19 inches tall and 13.25 inches deep so it is certain substantial! Not tiny, but not too huge. I'd recommend this size to start out if you're just getting into terrariums!
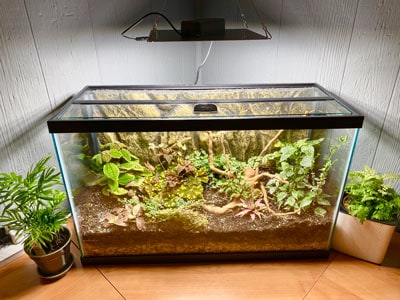
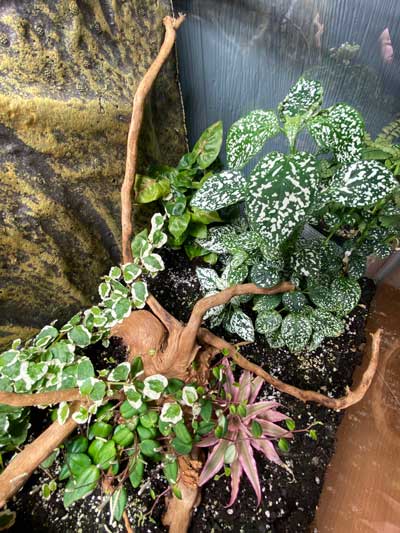
Here is the finished terrarium so you can see what it looks like!
I also purchased the aquarium top because I wanted my terrarium to be covered so I can grow plants that thrive in a high humidity environment.
I'll get into some plant choices later, but if you want to grow succulents that need to dry out, or even epiphytes that need air circulation, you won't need the top.
If you are reusing an old aquarium, make sure that you clean it out really well and sanitize if needed.
Be sure to select a very sturdy site for your terriarum because it will be pretty heavy by the time you're done!
STEP 2: MAKE A LAYER OF GRAVEL AT THE BOTTOM
When you plant something inside of a pot, you have the benefit of having a drainage hole so that excess water can drain.
In a terrarium, we don't have that benefit or luxury, so a layer of gravel at the bottom will be the first layer.
Aim for about ½-2 inches of gravel or so for adequate drainage. I have a little bit more for mine, but I didn't want any left over gravel. There is no harm in adding more.
STEP 3: MAKE A LAYER OF SPHAGNUM MOSS
Next you'll want to add a layer of sphagnum moss. This is so that when you add your very top layer of soil, it will stay put and not go into the gravel layer.
I purchased 1 bag of sphagnum moss and ended up using maybe half of it. You'd be surprised how far one bag will take you!
I soaked the moss in warm water for a few minutes, squeezed out any extra water, and then spread a layer right on top of the gravel layer.
You don't need tons of it, but just enough to create one uniform layer.
STEP 4: ADD ACTIVATED CHARCOAL
There is much debate over whether you need activated charcoal or not, but NASA recommends using it to help filter the water and help prevent growth of fungi.
Needless to say, I used a layer of activated charcoal. Don't go too crazy with it, but make one thin layer. It may not even cover the whole surface of the moss completely but that's fine.
The activated charcoal will also help to absorb any odors that develop, especially in terrariums that are closed off on top.
I used about 3 parts of potting soil to 1 part perlite. You can use other types of potting mixes if you have a favorite one, but I like to add additional perlite to aerate the soil and help reduce the risk of the soil staying too wet.
I graded my soil layer so that it is about 2 inches in the very front of the terrarium, and gradually sloped the soil layer so that the back was about 3-4 inches.
This creates a more visually appealing and beautiful effect.
After I added the soil layer, I gave everything a good watering to moisten the soil layer.
STEP 6: ADD ANY DECORATIVE ITEMS
There are a number of decorative items that you can add to your terrarium, both for visual appeal and, in some cases, functionality too!
This will be very important for visual interest, especially at the beginning when your plants haven't matured yet.
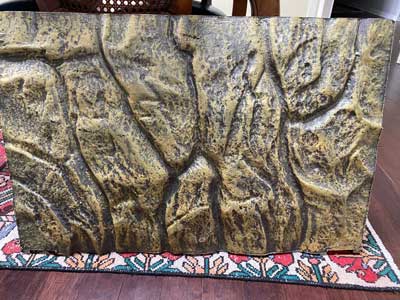
BACKGROUND
At this point you can install a backdrop in the terrarium itself both for visual appeal, and also to give a rougher surface for any climbing plants to use!
This didn't occur to me until later, but I added an Exo Terra Foam Background. I purchased the PT2614 version in order to fit my size aquarium.
It is made to look like natural rock, provides an amazing visual background to your terrarium, and easily cuts to size! It is made out of polystyrene so it is lightweight and can be easily cut to fit your specific terrarium.
You don't have to use any background, but it can provide tremendous appeal, AND it can provide a cool surface for any climbing or shingle plants (which I'll get into shortly).
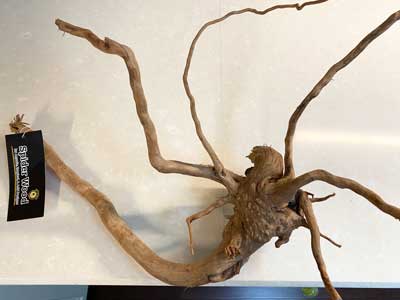
DRIFTWOOD
I love the piece of Galapagos Spider Wood that I purchased. Each piece that you purchase will be unique since it's natural and made of tree roots.
I like the height that it adds to my terrarium, and it can also serve as a support to climbing plants, or if you want to mount any plants on it!
There are other types of products you can buy, and you can even check the pet store and look in the reptile section for a selection of wood.
I believe that a truly beautiful and well balanced terrarium should always have a lot of natural elements such as driftwood of some sort.
STONES
I haven't included any yet, but you can use a variety of rocks for constrasting texture and visual interest. The possibilities are endless.
You can use polished river rocks, rough pieces of stone, or even gravel.
STEP 7: INSTALL YOUR LIGHT
After searching high and low for a great artificial light source, I finally settled on one and I am thrilled with the results!
The choices can be overwhelming, and I wanted to avoid the ones that produce a purple light. Just don't do it! You will be disappointed. Your plants will look bizarre and very unnatural. I'm not sure why this trend started!
It produces plenty of beautiful white light and is Full Spectrum 4000K. It is a great overall energy efficient light for both foliage and flowering.
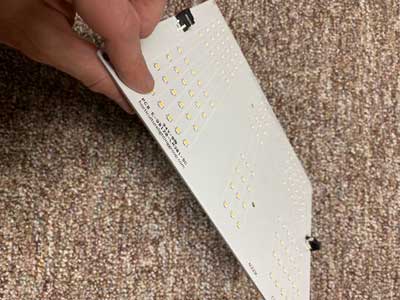
It is super thin and light. Just take a look!
I simply hung it from the ceiling from metal chain that was hanging from a ceiling plant hook that I installed. I set mine on an automatic timer, to which I plugged into a power strip, and have it on for 14 hours a day.
I followed the manufacturer's recommendation of placing the light 12 to 18 inches from the plants.
I would definitely recommend that you install your light before you add your plants to the terrarium.
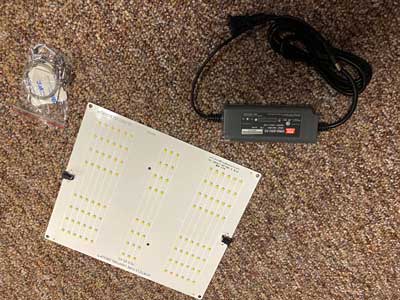
Here are the components it comes with and the assembly is easy.
STEP 8: ADD YOUR PLANTS
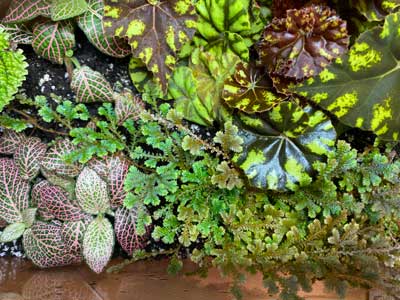
This was the fun part! The choice of plants to add in a terrarium can be quite overwhelming!
The only thing you need to keep in mind is that you need to have plants that require similar conditions (light, moisture, etc) in order for everything to work well.
For example, ferns and succulents would not be a good idea to put in the same terrarium since ferns need consistently moist soil whereas succulents and cacti like to dry out.
If you decide you want a succulent terrarium, you'll need to keep it as an open-top terrarium and need a very bright light.
I decided that I wanted my terrarium to have a lid on it so I can keep the temperature and humidity on the higher end. This way, I can grow plants that normally would not grow as well as in just plain pots somewhere in my house.
Don't be afraid to experiment as this is part of the fun! I used a mix of common plants and also some rarer and more unusual plants!
For the most interesting and beautiful effect, include plants of:
Varying heights (shortest plants in the front and taller ones in the back)
One or two ground cover plants.
A climber or two to cover the aquarium walls.
Different size, texture, and color leaves.
A mixture of fast (for instant gratification) and slow growers.
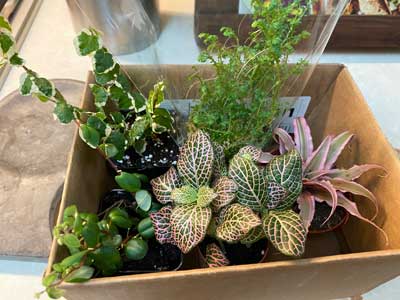
Here are a handful of plants I ordered online that I used in my terrarium:
In the following section, I talk a bit about each of the 9 plants that I planted in my terrarium.
Selaginella uncinata 'Peacock Spikemoss'
I love this plant, which is actually not a moss at all, but rather a type of lycophtye. According to Josh's Frogs, which is where I purchased this plant, lycophtes are the oldest living vascular plants and date back over 410 million years ago!
It's an amazing low-growing ground cover that I've found spreads quite rapidly! It thrives in the higher humidity and moist soil of a terrarium.
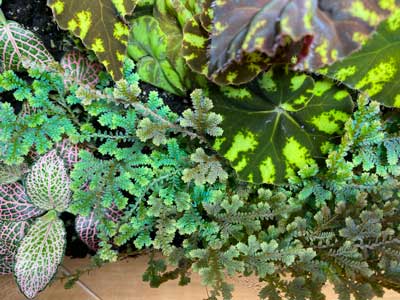
Selaginella unicata at the bottom
The iridescent green and bronze foliage adds a lot of interest to the foreground.
Another point of interest is that it extends what is called rhizophores into the soil as it grows and continues to creep along in your terrarium.
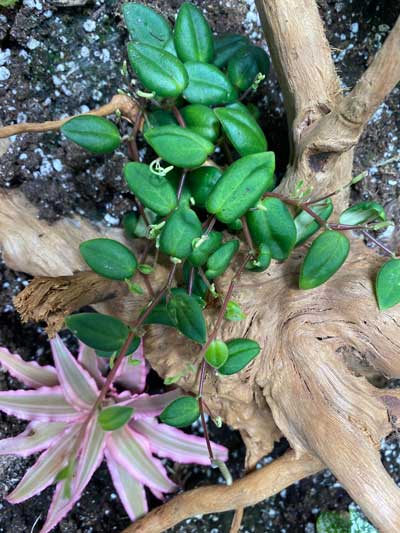
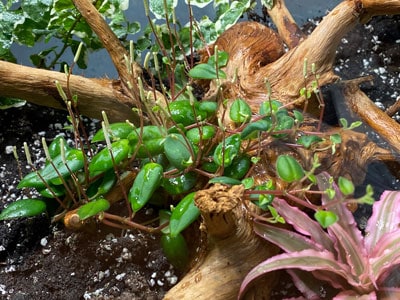
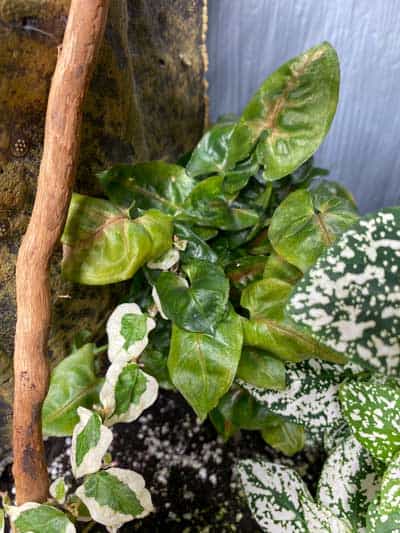
Ficus pumila Variegata 'Creeping Fig'
I planted this clinging vine in the back of my terrarium. I wanted it to ramble about in the terrarium and climb up the walls and provide a green backdrop.
It is quite vigorous and thrives in the moist, humid conditions in my terrarium. It is a very profuse grower, but don't be afraid to prune the plants back to keep it in bounds if it gets too unruly!
Variegated Ficus pumila growing on driftwood
Mine hasn't gone crazy yet, but it has grown quite a bit. You can always use the cuttings to make more plants to else elsewhere or to share with friends.
This is a great filler plant, and time will tell, but it seems to even be able to grasp onto the bare glass walls of the aquarium wall. I'm curious what it will do over time!
Peperomia fagerlindii
This is definitely the rarest and most unusual plant that I have in my Terrarium, and I'm glad to have secured a plant!
Peperomia fagerlindii, also sometimes called Perpomia perciliata, is a jewel for your terrarium.
It is considered to be endangered in its native Ecuador and has beautiful, creeping red stems, dainty heart shaped leaves and white flowers.
Be sure not to miss my dedicated blog post that I wrote on Peperomia perciliata.
Fittonia verschaffeltii 'Pink' - Nerve Plant
This native to Peru is commonly called Nerve Plant or Mosaic plant. This is a shorter plant with stunningly veined leaves.
This is another ideal terrarium plant because it hates dry air and dry soil. Terrariums provide a great environment to be successful with this plant.
Many of us may have grown Fittonias in pots, and we all know what happens when they go dry. They will literally collapse. If you wait too long to water them again, they will probably not make it.
Since it is a shorter plant, I planted it in the front of the terrarium. If it gets too tall, I will simply trim it back.
Fittonia in bottom left
It will eventually form a lovely ground cover since the stems will root at the nodes (where the leaves meet the stem) when they touch the soil surface.
If you want to keep this plant growing lower, you can always pinch off the growing tips.
These plants can also bloom, but the flowers are nothing substantial. You may want to pinch off any flower buds as they start to form in order to keep the plant tidier and more compact.
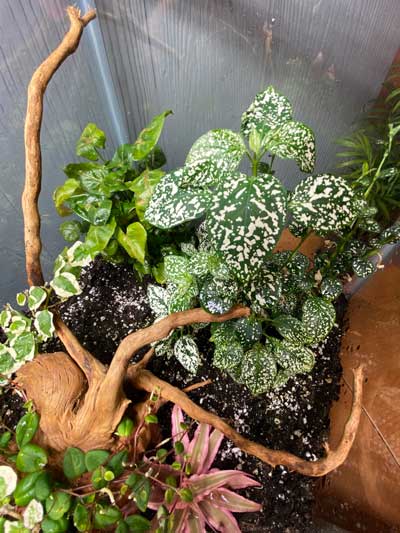
Cryptanthus bivittatus 'Pink Starlite'
This low growing bromeliad makes an ideal plant for the foreground of your terrarium.
Commonly known as Earth Star, these Brazilian natives add a pop of color with their beautiful pink and green striped foliage.
Earth Star in bottom right
Unlike many bromeliads that are epiphytes and grow on trees, Cryptanthus is terrestrial so plant this one directly into the terrarium soil.
Also unlike epiphytic bromeliads, Earth Stars lack a central cup that is normally filled with water. So you'll need to make sure that the soil is watered properly.
They will exhibit the best color when they have good light, and the leaves are stiff and have little teeth on the edges so be careful when you handle them!
It is probably the slowest growing plants that I chose for my terrarium, so you might need to stave off some of the others to give it some room!
Eventually, it will form a lovely pink colony as it sends out pups at the base of the plant after the mother plant flowers. This behavior is typical of bromeliads in that after the mother plant flowers, it will start a slow process of dying, but not before it sends out a future generation of pups!
If you are interested in growing epiphytic bromeliads as houseplants in pots, check out my Bromeliad Care post for tons of information!
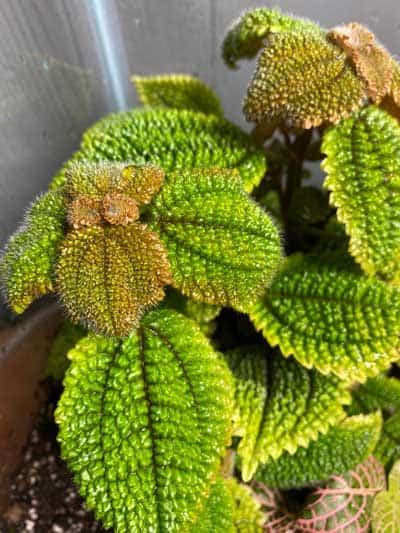
Pilea mollis
Pilia mollis, commonly called the Moon Valley Pilea, has heavily textured leaves and adds incredible interest to your terrarium.
Pilea mollis
I placed mine in the back of the terrarium. These plants shouldn't get much over 12 inches or so. With the soil level where it is at, I'm hoping that it will reach close to the top of the terrarium.
The new leaves are a bronze color and they turn green as they age and mature.
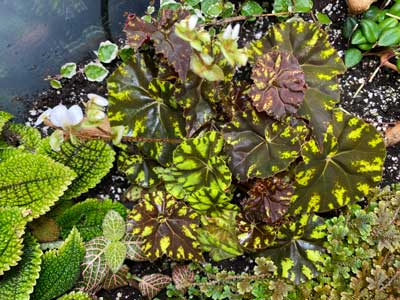
Begonia bowerae hybrid
I don't even want to start to understand begonias. Although they are gorgeous, there are so many varieties that it is difficult even for a Begonia expert to tell!
Begonia bowerae in middle
I consulted a few experts on my plant since of course it was only labeled "Begonia"! Ha! (At least it's better than some labels I've seen, such as "tropical plant." I mean come on...you can do better than that.)
The consensus was that I have some kind of Begonia bowerae hybrid on my hands. And what a lovely plant it is! Begonias can be very tricky indoors because they really need high humidity and excellent attention to soil moisture.
Fortunately, terrariums make them much easier to grow! Begonia bowerae is a type of rhizomatous begonia. All this means is that these plants grow from a rhizome which is a modified stem. All the leaves grow out of the rhizome.
According to the American Begonia Society, rhizomatous begonias are among the most forgiving begonias because the rhizome stores water and nutrients. This helps the plant withstand some abuse and neglect from its owner.
Rhizomatous begonias like shallower pots, so my terrarium is ideal because there isn't a deep layer of soil. They need a quickly draining potting mix, which I provided.
Syngonium
I also included Syngonium, or Arrowhead plant, but I'm not sure of the variety, unfortunately, because it wasn't labeled. It appears that it is a smaller Syngonium than the one you commonly see.
Polka Dot Plant
Polka dot plant (from the genus Hypoestes) has very showy foliage and most commonly has either pink spots or white spots on the leaves.
These plants hail from Madagascar and can get quite large in nature, but you can trim yours down to keep it smaller and bushier. After about a month and half in my terrarium, I'll already have to trim mine!
OTHER PLANTS TO ADD TO TERRARIUMS
Of course, the plants you can add to a terrarium are endless! A maidenhair fern would have thrived in my terrarium, but I chose to keep it in a pot instead.
One plant I do want to still add to my terrarium is a shingling Rhaphidophora to climb the back wall. The leaves will lay flat against the surface it climbs on and has a really unique appearance!
They are hard to find though and always seem to be out of stock everywhere...but one day!
STEP 9: MONITOR AND ENJOY!
Finally, the last step is to monitor and enjoy the terrarium you just created! Here are some things I've found are some routine maintenance tasks, but overall it will be pretty low maintenance!
You will need to deadhead any spent flowers. My begonia, Peperomia perciliata and polka dot plant flowered in the first month that I had the terrarium. Keep the terrarium tidy and snip off any dead flowers.
Monitor condensation on the glass. I have mine covered with a glass aquarium top, but I leave a gap on top so that condensation doesn't form. Experiment until you find what works for you.
You will need to water your terrarium. Maybe not as often as potted plants, but you'll need to keep an eye on it. I would recommend actually feeling the surface of the soil to judge if it needs water. Sometimes just looking at it can be deceiving! I aim to let the top half inch or so dry out before I water again. Thoroughly moisten the soil, but don't go too overboard. If I just want to spot water one plant, I sometimes use a turkey baster.
Many plants will grow extraordinarily well in these conditions, so don't be afraid to trim them back! Also remove any spent leaves or branches. Be aware of the adult size of any plant that you grow. Don't choose plants that will outgrow your terrarium. You can manage plants by pruning to some extent, but choose wisely!
Be sure to clean the glass of your aquarium (and the top as well if you have one) in order to allow maximum light to go through.
If you find that you have any rotting plants or leaves, be sure to remove them as soon as possible to avoid causing a bigger issue.
Keep in mind that if you have a closed system terrarium (or almost closed like mine), you'll want to avoid keeping the terrarium in areas with direct sun, or even too close to a radiator, where you can cook your plants.
I hope you've enjoyed this post and comment below with any questions! I'd love to know what you've done with your terrariums!


")


Very nice terrarium, but it needs some moss!
That would be a nice touch!
Are springtails and isopods a good idea in a terrarium?
I wouldn't intentionally introduce them into the terrarium. Do you have them in there now?