Are you ready to repot your Hoya plant (commonly known as Wax Plant) and want to make sure that you're following all the proper steps? Or maybe you're not sure when or even IF you should repot your Hoya? I will go through all of this and more, so have no fear!
Regardless what type of Hoya plant you have (and there are a LOT), you can use this process and I will show you step-by-step, with photos, how I repotted one of my own Hoya plants so that you can have the most success possible.
Would you like to save this post?
Enter your email, and I will send this link straight to you!
Whether you need to repot your Hoya carnosa, Hoya obovata, Hoya curtisii, hindu rope hoya, or any Hoya, you can follow this same process.
After I go through my easy 3 step process, I also will go over many tips and tricks as well as frequently asked questions about repotting Hoyas. Let's get to it!
Before I get into my process for repotting and transplanting Hoyas, I wanted to touch briefly on when and even IF you should repot your Hoya.
Hoyas can stay in the same pot for quite a long time, and in fact they prefer this. Did you know that having your Hoya root-bound will also help to encourage blooming?
How do you know if your Hoya needs a bigger pot? If you notice one or more of the following, it may be time to transplant your Hoya to a bigger home:
You see a hard mat of roots on the surface of the pot. If you see this, your plant is likely very root-bound.
Your find yourself watering a lot more frequently than you used to because the soil or potting mix is drying out much more rapidly than before.
You see a lot of roots coming out of the drainage holes.
Your plant seems unusually large for its pot and growth has slowed down dramatically or may have even come to a halt.
All of the above are indeed strong indications that your plant needs a larger pot. The only way you can truly tell for sure is if you take your plant out of its pot and look at the root ball.
HOW TO REPOT A HOYA OR WAX PLANT: 3 EASY STEPS
1. TAKE YOUR HOYA OUT OF THE POT AND LOOSEN THE ROOT BALL
If your potting mix is really dry, I normally like to give my plant a good soak and then actually do the repotting a few hours later or even the next day. This will make it much easier to loosen the root ball.
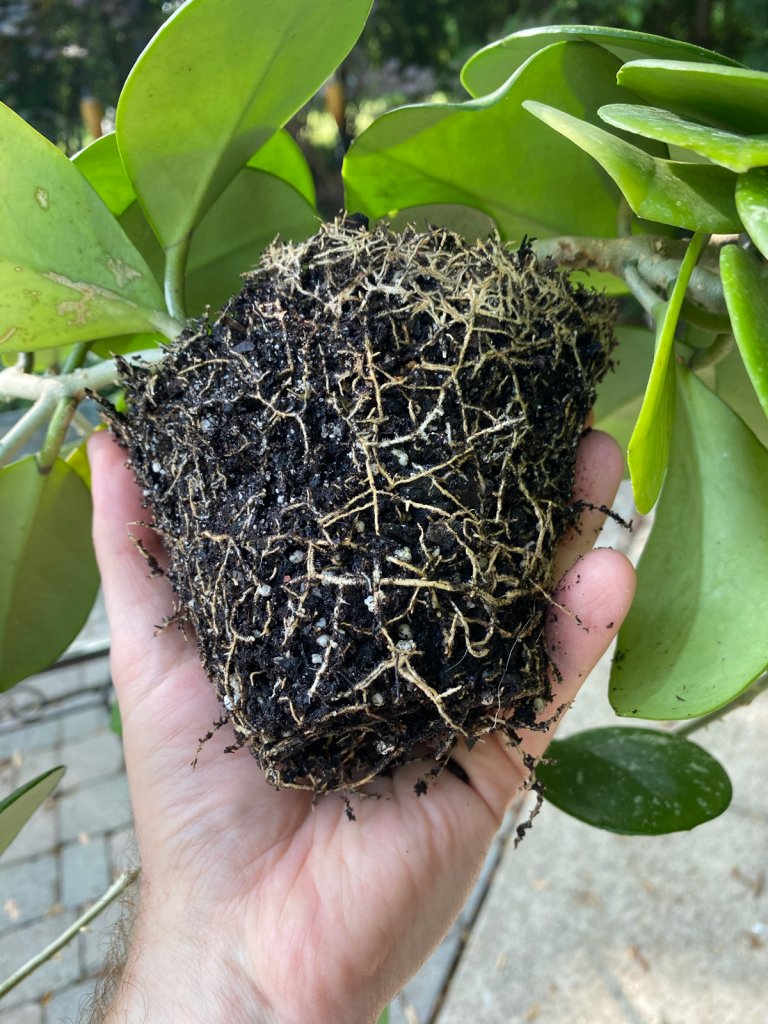
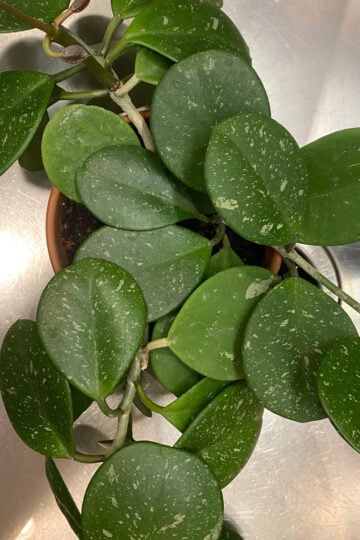
Here is the root ball of my Hoya obovata. I propagated the plant from cuttings and it grew in a 5-inch terra cotta pot for 3 years before I gave it a bigger pot.
You can see that the plant is pretty root-bound and there were quite a few roots matted on top of the soil mix. I had been planning on giving it a new pot. One day I was moving my 17+ year old Hoya carnosa, and it got entangled with my obovata and it fell to the ground!
Fortunately nothing broke on my plant and I was planning on repotting anyway. The universe gave me the push (literally) to proceed.
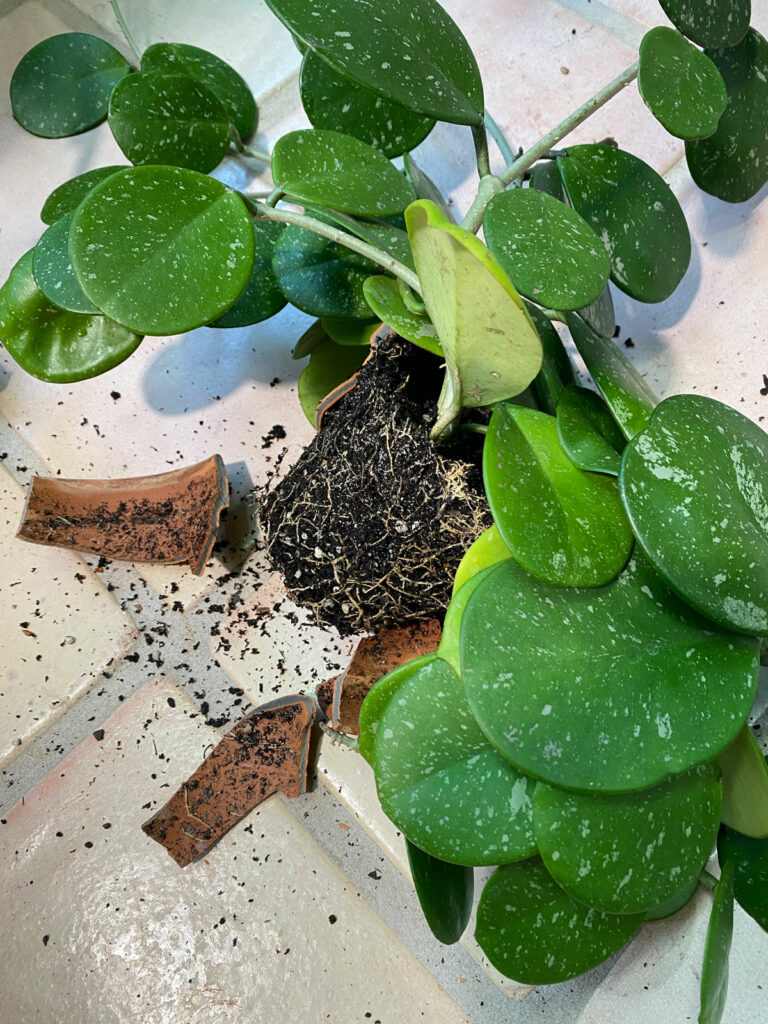
On this note, if you have a Hoya that seems too difficult to take out of it's pot and are worried you're going to damage the plant, there is nothing wrong with breaking the terra cotta pot or ceramic pot that it is growing in! I've done this in many cases where I care more about the plant than the pot.
Of course if you have your plant growing in a plastic nursery pot, it will be much easier to take out since you can gently squeeze around the perimeter and and can then tease the plant out.
Once you take your Hoya out of its pot, it's time to loosen the root ball. Why is this necessary? Simply because it will make it easier for the roots to grow into the potting mix once you transplant it to a bigger pot.
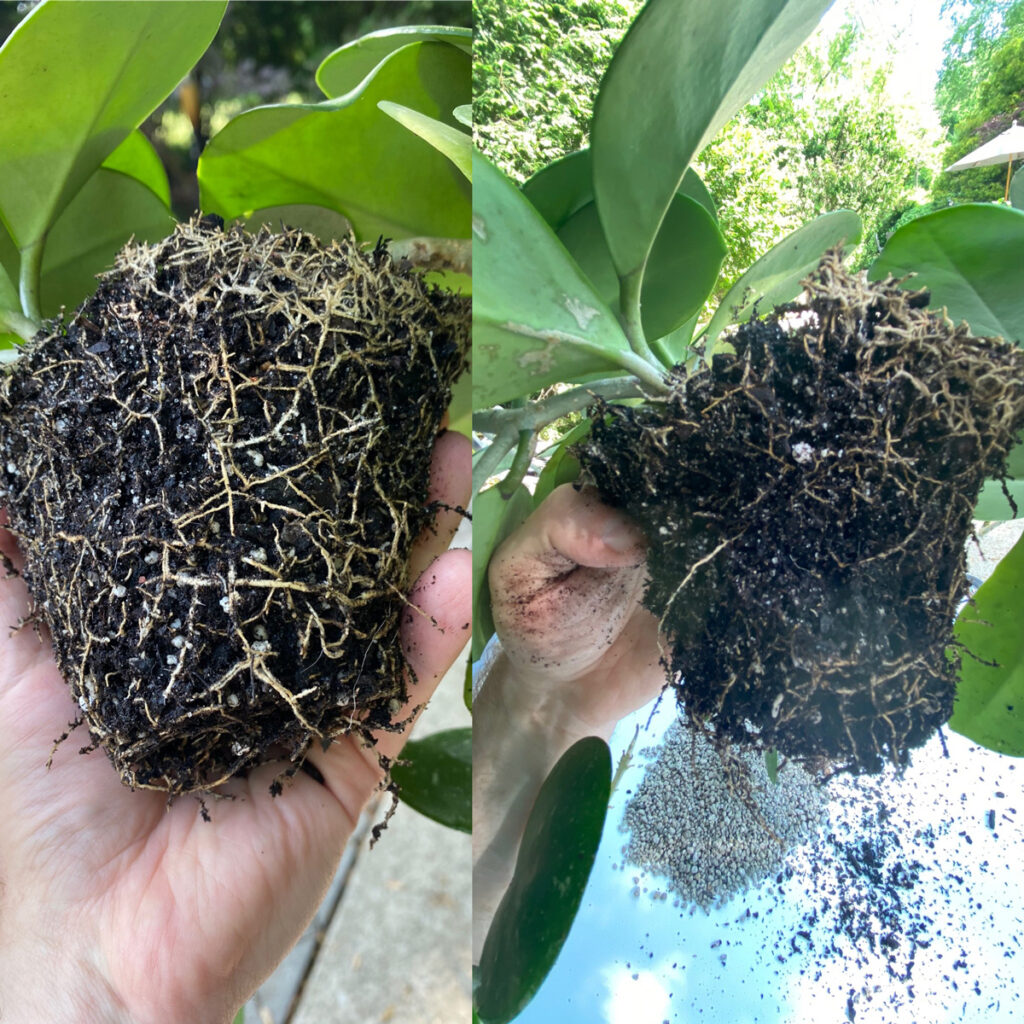
This is especially critical if your plant is extremely root-bound. In my case, it was easy to loosen the root ball a bit. You can see the before and after in the photo below.
Before loosening the root ball (left) and after loosening the root ball (right).
You can see from the photo above that I didn't go too crazy, but I did gently tease the roots at the bottom of the root ball as well as around the perimeter.
If your plant is so badly root bound where the root ball seems like one solid mass of roots with little if any potting mix or soil left at all, and you can't seem to loosen it at all, there is still something you can do.
In this case, you can take a sterilized knife or pruning shears and slice a few vertical slits around the perimeter of the root ball. I would do at least 4. This will at least allow for some areas for new roots to grow from. You will not damage the plant by doing this!
I will update this post with some photos showing how I do this with my 17+ year Hoya carnosa that has been in the same pot for all those years! I suspect that it will be one solid mass of roots.
2. CHOOSE AN APPROPRIATELY SIZED POT
Next, you'll want to choose an appropriately sized pot. My general recommendation, and this applies especially to Hoyas, is to choose a pot that is about 1-2 inches in diameter bigger than the old pot. Whatever pot you do choose, make sure it has a drainage hole. This is a must.
For example, if your plant was previously growing in a 4 inch diameter pot, go ahead and transplant it into a 6 inch diameter pot.
There are a couple reasons for this. If you choose a pot that is much too big (for example, going from a 4 inch pot to an 8 inch diameter pot or bigger), your potting mix will take a lot longer to dry out. Hoyas need to dry out pretty quickly in between watering otherwise you'll increase your risk of root rot and your plant will not be happy.
The other reason is that when Hoyas are root-bound, it will help to encourage blooming.
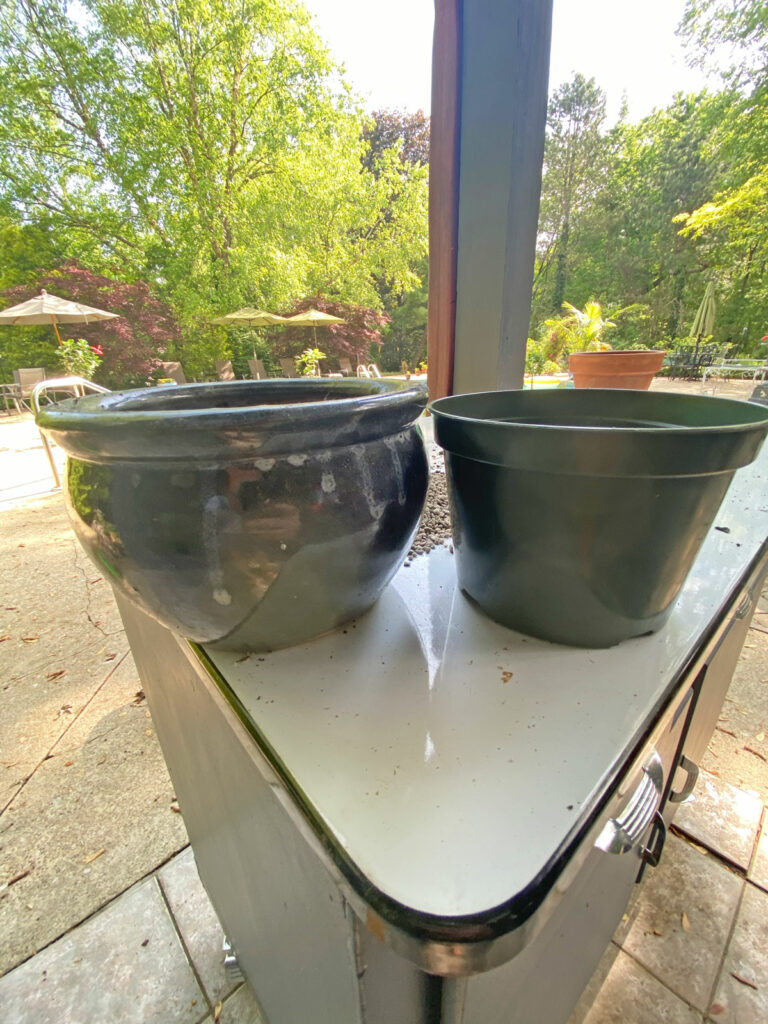
When I repotted my Hoya obovata, I decided to place it in a plastic nursery pot, and then slipped it into a decorative glazed ceramic pot.
The reason I like doing this is simply because plants are much easier to repot when growing in flexible nursery pots, and I can always slip it into a decorative cache pot to make it pretty, so I can have the best of both worlds!
I ended up repotting my Hoya into the plastic nursery pot on the right and then slipped it inside the ceramic cachepot on the left.
3. POT IT UP USING A VERY-WELL DRAINED POTTING MIX
Lastly, you want to make sure to have an extremely well draining potting mix for your Hoyas. Hoyas need to dry out pretty rapidly in between watering.
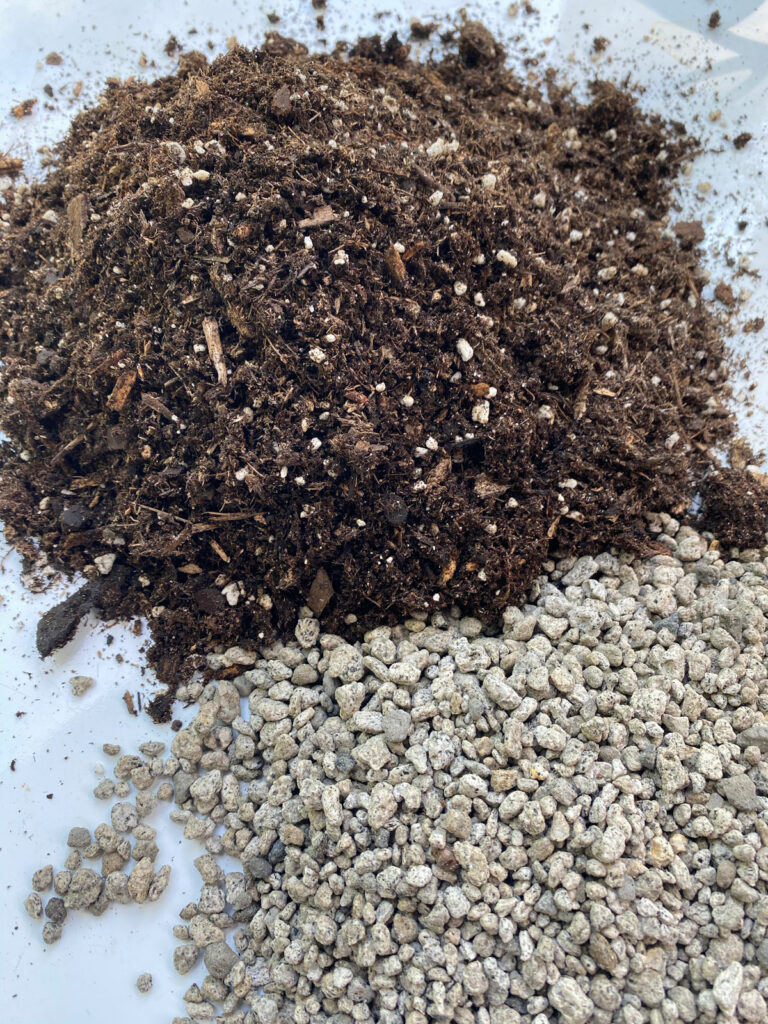
The mix that I love using for Hoyas (and I also like to use this mix for aloes, echeverias, jade plants and other succulents) is simply 2 parts of a cactus/succulent mix plus 1 part ¼" pumice.
Top: A cactus/succulent mix right out of the bag. Bottom: ¼" pumice
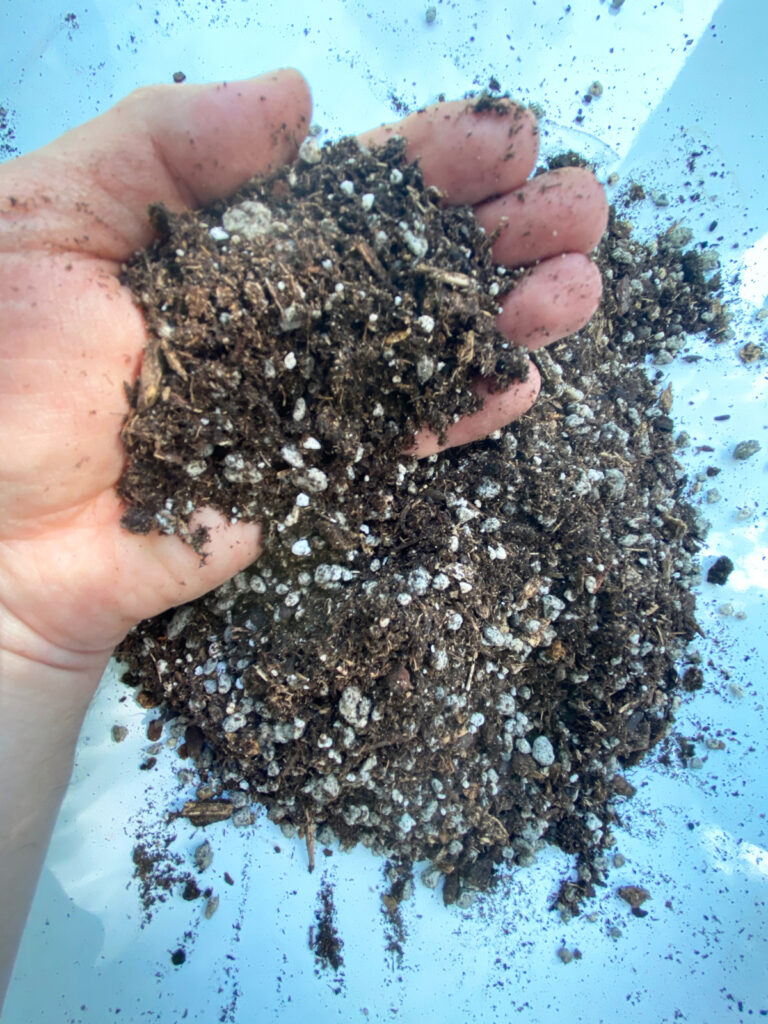
This blend results in an extremely well-drained mix that Hoyas just love. Here is what the mix looked like when I blended it all together.
Here are the actual products that I used.
Espoma makes a wonderful cactus mix. I used two parts of this cactus mix plus 1 part of ¼" pumice.
This mix works really well for me (2 parts cactus mix to 1 part pumice). You can also modify the proportions depending on your conditions.
If you want an amazing mix to use right out of the bag, check out the amazing Hoya soil blendfrom Oh Happy Plants. This is an amazing mix and you will get 10% off at checkout automatically if you use my link.
Your environmental conditions, as well as pot types, can greatly affect how quickly your mixes dry out so don't be afraid to experiment.
I have a more specialized guide to helping you choose the best pot for Hoyas.
You can use perlite too instead of pumice, but pumice will not float to the top like perlite often does when watering. And pumice is much heavier and it will help add some weight and make it less likely to have your pot knocked over.
Next add a little of your custom mix to the bottom of the new pot. Set your plant in and adjust as needed. Add your potting mix blend, and gently press down as you go to make sure that you don't have any big air pockets. Leave about a ½" of space from the soil line to the top of the pot.
This will allow for a reservoir for when you water so that you don't make a mess.
Lastly, give your plant a good watering, and you're all done!
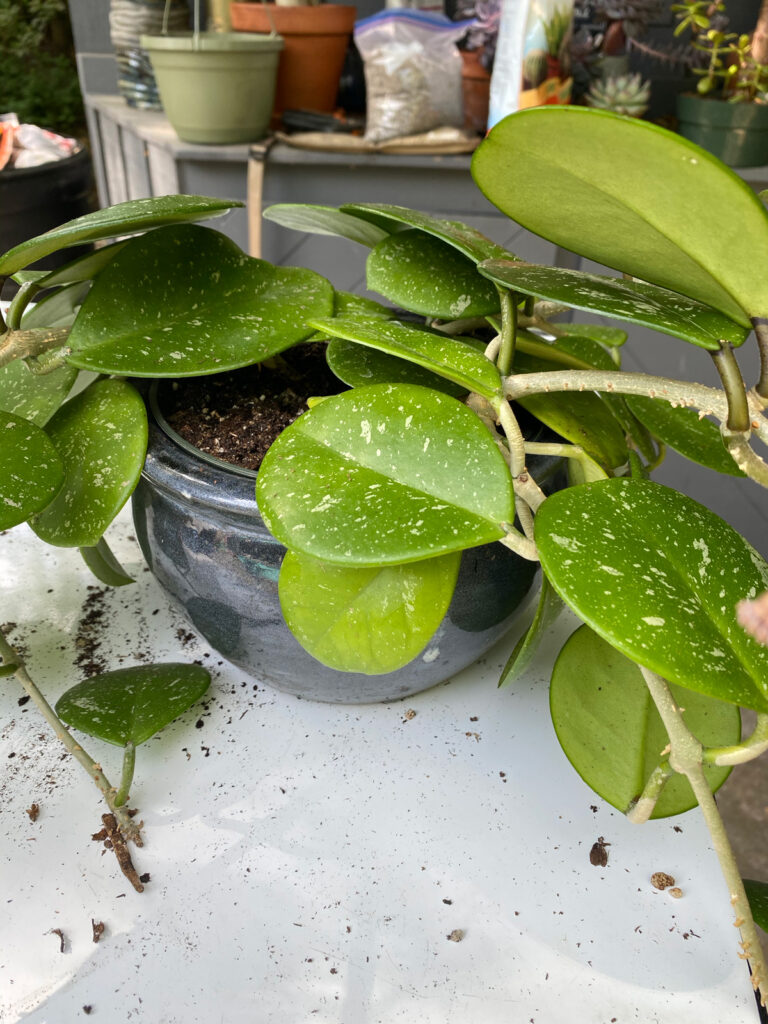
My newly repotted Hoya obovata
FREQUENTLY ASKED QUESTIONS ABOUT REPOTTING HOYAS
What kind of soil does a hoya plant need?
Hoyas need to dry out rapidly in between watering. One wonderful blend to use is 2 parts of a good cactus potting mix with 1 part of pumice. This results in a very well-drained mix that Hoyas love. You can adjust the ratio as needed to suit your environmental conditions.
Should I repot my Hoya?
Hoyas can stay in the same pot for quite a few years. Eventually, they will need a bigger home in order for the plant to continue growing. When your plant is pretty root-bound, you can go up one pot size (1-2 inches bigger in diameter compared to the old pot).
Do Hoya plants like to be root bound?
Yes! In fact, you will help encourage your plant to bloom if it is pot-bound. Eventually, your Hoya will grow better if you repot it into a slightly larger pot.
How often should I repot my hoya plant?
It's difficult to generalize as this can depend greatly on your conditions and how well your plant is growing. You should repot your plant when it is root-bound, but Hoyas can stay in the same pot for quite a few years.
Do Hoyas like small pots?
In general, they do like to have tight quarters. They should be repotted once they are root-bound.
When can I transplant a hoya plant?
Like any plant, it is best to repot during periods of active growth (typically spring or summer). Try and avoid repotting when the plant is not growing at all.
Can you split a hoya plant?
Yes you can and this is best done when you are repotting. If you have multiple plants in the same pot, all you have to do is simply divide your plant at the roots into as many segments as you wish and pot each of them up separately. Tease the plants gently apart at the root system, or if your plant is particularly root-bound, you can even take a sharp, sterilized knife or pruning shears and cut through the root ball to divide your plants.
What kind of pots do Hoyas like?
There are a lot of different types of pots that can work. Terracotta pots work well for hoyas since they are porous and dry out quickly. You can also plant directly in a flexible, plastic nursery pot and then slip your plant into a decorative cachepot. There are many combinations.
Should I water Hoya after repotting?
Yes. Give your Hoya a good watering after you repot. This will allow your potting mix to settle. Wait until your potting mix is just about completely dry, or close to it, before watering again.
Thank you so much . I have 2 Hoyas that are 50 years old - I’ve repotted 2 or 3 times. Now they are very heavy so I’m going to take to a nursery and have them split. They are happy and still flower. I hope they make it through this transition.
Great article. I have a very large Hoya and don't want to hurt the plant - but it just too heavy. I saw that you can use a sterilized knife. I think this will need a saw. Also can you use a self watering pot? I'm thinking not but want your comment . Also tried soaking the root ball - but it would not come apart. Look forward to your reply.
I probably would not use a self watering pot for Hoyas. If the plant is extremely root bound, it's sometimes easier if you can saw through the root ball (just be careful to not saw off the vines 🙂
I was given a pot of three different Hoyas 6 years ago. For the last two years, they have bloomed but they are very overgrown with multiple vines touching the floor and the pot completely filled by the three Hoyas ? Can I separate the three different Hoyas and repot them or will their roots be all intertwined.
Hi Jan! At this point, after 6 years, it would probably be really difficult to separate them. I would just recommend leaving them all together. You can still go up a pot size if you need a larger pot, but I wouldn't try and separate them.
Six or more years ago I was given a Pot with 3 different types of Hoya within itThe three different Hoyas are blooming but also over flowing their container with most of their vines dragging on the floor. I know i need to repot this 'plant' but I am very nervous about dividing the root 'balls' which may now be all entwined. What to do ? I found your article extremely helpful but any further guidance you can give regarding my issue would be deeply appreciated.
The plant is indeed a generational gift. my aunt gave me hers and it is now a total of approx 80 year about to be repotted. I have had it for approx 50 years.
I have a hoya start that was given to me 10 years ago. It has never flowered for me. I am trying to repot it has it has massive amounts of leaves and vines branches I tried to hold up with a bamboo trellis. After removing it from probably too big of a plastic pot, it only has 2 main roots for all that foliage, so I am not sure what to do. Do you trim some of the vines? it has been so lush and green and grows like crazy that is it getting hard to manage and I so want to have it flowers. My friend's beautiful hoya had exotic pink waxy flowers. I would appreciate any help. The plant traveled from Seattle to East Texas 2 years ago and she is my favorite. Thanks so much.
I have a hoya carnosa that's over 30yrs old (I inherited it from a friend's dad who brought it from EU to CA). He said he's never reported it, would you advise in changing the soil and pot? Currently the pot it's in is quite big (half of the plant died during a move 2 years ago). I've been thinking about putting it in a smaller pot with fresh soil mix. Thoughts? Thanks!
Hello Raffaele
I have a Hoya ( not sure what type but I think a Carnosa) and it is over 20 years old. Last transplant happened about 8 years ago. I made a huge mistake and overwatered it. Now having left it to dry out the leaves are all shrivelling and then falling off. Is the whole plant dying? Should I just transplant with your recommended soil mixture or is it a goner? It is huge and hanging in the northeast corner of living room. No direct light. Used to bloom like crazy!


Thank you so much . I have 2 Hoyas that are 50 years old - I’ve repotted 2 or 3 times. Now they are very heavy so I’m going to take to a nursery and have them split. They are happy and still flower. I hope they make it through this transition.
Sounds like 2 very happy Hoyas! 🙂 I'm sure they will be fine.
Great article. I have a very large Hoya and don't want to hurt the plant - but it just too heavy. I saw that you can use a sterilized knife. I think this will need a saw. Also can you use a self watering pot? I'm thinking not but want your comment . Also tried soaking the root ball - but it would not come apart. Look forward to your reply.
I probably would not use a self watering pot for Hoyas. If the plant is extremely root bound, it's sometimes easier if you can saw through the root ball (just be careful to not saw off the vines 🙂
I was given a pot of three different Hoyas 6 years ago. For the last two years, they have bloomed but they are very overgrown with multiple vines touching the floor and the pot completely filled by the three Hoyas ? Can I separate the three different Hoyas and repot them or will their roots be all intertwined.
Hi Jan! At this point, after 6 years, it would probably be really difficult to separate them. I would just recommend leaving them all together. You can still go up a pot size if you need a larger pot, but I wouldn't try and separate them.
Six or more years ago I was given a Pot with 3 different types of Hoya within itThe three different Hoyas are blooming but also over flowing their container with most of their vines dragging on the floor. I know i need to repot this 'plant' but I am very nervous about dividing the root 'balls' which may now be all entwined. What to do ? I found your article extremely helpful but any further guidance you can give regarding my issue would be deeply appreciated.
The plant is indeed a generational gift. my aunt gave me hers and it is now a total of approx 80 year about to be repotted. I have had it for approx 50 years.
Wow, 80 years!
I have a hoya start that was given to me 10 years ago. It has never flowered for me. I am trying to repot it has it has massive amounts of leaves and vines branches I tried to hold up with a bamboo trellis. After removing it from probably too big of a plastic pot, it only has 2 main roots for all that foliage, so I am not sure what to do. Do you trim some of the vines? it has been so lush and green and grows like crazy that is it getting hard to manage and I so want to have it flowers. My friend's beautiful hoya had exotic pink waxy flowers. I would appreciate any help. The plant traveled from Seattle to East Texas 2 years ago and she is my favorite. Thanks so much.
I'll refer you to my blog post on exactly this topic. I hope it helps! https://www.ohiotropics.com/2023/01/25/how-to-get-hoya-plants-to-bloom/
Please add me to your mailing list and emails
I have a hoya carnosa that's over 30yrs old (I inherited it from a friend's dad who brought it from EU to CA). He said he's never reported it, would you advise in changing the soil and pot? Currently the pot it's in is quite big (half of the plant died during a move 2 years ago). I've been thinking about putting it in a smaller pot with fresh soil mix. Thoughts? Thanks!
I would say it's probably a good idea! It may delay flowering a bit, but it will be worth it for the long term health of the plant.
Can I pot hoya cuttings
Yes of course! You can root them in water first, or directly in soil (which you would need to keep moist to encourage rooting).
I have a passion for Hoya and not very successful at growing. This sight is the best thing since sliced bread. Thank you for sharing this information
You're very welcome Lorraine! I'm so happy that you enjoy my site 🙂
Hello Raffaele
I have a Hoya ( not sure what type but I think a Carnosa) and it is over 20 years old. Last transplant happened about 8 years ago. I made a huge mistake and overwatered it. Now having left it to dry out the leaves are all shrivelling and then falling off. Is the whole plant dying? Should I just transplant with your recommended soil mixture or is it a goner? It is huge and hanging in the northeast corner of living room. No direct light. Used to bloom like crazy!
Hi Brigitte. Are you sure you "overwatered"? When you saw the leaves were shriveling, did you feel the soil? Was it bone dry?