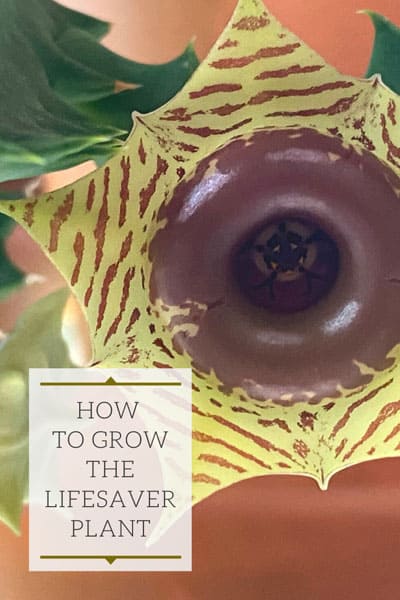
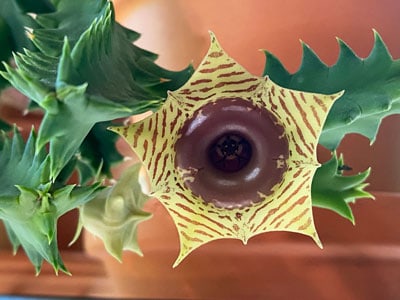
The lifesaver cactus, or Huernia zebrina, has unexpectedly become one of my favorite succulents. It is in fact not a cactus despite its common name!
I've also seen this plant listed as Huernia confusa and also Huernia insigniflora, but regardless what the proper scientific name is, it is an easy care succulent with incredible flowers.
Would you like to save this post?
Enter your email, and I will send this link straight to you!
It is easy to see where name lifesaver comes from because the central part of the flower looks like a lifesaver candy (or one could argue, a chocolate glazed donut!) and surrounded by 5 points with zebra-like stripes.
Table of Contents
LIFESAVER PLANT / HUERNIA ZEBRINA CARE
LIGHT
It is important to get the light right for this plant. These low-growing perennial succulent plants are native to low-altitude areas of eastern and southern Africa, and grow underneath other shrubs. They are actually in the milkweed family of plants.
Keeping this information in mind, you need to strike a balance with the light that you give your indoor Huernia. You need enough light to produce strong growth and flowering, but not too much light that can cause scalding.
Inside the home, the ideal location would be right in front of an Eastern facing window (morning sun) or a Western facing window (afternoon sun).
My own plant has been growing well and flowering in front of my Eastern window. Of course every window is different and you'll have to experiment.
Some indications of not enough light include weak growth and no flowering. On the other end, too much sun can start to produce reddish or purple coloring in your plant. If you see this, you may want to decrease the amount of direct sun just a bit.
A few hours of direct sun inside are necessary for good growth and flowering, but avoid harsh sun during mid-day.
TEMPERATURE
To be safe don't let your lifesaver cactus plant go below 50F (10C). If you move your plant outside during the warmer months, be sure to return it indoors before temperatures dip below this.
50-80F (10-27C) is a great growing range for this plant. Huernias can take down to 40F (4.5C) as long as they are kept dry and up to 100F (38C) as long as they're not in full sun. These extremes are not ideal for long periods of time though so try and avoid them.
POTTING MIX
All Huernias require very sharp drainage. There is no magic blend, as long as you have excellent drainage. The mix below is what I've been using and my plant is loving it!
I used 2 parts succulent/cactus soil with 1 part ¼" pumice (links to Amazon). Mix it up together, and it is a fantastic and very quickly draining medium for your lifesaver plant or ANY succulent!
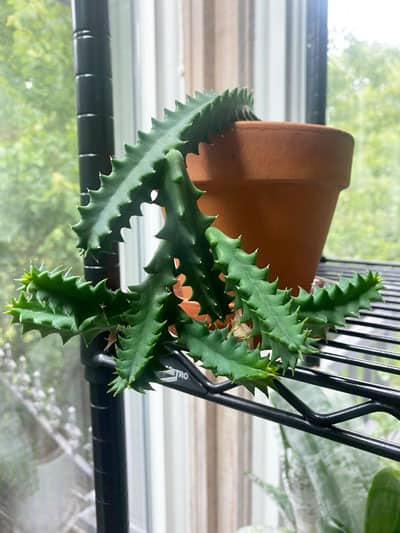
As far as pots go I prefer terra cotta pots for many reasons. They are heavier and make it less likely to knock over since the plants can be top heavy, and they will dry out more quickly than plastic pots.
Also, avoid pots that are unusually deep. Huernia roots experience root dieback during their cool season dormant period. If the pot is too deep, it will cause issues because the soil will take too long to dry out.
If you can find shallow pots, these would be ideal, but mine has been doing just fine in a standard, small terra cotta pot.
A spent Huernia flower
WATERING
I follow my standard watering for succulents. Water thoroughly, allow excess water to exit the drainage hole and wait until at least the top inch or two of soil is dry before watering again during the growing season.
You can (and I usually do) let the soil go completely dry during the growing season and this is fine as long as you don't let it stay completely dry for too long. Again, this is during the active growing season.
During active growth, as soon as the soil is completely dry, give it a good soaking, let it dry out again, and repeat.
During the winter time, you can keep the soil drier for longer periods of time.
FERTILIZING
As with succulents in general, avoid high nitrogen fertilizers and use ones that are low-nitrogen but high-phosphorus like Schultz Cactus Plus. Avoid fertilizing during the winter time.
If you prefer non-synthetic fertilizers, you can choose to mix in some blood meal or bone meal into the soil in the Spring.
PESTS and PROBLEMS
The most common pest that you may encounter are mealybugs. As with any pests, early detection is key to controlling them. The easiest and best method to treat mealy bugs on your lifesaver cactus is to manually remove the mealybugs that are visible, and then treat with a systemic houseplant insecticide.
This is a softer succulent, so be especially careful of conditions that can produce stem rot, including long periods of cool temperatures, especially if combined with wet soil.
If you notice any soft, dark spots on the stems, cut these areas off your plant.
FLOWERS
When my Huernia first bloomed, I was surprised because I was expecting bigger flowers. The flower are only about an inch in diameter or a little less.
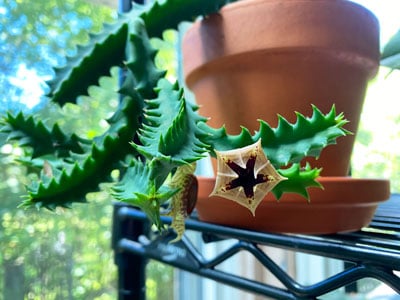
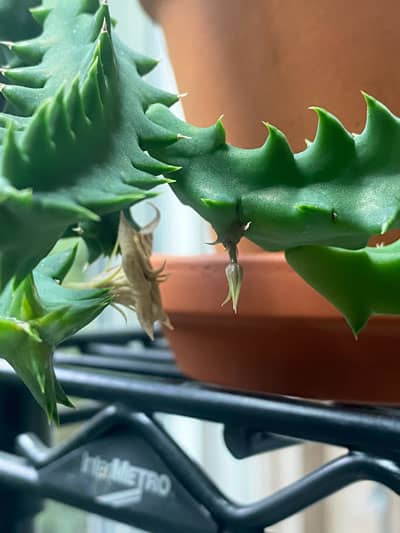
When the buds first appear, they'll look like the one in the photo below.
I've read some sources that say that the flowers sometimes produce a very foul scent similar to rotting flesh! Fortunately, I've never noticed this odor in my plant.
They are related to the Stapelia genus of plants, or Carrion Flower, and these DO have horrendously smelling flowers.
PROPAGATION
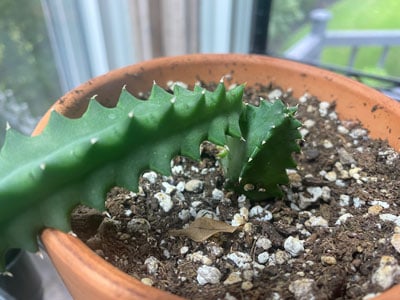
I propagated my own plant from a small one inch cutting that a friend sent me in the mail. It was the easiest thing I've ever propagated.
The original cutting was the vertical stem shown in the photo below.
All you have to do is cut off a portion of the stem, allow the end to dry and callous over for 3 or 4 days or so, and then simply insert it into a small pot of soil. It's as simple as that.
(You want to dry or callous the end in order to help prevent rotting.)
Water the pot, and wait until the surface dries out and keep repeating. Before you know it, you will see growth. My own plant took about 2 years before it bloomed, and this was all from a small 1 inch cutting.
Do you have a Huernia zebrina or lifesaver plant? Comment below. I'd love to hear!
I noticed that when my flowers begin to die, they shrivel up and then fall off the stem. It looks like a small seed. Has anyone tried to plant these? I just assume their seeds as they fall in the plant dish. Let me know what you think. If I try planting them, I’ll let you know the outcome.
Thanks! I’m having issues with my 2 year old plant and getting the buds to go from the bud to flower. The first bud started to form and then died before getting to the flower stage. But a new one was growing along side it at some point. They that second bud looked promising but then it died before getting to a flower stage and now a 3rd bud is right near it starting to grow. On the other side of the arm these buds were on a new arm was going. Were all the nutrients going to that arm causing premature bud death? Today I now noticed a totally new (2nd) bud off of this brand new arm that’s been growing for only 2 weeks. What’s causing this cycle of bud death and growth with no flowers? I’m so frustrated plant is in an East window. I live in Wisconsin. Plant gets adequate watering when leaves start to feel soft. Thanks in advance!
@Claire Hertig,
And sorry if this was confusing and hard to follow-I made a couple typos above!
Long story short I basically have buds that never make it to the flower stage. They all die off and are replaced by another bud right next to it that eventually dies off as well.


I noticed that when my flowers begin to die, they shrivel up and then fall off the stem. It looks like a small seed. Has anyone tried to plant these? I just assume their seeds as they fall in the plant dish. Let me know what you think. If I try planting them, I’ll let you know the outcome.
How long from the bud stage (pictured above) to full bloom flower?
Oh gosh, I don't remember...it would be a complete guess at this point 🙂 Probably a few weeks.
@Raffaele Di Lallo,
Thanks! I’m having issues with my 2 year old plant and getting the buds to go from the bud to flower. The first bud started to form and then died before getting to the flower stage. But a new one was growing along side it at some point. They that second bud looked promising but then it died before getting to a flower stage and now a 3rd bud is right near it starting to grow. On the other side of the arm these buds were on a new arm was going. Were all the nutrients going to that arm causing premature bud death? Today I now noticed a totally new (2nd) bud off of this brand new arm that’s been growing for only 2 weeks. What’s causing this cycle of bud death and growth with no flowers? I’m so frustrated plant is in an East window. I live in Wisconsin. Plant gets adequate watering when leaves start to feel soft. Thanks in advance!
@Claire Hertig,
And sorry if this was confusing and hard to follow-I made a couple typos above!
Long story short I basically have buds that never make it to the flower stage. They all die off and are replaced by another bud right next to it that eventually dies off as well.
Thank you for your advice.You make it sound so simple,I’m hoping I will get there one day. Kind Regards Lynette.
You're very welcome Lynette! Good luck!