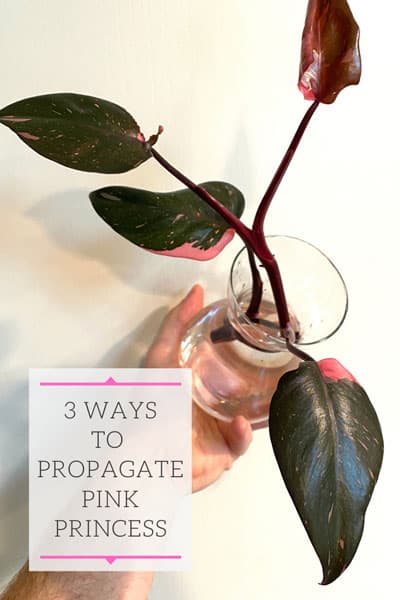
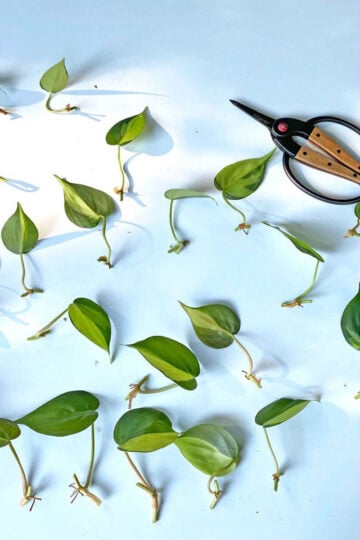
Want to learn the basics of how to propagate Philodendron Pink Princess and easily make more of this super popular, always out-of-stock plant? It is easier than you think, and I will teach you 3 easy ways to propagate your Philodendron erubescens 'Pink Princess'!
Would you like to save this post?
Enter your email, and I will send this link straight to you!
You may be familiar with some ways I'll show you, but I will also explain an unusual propagation method to get the most out of your Pink Princess and easily start several new plants!
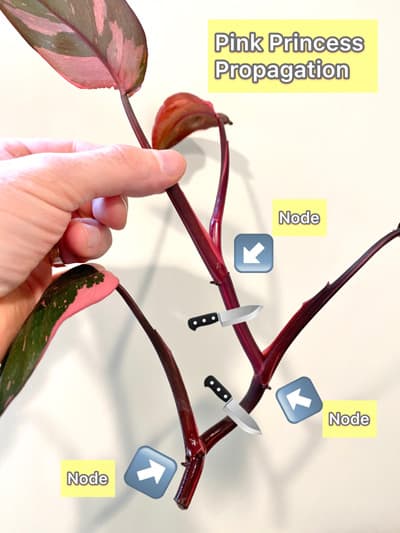
Before we go any further, let's take a look at the basic anatomy of the plant so that you have a basic understanding of the plant and how to propagate.
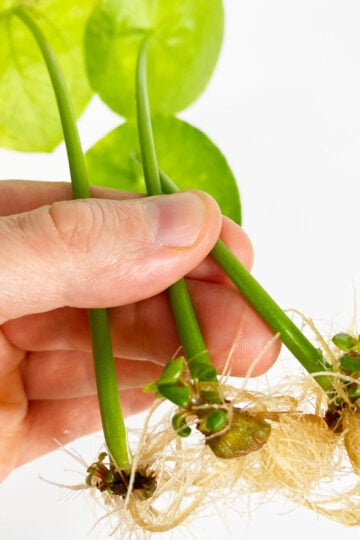
Check out the photo below of a cutting I made:
The area where each leaf meets the stem or vine is called a node. The node is where both roots and new growth will form.
You can see the aerial roots where the arrows are pointing. I could have taken this one cutting and made 3 separate cuttings if I wanted, but I wanted to have one nice plant because I raffled off this cutting for charity.
If I wanted to make multiple cuttings, I indicated where to cut with the knives in the photo.
At a minimum, you really just need one node to propagate.
Now let's take a look at 3 various methods to root and propagate your plant.
PINK PRINCESS PROPAGATION METHODS
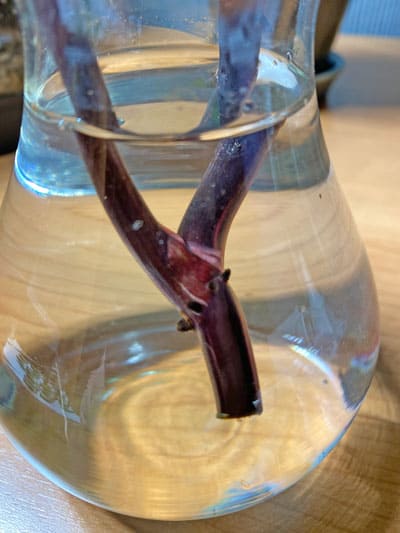
1. WATER PROPAGATION
Most of us are very familiar with this one, and it is very simple!
All you need to do is make sure you have one node (the part where the leaf meets the stem) under water, just like in the photo above.
You can see the aerial roots surrounding the node. After a few weeks or so, these roots will extend and grow in the water.
Make sure you have one or two leaves on each cutting.
You don't need to wait long after the roots start growing before putting the cutting in soil. You can transfer to soil after the roots are maybe an inch long or so. A little shorter or longer won't make a difference.
Just don't wait forever!
When you pot up your cutting into soil, I like to use 3 parts of a good potting mix like Miracle Gro and I add 1 part perlite to make it nice and fluffy. This is a great overall potting mix for your leafy tropicals.
Or you can purchase the AMAZING potting mixes from Oh Happy Plants. Use either the Tropical Climber Soil Blend or the Rainforest Soil Mix, and if you use my links, you will automatically receive 10% off at checkout for any products.
Don't use a huge pot when you're potting up your cutting. A 4 inch diameter pot is plenty for one cutting.
Once you have your cutting, instead of putting it in a vase of water like I did above, you can choose to plant it directly into a pot that contains a soil mix instead. For rooting in soil, I'd recommend a mix that is half soil and half perlite and you will want the node buried under the soil.
This method will require a little bit more baby sitting. You'll want to keep your potting mix fairly damp to encourage rooting. Don't ever let it dry out, especially for long periods, or roots may never form.
And don't worry about "overwatering." Since half of your potting mix is perlite, it introduces a lot of air and oxygen so it is pretty hard to "overwater." It is the lack of oxygen to the roots that causes root rot.
By adding enough perlite, we are able to maintain a moist medium that is needed for rooting, but it also helps to prevent rotting!
Increasing humidity is also helpful if you're doing soil propagation. You might want to loosely place a clear plastic bag as a tent over the cutting, use a humidifier, or place on a tray of moist pebbles.
The final way to propagate Pink Princess and easily increase your collection by a lot is...
3. BARE STEM CUTTINGS
This method is fun, and will result in quite a few plants! You will generally get a new plant at every single node! This method uses segments of the stem and no leaves at all.
This method is ideal if you have bare areas of stem. Or even if you have leaves that look a bit ratty so you can start fresh.
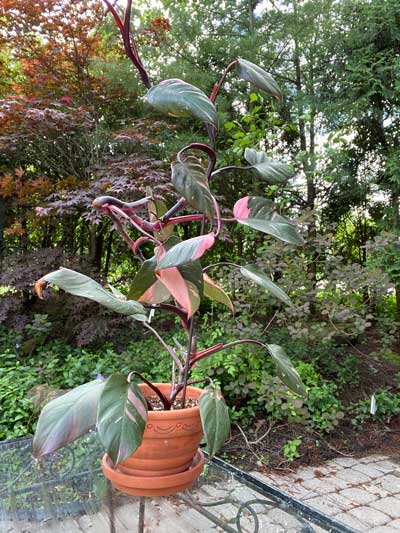
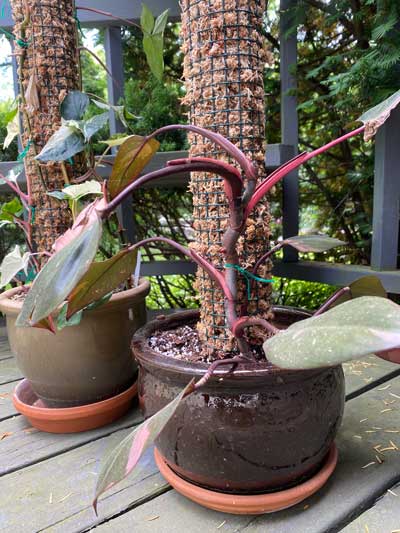
I didn't pay much attention to giving my plant a good support, so it grew with a really crooked stem.
I decided to take advantage of this situation to propagate, and give the original plant the moss post that it deserved from the beginning.
I cut most of the plant off to propagate and gave my original plant a DIY moss pole. I made my own and I can't believe I waited so long to do it! It was super easy and much better than anything commercially available.
With the rest that I cut off, I water propagated the tip cutting I showed earlier in this post, and then used the rest of the stem for bare stem cuttings.
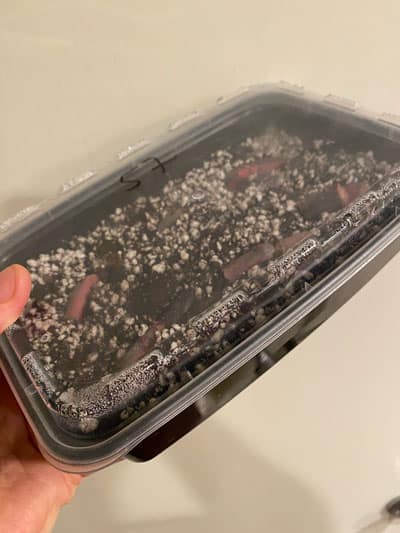
For this method, you want to use a container with a clear lid. Asian takeout containers are perfect for this!
Fill your container with a mixture of half potting soil and half perlite. Moisten the mixture but make sure you don't have any water accumulated at the bottom.
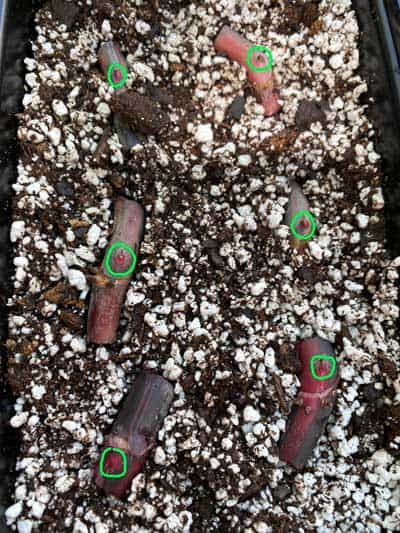
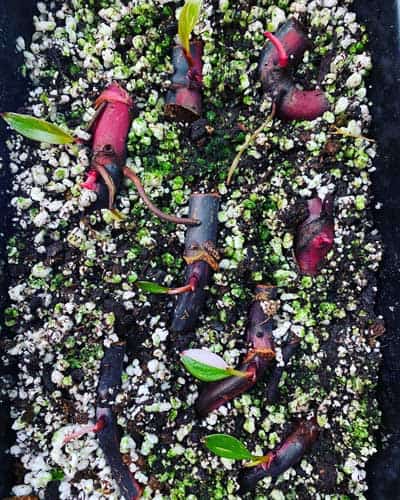
You're basically going to cut the stem on either side of each node and completely remove the leaves if you have any leaves. The segments I cut off were about 1 ½ inches long or so.
Then place each stem cutting half buried in the soil mix as shown below.
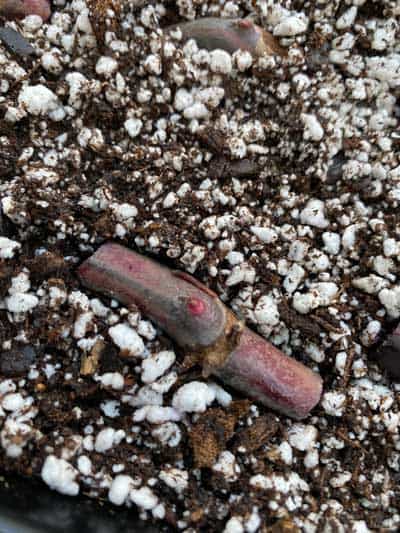
You'll want to place the "eyes" facing up. I circled the eyes above. They will appear as a slightly raised pink area. You can see the eye a little more clearly in the photo below.
The "eye" is where the cutting will start to grow your new plant! Be sure to remove the leaf completely off the stem so that it exposes the eyes.
If you don't see the eyes or aren't sure, just place the stem cuttings in the soil mixture anyway. Nature will still figure it out!
When you have placed all your stem cuttings in the soil mixture, close the lid and place it in a bright area, but out of direct sun so you don't cook your plants!
Be sure to only use containers with clear lids. You can also cover with clear plastic wrap if you don't have these types of containers handy.
The clear lid lets light through, but also keeps the humidity high which is so helpful for propagation. Every so often, I remove the lid for a few minutes just to air things out.
After a few weeks, you should start to get some growth! You will have best success if you propagate this way during the Spring or Summer when plants are actively growing.
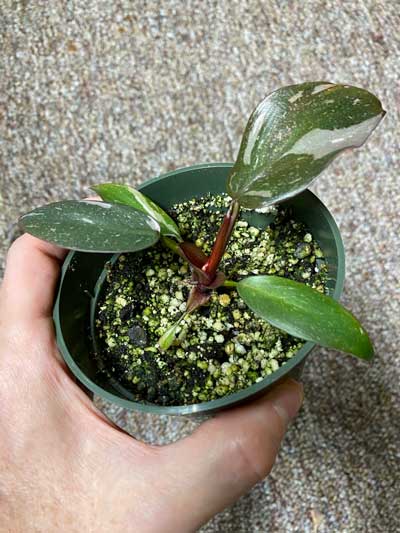
Here is one of the two containers after less than 2 months!
You will obviously have to remove the lid once growth starts to occur to allow for room. Be sure to keep the medium moist. Once the cuttings each have a leaf, you can transplant into its own pot.
After each stem cutting had at least a couple leaves, I went ahead and transplanted each into its own small pot. This time, I buried the original stem below the surface.
The fun part about this method is that you will have a lot of new plants and each one will be different. Not all will exhibit the same variegation, and you might just get the one gem that you've been looking for!
POTTING MIX VS. SPHAGNUM MOSS PROPAGATION
After I conducted the 3rd propagation method with bare stem cuttings in the takeout container, I made a few observations.
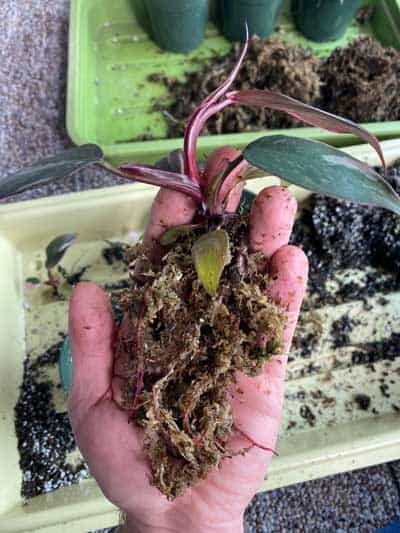
Once I removed the sprouted stem cuttings out of the take out container, I placed each one in a separate small pot. I placed some in a potting mix and perlite blend, and the rest is moist sphagnum moss. At this point, none of the cuttings had any root system yet, even though they all started to grow leaves.
I allowed them to grow for several weeks, and what I noticed though that the ones that I had moved into sphagnum moss went on to develop a beautiful root system, while the ones that I had moved into a potting mix STILL had no root system.
Take a look at the long, pink roots on this cutting that was growing in sphagnum moss. It grew quite a few roots and was quite vigorous!
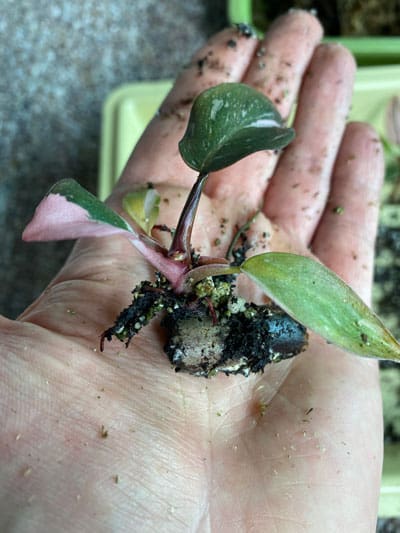
Now take a look at this cutting that was in the potting mix/perlite blend for a while. NO roots!
Every single one of the cuttings that I had transferred to sphagnum moss had developed a root system. NONE of the ones in potting mix/perlite had a root system. This led me to conclude, at least in this case, that propagation in sphagnum moss will lead to a superior root system development.
Once the ones growing in sphagnum moss grew a good root system, I transferred them to a pot with my normal potting mix (3 parts of miracle gro and 1 part perlite) to continue growing.
If I were to do this 3rd propagation method again , I would start all the bare stem cuttings in sphagnum moss from the start.
For any of the 3 Pink Princess propagation methods above, you may want to avoid doing this in the Winter to maximize success.
MORE RESOURCES
Be sure not to miss my other posts on Philodendron Pink Princess:
This blog post is the absolute most informative and detailed I have come across. THANK YOU x’s 100!!! You do an astonishing job at explaining the details. And the pictures…. I LOVE that you have pictures with specific things identified. It’s like you already know what questions are going through peoples head. I have recently discovered your website and I am in total awe at your thoughtfulness. I will be sharing your website from here on out and it will always be the first place I come to look for answers and suggestions. That being said, when the time comes I’m going to go through your page to order supplies and things since I know it will help you keep doing what you do. Much love and I hope all your plant dreams come true!! 💚
Awww, thanks so much for your comments Tiffany. I'm glad you enjoy my posts, and that they're helpful for you! Thanks for taking the time to comment. It keeps me going!
Hello! My plant is definitely on the decline since propagating it, so much so that I’m left with bare stems and two dying leaves. The plant originally had so many aerial roots that they were old and brown and also appeared lifeless. I took a top cut and trimmed back the aerial roots because they were 4-5 inches long of dead growth. (Plant was never given support) This top cut has been in water for about a month, with an inch or less of viable aerial root left. Curious to know your thoughts here on if you have any experiences obtaining plants with obscenely long aerial roots with little viability. I have also trimmed the bare stem and took a bare stem cutting in a takeout container with moist moss. Fingers crossed for something!
Hi Deborah! From what you've described, it sounds like the aerial roots did not receive enough moisture and they shriveled and died. Perhaps they grew long in search of moisture and didn't find it and they eventually shriveled up. This could come from a number of things. Keeping your potting mix too dry, and also having dry air, will cause this. I hope this helps a bit! It's important to know why your plant declined. My hunch is that perhaps you kept the soil too dry.
Hi! I was wondering if this one that I bought has a chance to grow roots? Not sure if it was cut correctly. It was a cutting wherein it had a left, right, and middle leaf, then the seller cut off the middle one to sell, so what I bought was the one with the left and right so I have a stump in the middle and then of course the stem. It's hard to explain but I couldn't attach a photo.
HI Phoenix! Yes, that would work as well! Sphagnum is great for propagating and you can transfer later to potting mix. I personally prefer the soil/perlite so I don't have to change mediums, but sphagnum should work well for you to get your cuttings started.
Hi! I was fortunate enough to be gifted a bare stem cutting. It has 2 eyes on the vmcutting, will these both develop into their own plant, and should I make a cut between the two eyes so they're separated? They are on each end of the cutting.
Hi Carlie! Yes, you can certainly do that. Each should grow its own plant! I would love to see a photo though to be sure. Can you send me a photo? Just use the contact form on my website, and when I reply, you can attach a photo.
Thank you. You state different propagation methods clearly better than in the youtube (some of the youtuber just mention one or two particular methods).
I bought this plant yesterday and I noticed it developed long aerial roots on every node. Should I cut off the aerial root and then wrap the node with sphagnum moss? Because I’m afraid those roots might be dry.
You're very welcome Lia! I would still leave the aerial roots. If the roots are still exposed after you wrap with sphagnum, you can always mist the roots. If they aren't too dry, they may still start to grow again. Good luck!
I have two PPP that were taken from a larger plant. They have been growing since 2016 and have grown significantly! For some reason, there is about 10 inches between the active plant growth and the soil, meaning 10 inches of bare stem. Can I propagate the section with leaves? Will the bare stem (that does have nodes, and I'm assuming a great root system) produce leaves?
Hi Megan! If you trim your plant back, as long as it is healthy and you leave some nodes on the bare stem, it will grow back. It sounds like you should have no problem because the plant sounds vigorous. Then you can also use the sections with leaves to propagate more as well. Hope this helps!
Hi! I received a small PPP rooted plant in moss. When I tried to plant it the moss stuck to it. I couldn't get it completely off. So when I planted it all the leaves slowly died. I luckily was able to water propagate it successfully, but I'm scared it'll go into shock going from water to soil. What do you think? Thank you!
Hi Bianca. What you experienced could have just been from shock from the plant being shipped or transported, so you should be OK to place it in potting mix once it is rooted. Hope this helps!
Hellom thank you for sharing these helpful tips.I just took a pair of scissors to my PP to experiment with some different propagation methods. I usually water propagate, but I'm trying out spag propagation with some cuttings that have no leaves and just a node. My question is about how much spag to use and how deep to bury the cutting? I noticed you put the cutting halfway into the soil, does the same guidance apply to spag? I'm worried I'm going to mess this up and rot them all so appreciate your feedback.
Hi Samantha! It doesn't really matter how much sphagnum moss you use, as long as you can keep it moist. I wouldn't bury it completely. Just about half way or so like I showed in my photo. Good luck!
Thanks for this beautiful article,
I found very informative and I have read your the other philodendron Pink Princess care as well. I have recently bought the Philodendron Pink Princess and it is about 40ish cm tall and only has 1 leaf that has pink colour, the rest only 1-2 has pink small drop.
Wondering if this still have hope to have more pink? reading about your article saying goodbye to pink princess if all green, make me a bit of nervous that will happen to mine, I would like to send a photo or video to show mine to you if possible to consult
Hi there! Yes, you can go ahead and send me some photos. If you're on Instagram, you can DM me @ohiotropics. Otherwise, feel free to write to me using my contact form on the website, and once I respond, you can attach some photos.


This blog post is the absolute most informative and detailed I have come across. THANK YOU x’s 100!!! You do an astonishing job at explaining the details. And the pictures…. I LOVE that you have pictures with specific things identified. It’s like you already know what questions are going through peoples head. I have recently discovered your website and I am in total awe at your thoughtfulness. I will be sharing your website from here on out and it will always be the first place I come to look for answers and suggestions. That being said, when the time comes I’m going to go through your page to order supplies and things since I know it will help you keep doing what you do. Much love and I hope all your plant dreams come true!! 💚
Awww, thanks so much for your comments Tiffany. I'm glad you enjoy my posts, and that they're helpful for you! Thanks for taking the time to comment. It keeps me going!
Hello! My plant is definitely on the decline since propagating it, so much so that I’m left with bare stems and two dying leaves. The plant originally had so many aerial roots that they were old and brown and also appeared lifeless. I took a top cut and trimmed back the aerial roots because they were 4-5 inches long of dead growth. (Plant was never given support) This top cut has been in water for about a month, with an inch or less of viable aerial root left. Curious to know your thoughts here on if you have any experiences obtaining plants with obscenely long aerial roots with little viability. I have also trimmed the bare stem and took a bare stem cutting in a takeout container with moist moss. Fingers crossed for something!
Hi Deborah! From what you've described, it sounds like the aerial roots did not receive enough moisture and they shriveled and died. Perhaps they grew long in search of moisture and didn't find it and they eventually shriveled up. This could come from a number of things. Keeping your potting mix too dry, and also having dry air, will cause this. I hope this helps a bit! It's important to know why your plant declined. My hunch is that perhaps you kept the soil too dry.
Hi! I was wondering if this one that I bought has a chance to grow roots? Not sure if it was cut correctly. It was a cutting wherein it had a left, right, and middle leaf, then the seller cut off the middle one to sell, so what I bought was the one with the left and right so I have a stump in the middle and then of course the stem. It's hard to explain but I couldn't attach a photo.
I will send you an email and you can attach photos so I can take a look.
Great methods. Thanks for sharing !!!
Thanks so much for the info! Do you think I could skip the soil/perlite entirely and use sphagnum in the humidity tray?
HI Phoenix! Yes, that would work as well! Sphagnum is great for propagating and you can transfer later to potting mix. I personally prefer the soil/perlite so I don't have to change mediums, but sphagnum should work well for you to get your cuttings started.
Amazing article and wonderful follow through on tips! I'm using your tricks as I type!
Glad you enjoyed it Erica! :-). Good luck!
Hi! I was fortunate enough to be gifted a bare stem cutting. It has 2 eyes on the vmcutting, will these both develop into their own plant, and should I make a cut between the two eyes so they're separated? They are on each end of the cutting.
Hi Carlie! Yes, you can certainly do that. Each should grow its own plant! I would love to see a photo though to be sure. Can you send me a photo? Just use the contact form on my website, and when I reply, you can attach a photo.
Awesome information clear to understand too😊
Thank you
Glad you enjoyed it Josie 🙂
Thank you. You state different propagation methods clearly better than in the youtube (some of the youtuber just mention one or two particular methods).
I bought this plant yesterday and I noticed it developed long aerial roots on every node. Should I cut off the aerial root and then wrap the node with sphagnum moss? Because I’m afraid those roots might be dry.
Thank you.
You're very welcome Lia! I would still leave the aerial roots. If the roots are still exposed after you wrap with sphagnum, you can always mist the roots. If they aren't too dry, they may still start to grow again. Good luck!
@Raffaele, Thank you very much for sharing the info. 👍🏻👍🏻👍🏻 I will try to propagate as soon as possible.
I love how the way you explained the methods you’ve tried. Thank you so much for sharing this 😊
Glad you enjoyed it Josephine 🙂
Hello! Do you let the cutting callous over before either of the methods?
Hi Ashley! It's not necessary in this case, and I did not do this for any of these methods that I showed in the post. 🙂
I have two PPP that were taken from a larger plant. They have been growing since 2016 and have grown significantly! For some reason, there is about 10 inches between the active plant growth and the soil, meaning 10 inches of bare stem. Can I propagate the section with leaves? Will the bare stem (that does have nodes, and I'm assuming a great root system) produce leaves?
Hi Megan! If you trim your plant back, as long as it is healthy and you leave some nodes on the bare stem, it will grow back. It sounds like you should have no problem because the plant sounds vigorous. Then you can also use the sections with leaves to propagate more as well. Hope this helps!
Hi! I received a small PPP rooted plant in moss. When I tried to plant it the moss stuck to it. I couldn't get it completely off. So when I planted it all the leaves slowly died. I luckily was able to water propagate it successfully, but I'm scared it'll go into shock going from water to soil. What do you think? Thank you!
Hi Bianca. What you experienced could have just been from shock from the plant being shipped or transported, so you should be OK to place it in potting mix once it is rooted. Hope this helps!
Do you Rinse the moss off before switching to soil/perlite?
I gently removed most of it with my hands, taking care not to break and roots.
Hellom thank you for sharing these helpful tips.I just took a pair of scissors to my PP to experiment with some different propagation methods. I usually water propagate, but I'm trying out spag propagation with some cuttings that have no leaves and just a node. My question is about how much spag to use and how deep to bury the cutting? I noticed you put the cutting halfway into the soil, does the same guidance apply to spag? I'm worried I'm going to mess this up and rot them all so appreciate your feedback.
Hi Samantha! It doesn't really matter how much sphagnum moss you use, as long as you can keep it moist. I wouldn't bury it completely. Just about half way or so like I showed in my photo. Good luck!
Hi Raffaele,
Thanks for this beautiful article,
I found very informative and I have read your the other philodendron Pink Princess care as well. I have recently bought the Philodendron Pink Princess and it is about 40ish cm tall and only has 1 leaf that has pink colour, the rest only 1-2 has pink small drop.
Wondering if this still have hope to have more pink? reading about your article saying goodbye to pink princess if all green, make me a bit of nervous that will happen to mine, I would like to send a photo or video to show mine to you if possible to consult
Regards
Hi there! Yes, you can go ahead and send me some photos. If you're on Instagram, you can DM me @ohiotropics. Otherwise, feel free to write to me using my contact form on the website, and once I respond, you can attach some photos.