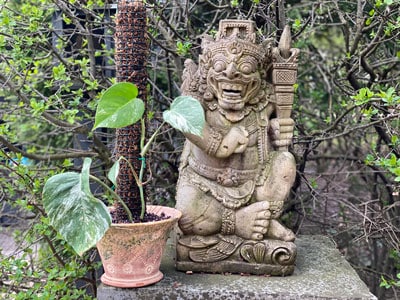
Have you been looking for the best moss pole to support your indoor plants? Maybe for your pothos, monstera, philodendron or any other climbing plants? The truth is that the best one out there is one that you can EASILY make yourself in 7 simple steps!
I've been disappointed with moss poles available on the market, and they are expensive on top of all this! I'll show you how you can make an amazing, high quality moss post that is better and cheaper than any you will find on the market!
Would you like to save this post?
Enter your email, and I will send this link straight to you!
The inspiration and process for how to make this moss pole was taken, with permission, from a fabulous account on Instagram @craigmilran.
Craig is an amazing interior plant designer who has done incredible things with his plant collection. I highly recommend you follow Craig!
It is higher quality and much more sturdy and durable than pre-made ones that you can purchase.
It is easy to make and it only requires 3 or 4 materials!
You can easily extend the moss pole as your plant grows, so you can make a small moss pole or a large one and customize the size.
Your plants will literally grow into the moss pole and help transform the juvenile leaves on your climbing houseplants into larger mature leaves. Be the envy of your plant friends!
I can't believe I waited this long to make my own moss posts! Without further ado, here is how you can make your own moss totem. Be sure to reference the materials list with links at the very end of this post for your convenience.
For a FREE printable version of the instructions below (free of ads), scroll to the bottom of this post and download your free printable so you can refer to it again and again!
DIY Moss Pole
4.7 Stars (23 Reviews)
Make your own moss totem pole for your climbing plants! It is so easy that you will wonder why you haven't done it yet!
Prep Time5 minutes
Active Time30 minutes
Total Time35 minutes
Materials
½" 19 gauge PVC coated hardware mesh (either 2 ft x 5 ft, 3 ft x 5 ft, or any other size that you can find.)
Vigoro 100 ft. Plastic Coated Wire Twist with Cutter
Sphagnum Moss
Optional: Vigoro Plastic Coated Stakes (4 ft or 6 ft)
Tools
Pair of scissors, wire cutters or pruning shears.
Instructions
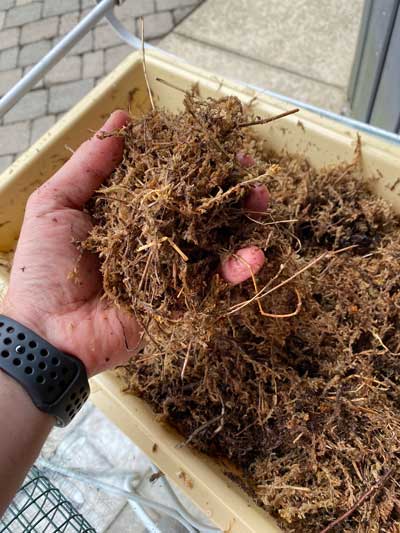
STEP 1: SOAK YOUR SPHAGNUM MOSS IN WATER
Obviously the amount of sphagnum moss that you need depends on how big your moss pole is, so go conservative so that you don't have a bunch of wet sphagnum moss left over! You only need to soak it for a minute or two, but you can leave it soaking until you are ready to use it.
If you run out of moistened moss as you're working, you can easily and quickly soak more.
I just used a plastic tray and added warm water. Swish the moss around to make sure that everything gets wet and set this aside while you work on the next steps. You can also use a bucket or a sink to soak the moss.
If you find other sizes of hardware mesh, that's fine! Just make sure the wire mesh is coated with PVC so that it is more durable and wont rust. I found one that is ½" x 4ft x 25 ft so this will give you 4 foot tall moss poles. The roll is 25 feet long so if you anticipate making a lot, you can get this one!
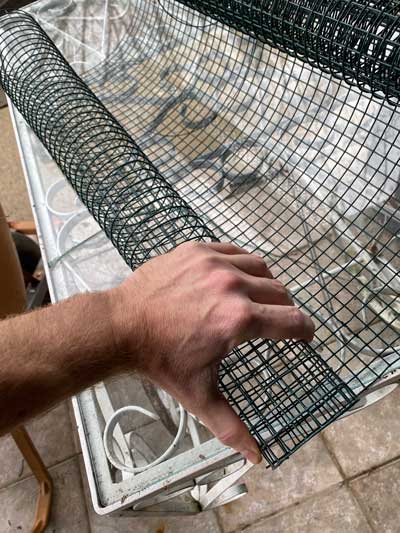
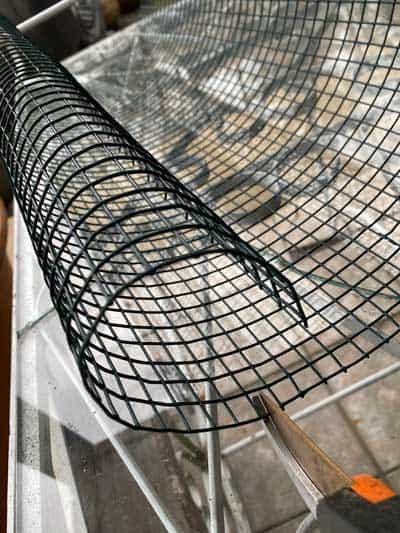
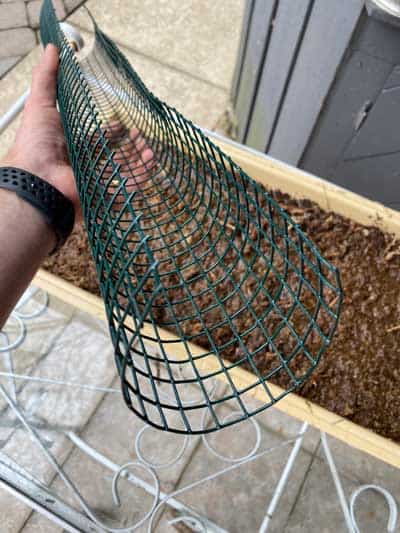
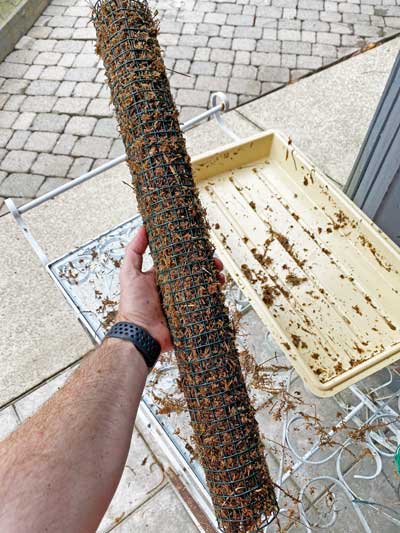
Carefully bend the hardware mesh into a cylinder as shown in the photo below. You can make the diameter as big or small as you want, but it becomes harder to make really small diameter ones. The one I made in this how-to is about 8 ½ inches in circumference and it was very comfortable to form with my hands.
STEP 3: CUT THE HARDWARE MESH
Use a pair of wire cutters, scissors or pruners to cut your piece of mesh for the pole.
STEP 4: FORM THE HARDWARE MESH INTO AN OPEN CYLINDER
Next, form it into an open cylinder, allowing enough room for the next step where you add your sphagnum moss.
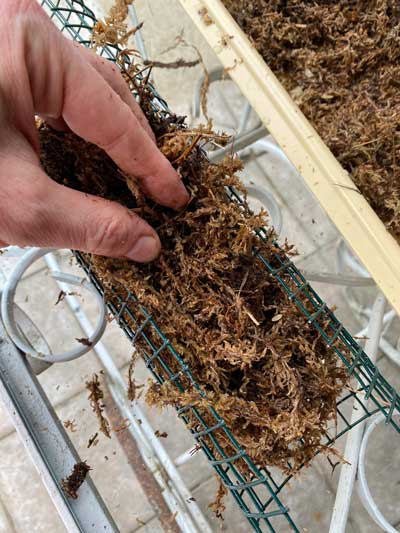
STEP 5: FILL THE CYLINDER WITH PRE-MOISTENED SPHAGNUM MOSS
Squeeze any excess water out of your sphagnum moss and start filling your your entire cylinder with the moss!
You'll want to add a good amount so that when you close your cylinder, the moss is snug. Over time, the moss will start to degrade and get looser, so make sure it is completely filling the cylinder and that you gently pack it down.
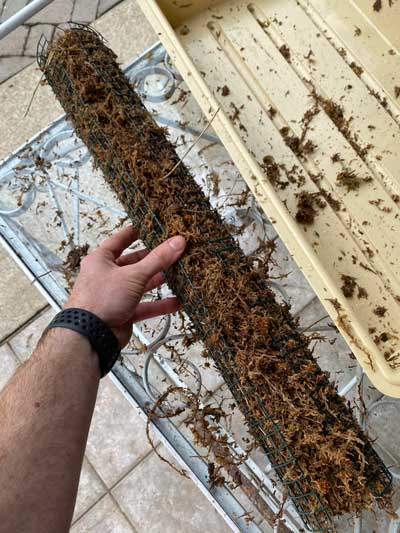
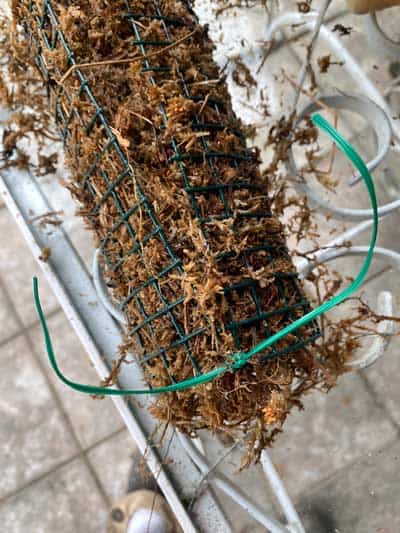
STEP 6: STITCH UP THE CYLINDER WITH PLASTIC COATED WIRE TWIST
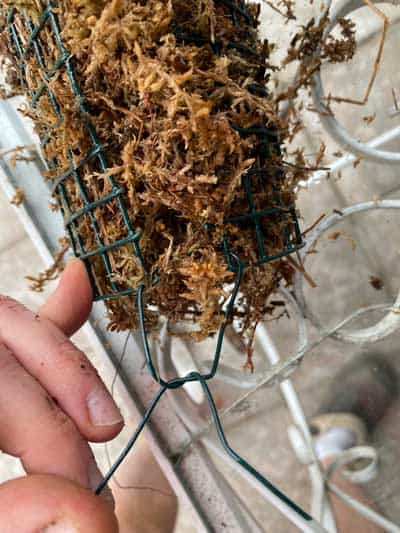
Now it's time to "sew" up your cylinder and finish your project! Grab your roll of plastic coated wire twist, and start at one end of the cylinder.
Don't cut the wire twist until after you tie a couple knots together to close the cylinder. In the photo below, my hand is holding the long end of the wire roll. This will help with tightening.
After you have added a couple knots and closed the cylinder, you can cut the wire, but you want both pieces of wire on either ends of the knot to be about 3 inches long or so.
Continue adding these stitches about every 6 inches or so until your cylinder is complete!
The reason you are leaving longer twists attached to the pole is for the future when you may need to reinforce your moss pole for a heavier plant. I'll talk about this a bit later.
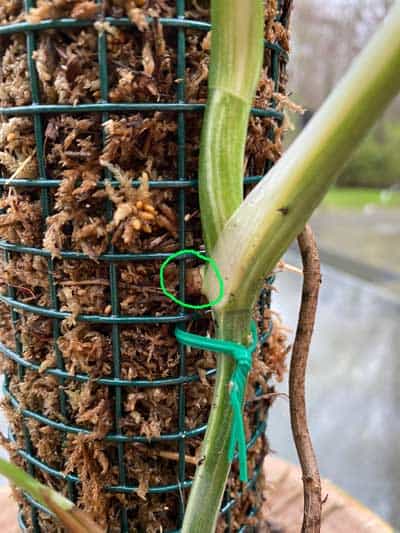
STEP 7: REPOT YOUR PLANT OF CHOICE AND ADD THE MOSS POLE
Lastly, place the moss pole at the bottom of an empty pot. Place the plant in next and tie the plant against the moss pole. And finally, fill in with your potting mix!
Next, cut more plastic coated wire twists to secure your plant's stems to the moss pole. In the photo below, there was an aerial root growing on my Monstera (circled) and I secured it right below so that the root can grow into the moss.
Simply slip a piece of the wire twist under one square of the mesh grid and twist it around the stem to secure it.
That's it! You're done for now!
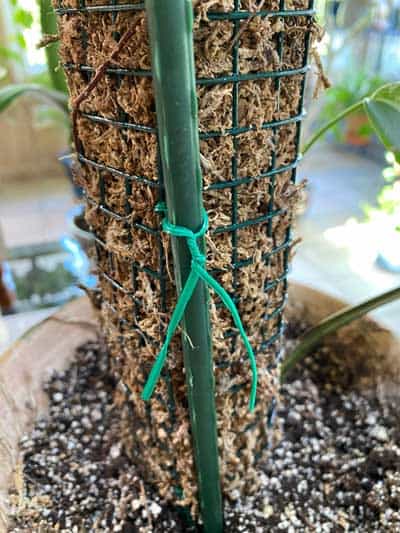
REINFORCING THE MOSS POLE FOR HEAVY PLANTS
It is not necessary though, but if you have a heavier plant, you can reinforce your moss pole for more strength. Simply use a plastic coated stake to reinforce the moss pole, and then you can use the ties that you had left attached to the moss pole when you first stitched it up, to tie the stake as in the photo below.
You can get a plastic coated 4 ft stake, or a 6 ft stake. There may be other sizes out there, but just choose one that is the same length as the moss pole you are trying to reinforce.
You can add the plastic coated stake in the beginning, or insert it later and then simply twist the plastic coated twists that you already have on the moss pole.
Reinforcing the moss pole with a stake is also helpful if you are extending your moss pole. At some point, your plant will reach the top of your moss pole. Once this happens, you can either cut the plant if it extends beyond the height of the pole, or you can extend your moss pole. Here are the steps, and I will add pictures soon once I do this again. It is basically the same as what you already did when you made your original moss pole, except this time you will be working vertically this time on top of the original moss pole.
EXTENDING YOUR MOSS POLE
Measure the circumference of your existing moss pole that you want to extend.
Measure this exact amount on your roll of hardware mesh and cut it.
Form it into a loose cylinder shape just like you did before.
Wrap the cylinder around the top of the existing moss pole. You will want to overlap about 3 square or so. Use your plastic coated wire twist to secure the new cylinder all around the perimeter.
Start packing moist sphagnum moss down into the new cylinder. Make sure that it is packed down pretty good at the bottom where the old moss pole meets the new cylinder.
As you fill the cylinder, use your plastic coated wire twist to stitch the cylinder together every 6 inches or so until you reach the top.
When you're done, go back to where the old moss pole and and the new pole that you just attached meet. Add more plastic coated wire twists to reinforce this area if needed.
If needed, add one of the plastic coated support stakes and secure it tightly against the moss pole with the plastic coated twists.
Did you make this project?
Please leave a comment on the blog or share a photo on Instagram
PLANTS TO USE A MOSS POLE ON
You can add a moss totem to any climbing plant! The benefit is that many plants, once they grow securely attached to your moss pole, will grow mature leaves that will look substantially different from their juvenile leaves.
Some examples of plants that you can add a moss pole on include, but are not limited to:
Be sure to water your moss pole whenever you water your plant. Misting will be too hard, so take your plant to the sink, wash tub, bath tub or shower and thoroughly soak the moss pole and you can water your plant at the same time! The most efficient and easiest way to water is to make an easy self watering moss pole set up.
Allow your moss pole to dry out somewhat in between watering, but never let it get bone dry or it will become harder to re-wet.
Be sure to continue to use the plastic coated wire twists to train your vines as they grow, and securely tie them to the moss pole. If you notice aerial roots on the vines, place these right against the moss pole and tie the vine to the pole. This will encourage the roots to grow into the pole.
When you first place your moss totem in your pot, secure your plant to it and fill the pot with soil, your totem should be pretty stable. But be careful for a while when you move it. Once the plant and roots grow, the totem will be even more stable.
Once your plant reaches the top of the moss pole, you can either chop the top of the plant off if it grows beyond the top, or you can extend your totem!
Lastly, if you want your moss pole to be a certain size, and you want this size from the beginning and don't want to extend it later, you can just simple stitch two cylinders together from the beginning.
Let's say that you have a 2 ft tall roll of hardware mesh but you want a 4 ft moss pole. Simply make two matching cylinders and join them together end to end in the beginning with the plastic coated twists!
Then you can proceed as normal with the instructions in this post. I would recommend using the plastic coated stake to reinforce your posts though since you joined 2 together. This will make your moss pole stronger.
MATERIALS LIST
Here is a materials list with different options from Amazon.
Comment below if you make a moss pole following these instructions. They are fun to make, and so much better than anything you will find available pre-made!
RELATED POSTS
Moss poles are commonly used with Monstera deliciosa. You may also want to check out my Monstera Problems post if you have having any problems with your plant.
MOSS POLE QUESTIONS
Do I need a moss pole for my Monstera?
You don't need a moss pole, but some kind of support is definitely needed since they are vining plants, especially for Monstera deliciosa which will eventually get too large. A moss pole is one good option.
What can I use instead of a moss pole?
There are multiple other supports if you don't want to use a moss pole, and these include rough wood plants, bamboo and more. Read my blog post on best supports for houseplants to explore these options a little further.
Do you need to wet a moss pole?
Yes, do you do need to wet your moss pole so that your plant's roots can more easily grow into the moss. It doesn't have to stay wet all the time, but try and at least check it weekly, and try not to keep it completely dry for too long.
Download my free DIY Moss Pole Tutorial below (free of ads!) If you haven't signed in, click below to sign up for Grow for free, and unlock this exclusive content and more for FREE.
Thank you so very much. I have been looking for something like this. I must say that you knocked it out of the park. Very easy to understand, and everything was laid out perfectly. I can't wait to get started. Thank you again.
Hi Raffaele, appreciate your informative post. I was wondering if I can use plastic mesh that has no metal wiring in it for the moss pole? Would it be able to support a heavy plant?
How do I stabilize the pile into the pot with my plant? Does the moss filled wire mesh pole go down into the dirt with the roots of the plant, or how do I make it stand up if not? Also, how would I go about repotting my plant to a larger pot if it’s aerial roots are growing inside the pole? Thank you.
Hi Angie, the moss pole as I describe it in this post is wide enough that it will stand on its own. And as the plant grows more roots in the pot, it will become even more stable. The base of the pole rests right at the bottom of the pot, so it's best added when you repot. It would be too difficult to add to an existing pot. For repotting a plant that already has this pole and aerial roots growing into it, you'd keep the pole in place and you can always extend the pole by adding more on top. Or if you want to propagate the plant, you can actually cut off part of the pole with the plant attached to it and then plant that part into a new pot.
Hi,can I use Peat Moss in place of sphagnum peat ? I have 3 bags of this that I want to use up, and my babies, especially my Swiss cheese plant needs a pole.
Thanks
Hi Angela! No, I would not recommend using peat moss. You need the more open, airy structure of sphagnum moss for moss pole in order to allow for enough air to the roots. Also, peat moss would probably start coming out of the pole itself and cause a mess.
Hi Raffaele and thank you for your very helpful guide which I'm about to try out. I'm making the pole for a Monstera which has grown too big and is in a state of collapse.
How do I keep the moss pole wet if the plant and pot are too big to move to a tub/shower?
Look forward to hearing from you.
Vanessa (UK)
I saw someone once make a round indentation into the moss at the very top of the moss pole and then they turned a bottle of water upside down into that hole and let it soak into the moss pole. That could be a good option!


")


Thank you so very much. I have been looking for something like this. I must say that you knocked it out of the park. Very easy to understand, and everything was laid out perfectly. I can't wait to get started. Thank you again.
So glad you enjoyed it Mary! 🙂
This is great, thank you!
You're very welcome Vanessa!
Hi Raffaele, appreciate your informative post. I was wondering if I can use plastic mesh that has no metal wiring in it for the moss pole? Would it be able to support a heavy plant?
Hi Timothy! Depending on how sturdy it is, it's possible, but it would be better to use one with metal wiring on the inside.
How do I stabilize the pile into the pot with my plant? Does the moss filled wire mesh pole go down into the dirt with the roots of the plant, or how do I make it stand up if not? Also, how would I go about repotting my plant to a larger pot if it’s aerial roots are growing inside the pole? Thank you.
Hi Angie, the moss pole as I describe it in this post is wide enough that it will stand on its own. And as the plant grows more roots in the pot, it will become even more stable. The base of the pole rests right at the bottom of the pot, so it's best added when you repot. It would be too difficult to add to an existing pot. For repotting a plant that already has this pole and aerial roots growing into it, you'd keep the pole in place and you can always extend the pole by adding more on top. Or if you want to propagate the plant, you can actually cut off part of the pole with the plant attached to it and then plant that part into a new pot.
How much sphagnum moss did you use for the pole you made? The good stuff is pricey and I don't want to buy too much
It's hard to say since I've never measured it exactly, but if you get a package, it should be more than enough for a 2 foot pole.
Hi,can I use Peat Moss in place of sphagnum peat ? I have 3 bags of this that I want to use up, and my babies, especially my Swiss cheese plant needs a pole.
Thanks
Hi Angela! No, I would not recommend using peat moss. You need the more open, airy structure of sphagnum moss for moss pole in order to allow for enough air to the roots. Also, peat moss would probably start coming out of the pole itself and cause a mess.
Hi Raffaele and thank you for your very helpful guide which I'm about to try out. I'm making the pole for a Monstera which has grown too big and is in a state of collapse.
How do I keep the moss pole wet if the plant and pot are too big to move to a tub/shower?
Look forward to hearing from you.
Vanessa (UK)
I saw someone once make a round indentation into the moss at the very top of the moss pole and then they turned a bottle of water upside down into that hole and let it soak into the moss pole. That could be a good option!
Your content is SO helpful. So glad I fell into the rabbit hole that led me to you.
I really appreciate how generously you share your knowledge.
I'm so happy to hear that Kitty! Thanks for taking the time to comment 🙂