If you are looking for a strange and exotic houseplant, Epiphyllum oxypetalum, or Queen of the Night, definitely fits that ticket. Sometimes you will also see this plant named Night Blooming Cereus, or more generically as orchid cactus, but if you follow me on my blog and on my Instagram (@ohiotropics), you know how I feel about common names! Why should you grow Epiphyllum oxypetalum?
Would you like to save this post?
Enter your email, and I will send this link straight to you!
They are a cinch to grow
They grow quickly
They are very exotic and unusual looking
They produce some of the most stunning flowers you will ever see
They bloom only at night so this adds quite a bit of intrigue! I have a story about this later...so keep reading
Before I go into the care of this plant, I wanted to inspire you with the beauty of the flowers. This is why we grow these plants after all!
But if you snooze you lose with this plant. The flowers are only open one night and are closed by dawn!
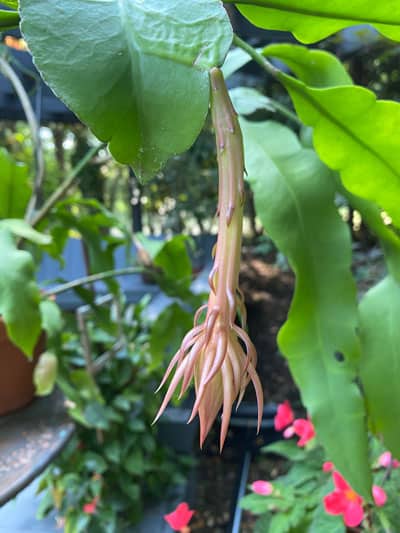
This is a photo of the bud on August 27, 2020. I didn't document when I first noticed the bud starting to grow, but it was definitely sometime in August of 2020.
Epiphyllum oxypetalum flower bud
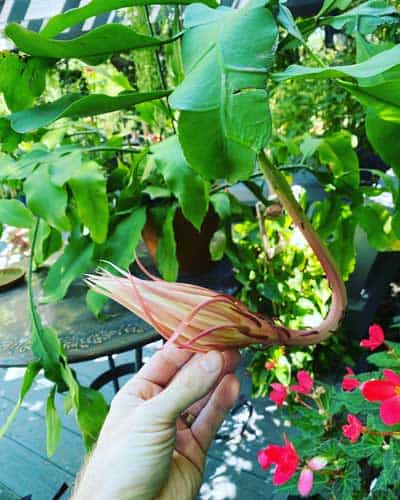
This is the same flower bud on on September 4, 2020. I know from experience that it was going to open that evening. You can see that the bud changed orientation and became horizontal and the bud grew substantially.
The flower bud a few hours before it opened
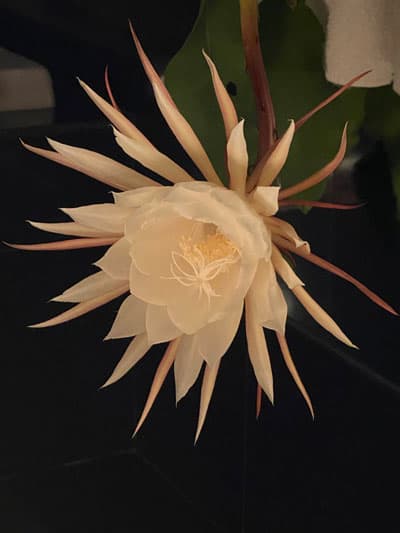
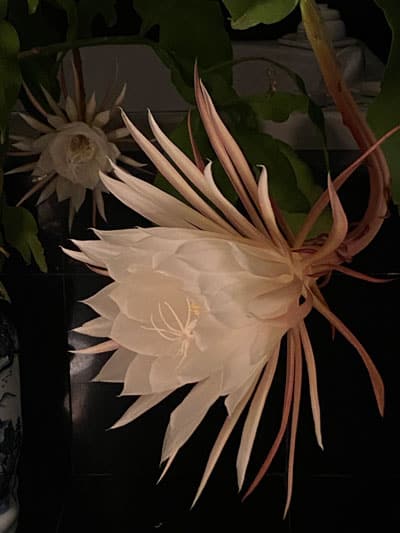
Isn't it spectacular! The photo below shows one of the two flowers that opened on the evening of September 4th. It also has a lovely scent. I didn't measure the flower since I was doing a time lapse video, but I estimate that the flower was 9-10 inches (about 23-25cm) in diameter.
Fully open flower
You can see both flowers that opened below. The night that they opened, we left the house at 6:45pm. The bud was still closed then. By the time we came back home shortly after 9pm, both flowers were fully open.
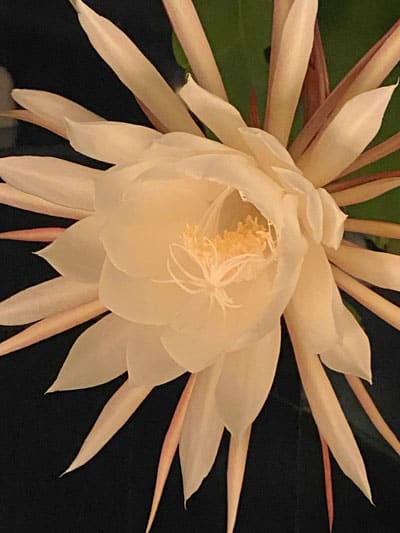
Here is a closeup.
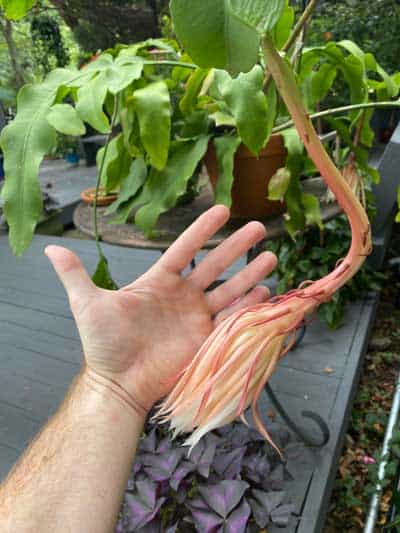
By about dawn the next morning, the flower had already expired. I included my hand in the photo below for scale. It was truly a spectacular, fleeting moment of beauty!
Ephiphyllum Oxypetalum in Nature
It's always wise to take a cue from where and how plants grow in nature, so that we can better understand how to grow them in our homes.
This plant is actually a species of jungle cactus, and is related to what you may know as "orchid cactus" (which is not an orchid at all, but it is a cactus.) Hey, at least half of the common name is accurate.
Epiphyllums are native to parts of Mexico, and Central and South America. For the most part, they are largely epiphytic, like most orchids and bromeliads.
This means that they grow on tree trunks or branches. They will send out growth and ramble among the canopy.
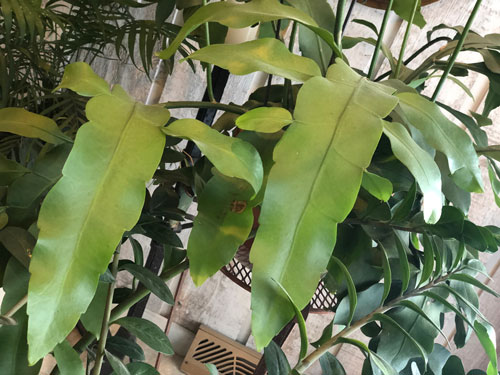
Since these are actually cacti, just like their desert relatives, this means that they have no leaves. The "leaves" are actually modified stems!
Light
As I mentioned, these plants are epiphytes and grow in shadier locations in the jungle. So be sure not to give them TOO much direct sun, but at the same time if you place them in too dark of a location, they will not bloom for you.
Years ago, I had propagated an Epiphyllum oxypetalum from my great aunt. She would always trade cuttings with other ladies from work, so she gave me some cuttings.
It grew into a monster as a floor specimen, and it actually reached the ceiling!
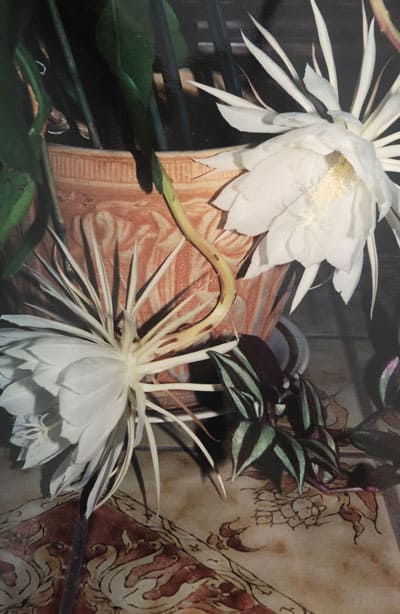
It was so long ago, but I was fortunate enough to have kept a picture of when it started blooming. I will reveal the secrets of how I got it to bloom later. Isn't it gorgeous?
I no longer have the plant in the photos below since I left it behind, but all the photos you just saw further up in this post are from my plant currently in 2020.
For this Epiphyllum oxypetalum that I had growing up, it grew in front of a large southern facing window. In the winter, the blinds were wide open and it was able to take those conditions.
During the rest of the year, the direct sun was filtered with blinds so that it received very bright, but indirect light, for most of the year.
This really proved to be a great location for this plant. Remember, it can not take too much direct sunshine.
Many, many years later, I obtained another one for myself and it lives happily in front of an Eastern window.
These plants are often sold in hanging baskets, but I prefer mine as either floor plants, or on plant stands. They will end up looking awkward eventually in a hanging basket, and grow much too large.
I do like to grow them in a heavy pot, either terra cotta or a ceramic pot, because they can get top heavy.
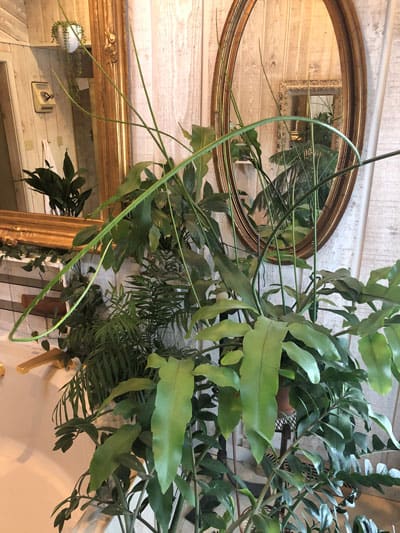
Long Shoots on Epiphyllum
Have you ever wondered what the long shoots are on your Epiphyllum oxypetalum, or maybe on your other species of Epiphyllum? Take a look at the wild and crazy stolons on my plant below:
After going considerable research, the long growths that you see are very normal. In the wild, Epiphyllum oxypetalum will send out long stolons and then attach onto a tree with the roots.
If you look closely at the photo, you can see little roots along the stolons. This is the natural growth habit and how the plant will move around the tree canopies, possibly in search of better light!
Epiphyllum Oxypetalum Potting Soil
Being epiphytic plants, these plants really need a very loose, well drained potting mix. The Epiphyllum Society of America recommends using a camelia or azalea potting mix, to which you would add perlite and bark.
If you don't want to purchase a camelia or azalea potting mix, you can do what I do. I've achieved perfectly good results with my custom blend of materials that I always have on hand.
I'll use whatever all-purpose potting mix I have on hand, and then I like to mix in some perlite and moth orchid bark mix. Remember, epiphytes need an airy potting mix and demand superior drainage.
These are all materials that I ALWAYS have on hand. I rarely use a potting mix anymore without amending it somehow to suit various plants.
I don't have any strict measurements. Just take your all-purpose potting mix, add a couple handfuls of perlite and a couple big handfuls of the orchid bark, and it will be a far superior potting mix for any of your epiphytic jungle cacti!
How Do You Get Orchid Cactus to Bloom?
Proper light is always #1 when it comes to getting any plant to flower the way it should.
Another way to encourage blooming in many plants, including Epiphyllum oxypetalum, is to make sure that you don't put them in too large of a pot. They do like to be somewhat root bound, so don't go crazy repotting.
If you do need to repot, only go up one or two pot sizes larger than where you started.
Use a general houseplant fertilizer, or one that is a low-nitrogen fertilizer such as the Schultz cactus fertilizer that I love using on all my succulents and cacti.
I like to use this fertilizer on all my succulents and cacti (whether the cacti are desert cacti or tropical cacti like Epiphyllum), from about February or so until about October. I will typically not fertilize from October through January.
But here is a secret weapon. I had experimented with this and it produced fantastic results to get my Epiphyllum oxypetalum to bloom abundantly.
Want to know what sparked my Epiphyllum oxypetalum into bloom?
Dried Banana Peels for Fertilizer
You read it correctly! Dried banana peels for fertilizer! Years ago, when I grew the giant Epiphyllum oxypetalum at my parents' house before I moved out, I had read about a trick to help encourage plants to bloom.
The plant was almost up to the ceiling, huge and several years old. But no blooms! It was getting plenty of light, so that certainly was not the reason why it wasn't flowering.
So I dried some banana peels, mixed them into the soil, and within a short time, the plant started growing the gorgeous, exotic blooms!
Whether this was coincidence or not, dried banana peels are a wonderful way to supplement your houseplants with readily available nutrients.
How to Dry Banana Peels
There are multiple ways that you can dry banana peels. Cut them up into small sections to speed up the drying process and then use one of the following methods to dry them:
You can use a food dehydrator.
You can dry them in the oven at 160F with the door slightly propped open or ajar. Please don't forget about the oven though. Safety first!
You can place them on top of a wire mesh or screen outside in full sun, with another screen on top so animals don't get to it. You will have to repeat this for a few days, and bring them inside or in a sheltered location at night so condensation doesn't wet the banana peels.
Use any of the above methods, but the end goal is to have very, very dry and crispy banana peels.
Once you have thoroughly dried out the banana peels, you can either use them as is, or you can use a food processor or a high powered blender and beat up the dried banana peels into a powder or smaller chunks.
This will speed up the availability of the nutrients once you add it to the soil.
Then simply take some of the dried banana peels and top dress your pot with them. Incorporate them into the top layer of the soil, and water them in if your plant is dry.
Why do banana peels make amazingly wonderful fertilizer for flowering plants?
Use dried banana peels in conjunction with your regular fertilizer because banana peels contain no nitrogen, which is needed for leafy growth.
The NPK analysis on dried banana peels is 0-3-42. The banana peels will break down more quickly than other organic fertilizer that you purchase.
The Potassium, Phosphorus and Calcium the peels provide will be very beneficial for your plants, whether they are flowering plants or not.
Why not give your plants a boost with dried banana peels? The bananas are healthy for you to eat, and then you can make your own fertilizer with the peels.
Just make sure that you use it in conjunction with other fertilizers since banana peels contain no Nitrogen, which is also important for plant growth.
Add your homemade banana peel fertilizer around the end of winter, in the February to March timeframe. See what happens! You may just get lucky enough to get flowers.
Keep in mind that a plant typically will need to be at least 3 years old before flowering can occur.
Watering Epiphyllum Oxypetalum
Be careful not to let your pot dry out completely. For most of my plants, in larger pots, I like to use the rule of thumb of letting the top inch to two inches dry out, and then I water thoroughly.
Don't let your Epiphyllum sit in water for extended periods. As epiphytes in nature, they demand excellent drainage and should never sit in water for any extended period.
Epiphyllum Oxypetalum Flowers
Epiphyllum oxypetalum typically bloom in Spring or Summer. And one word of caution! The flowers will open up at night and if you get up too late the next day, they will be completely done! They only last one night!
You can imagine the excitement after my gigantic plant bloomed for the first time. I noticed the buds starting to grow off the modified stems and watched them grow day by day.
Be sure to check them every night though, because if you miss the critical one night that the flower is open, you will be very disappointed!
The flowers that you see in the photo above were a full 9 inches in diameter! Amazing!
They also have a lovely fragrance, and although their flowers last but only one night, they are totally worth it. If you are lucky, your plant may put out multiple flowers.
Placing Your Epiphyllum Outdoors
Another very beneficial thing for your Epiphyllum is to place them outdoors when the weather is warm enough.
Wait until the night time temperatures are consistently a minimum of 55F or so before you place them outside.
Houseplants can greatly benefit from summering outdoors, especially epiphytes such as Epiphyllum, orchids, and bromeliads.
Be sure to place your plant in complete shade first so it doesn't burn. Your plant will have spent a long time indoors in less than ideal conditions, so your plant will need time to harden off.
Keep it in complete shade for several days. Then you can maybe move it to an area with dappled sun, or maybe just a touch of morning sun. Avoid harsh mid-afternoon sun or your plant may quickly burn.
Propagating Queen of the Night
Propagating Epiphyllum oxypetalum is very easy.
Select a leaf to cut and cut off a 4-6 inch portion or so from the tip of a leaf. Take multiple cuttings if you'd like.
Dip the end of the cutting that you cut into a rooting hormone.
I always have this rooting hormone on hand for soil propagation projects. It will increase your chances, and speed, of rooting. It is inexpensive and well worth it.
This step is critical! Be sure that you then place your cutting(s) in a cool and relatively darker area for a good two weeks, or close to it. Why?
Because you need to let any succulent or cactus (remember, this is a tropical cactus) dry out and callous over where the cut is so that you can minimizing rotting.
Then simply insert them in an epiphyllum potting mix that I described earlier in this post. Use a smaller pot, maybe 4 or 5 inches. Or 6 inches at the most if you have multiple cuttings.
Insert the cutting about an inch deep or so and make sure that it is secure and not flopping around.
Wait at least 7-10 days before watering. Then give it a light water. Keep it on the dry side with occasional watering when the medium is dry to almost completely dry.
After new growth is visible, then you can start a regular watering regiment.
Other Resources
For other blog posts that relate to the topics of this post, please visit these useful articles that will elaborate on topics that were not fully covered in this post:
Check out this blog post on summering your houseplants outside. It goes in depth on how to properly make the transition so your plants don't undergo shock.
So there you go! So whatever you call it...Epiphyllum oxypetalum, Queen of the Night or any other common name, this is one of the most unusual, delightful plants that you can easily grow indoors.
And few plants can match the flower power of Epiphyllum oxypetalum! Just don't get up out of bed too late or you may miss the flowers...
I have had this epiphyllum for 50 years..or a cutting from the original when it got too out of control. It has NEVER flowered. It's lived in an east window in Las Vegas, a south facing greenhouse in Summit County, Colorado. I've tried outside in the summer in the sun/in the shade in various rooms in houses in Utah. It lived in a sunny eastern window in Alaska with 22 hours of filtered sunlight. It is now back in Colorado - spent the summer outside in the shade - lived through the first snow last week - I took cuttings before I left it out....nothing - nada - and 50 years later I still haven't thrown the darn thing out. I keep promising myself I will get it to flower.....so good luck to the rest of you....
Wow 50 years old! Have you fertilized the plant? If you haven't I would start. Consider using a bloom booster type fertilizer in the spring and summer next year and see if that does the trick!
I have a Epiphyl oflum Oxypetalum plant
Since four years.It bloom recently in June and again last night.The size andthe fragrance is excellent.I have propagated three leaves dropped from the same plant.All the three growing well with new leaf. Now I want to increase the size of the older pot.I hope your above article will help me in repotting.Kindly suggest when to repot so that plant health and blooming will not be effected. Thanks for your above article.
I have a Queen of the Night plant that is 60+ years old and maybe as old as 80. It was given to me. The blooms are beautiful! I need to repot it, as it is very pot bound. Should I wait until after it blooms to disturb it? It lives on my screen porch during the summer and in my garage during the cold months.
Wow, that sounds incredible! When does yours usually stop flowering? As long as it's not too late in the season. Otherwise I would wait until the Spring. I'm curious about your garage. Is it a heated garage with windows?
Thank you for sharing the 'secret recipe'. My mom gave us a plant few years ago. We have it at the large south facing window in living room and for years it never bloom. Finally, we had one flower bloom in 2018. After that year, we discovered your blog and added dried banana peels to the plant. In 2019, we got several flowers, and in couple of 'waves'.
One question I have is, in mid-spring, May time frame here in US Pacific Northwest, the 'first wave' bud just 'die', meaning, the bud will grow big and shape like fish-hook, then, they will slowly turn pink-ish and eventually go droopy and die, but never bloom. This has happen to us two years in a row. Any idea why the buds just die like that? too much sun perhaps in the large south facing window?
Was your soil moisture inconsistent? Did it go too dry perhaps for a while? Sometimes plants still terminate their flower buds if soil moisture is inconsistent. They don't like to be in too much direct sun, so if it's sitting in all day direct sun, you may want to decrease it a bit too.
Hey, I stumbled upon your site while searching for information on overwintering my Amaryllis bulb. I saw that the next article was on the Night Blooming Cereus, I had to read it. My grandmother obtained a cutting of this plant and grew it to enormous proportions, well over 6 feet tall and spanning a wall/picture window of over 8 feet. I recall her feeding it bone meal. It would bloom for her at least once a year, and she made sure to let me know when, so I could spend a few days with her during blooming. We would stay up and have tea while the blooms opened. I loved the scent of them. I found it would begin to fill the house days before opening and then linger for days after. I would love to get one to grow on my own, as she is long gone. Can you advise me as to where I might obtain one? Your articles are great by the way, I have become a follower. Thank you so much for igniting this special memory for me.
Hi,
I just received a rooted night blooming cereus cutting. Do you have any care tips? I potted it in cactus soil upon reviving it and it seems to be doing okay but I’ve only had it for a couple days so it’s hard to say.
Hi - we have a healthy queen of the night that produces flowers every two years. Recently, it has grown very large tendrils that are slightly taking over the lounge! Should I prune these near their joining onto the main stems to help the plant put more energy into growing flowers, or are flowers likely to next come off possible future leaves on the tendrils? There are no leaves on the tendrils, which I suppose is normal? If you give me your email I can send you photographs. Thanks
Hi Lucas! I know exactly what you mean. Those tend to grow when there are periods of lower light (like in the winter time). In nature, these stolons keep growing until they find more light and then the plant will continue to grow from there. In the home, I think you are perfectly fine to chop those thin stolons off. I do the same because otherwise the plant just takes up so much room! The flowers will grow on the big, flat leaves (which are actually modified stems) so go ahead and chop those thin growths off!
I have 2 plants. I got cuttings from a friend. In July it will be 2 years old. No flowers yet. I repotted them in a large container last year. The pots are 18.5 in tall and at the top it is 18 in wide. You mentioned that they don’t need to be in a big pot. Is my pot too big? Should I report them in a smaller pot?
Can I use grow lamp on them? I live in WI so it gets cold here.
Hello, it's hard to say without actually seeing your plant, but those are extremely large pots. I would probably repot them into a pot that is more appropriate for the size of the root ball. Feel free to send me a photo though so I can take a look and see how large your plants are.
Good morning Sir,
I have 3 epiphyllum plants. And they bloom regularly. But for years I have been searching the use of its flowers. And didn't get any adequate information. Please can you explain the use of its flowers? Is the flowers consumable? By the way I am from Mauritius. Thanks in advance. Best regards
Hi, can you please help me out? I've been thinking about putting my spider plant and queen of the night together in a terra cotta pot. Will they survive together? I'm not too worried about water and sun because I give them both the same watering and light condition and they're doing fine. I'm only worried that both of them tend to be pot-bound. So will they hinder each others growth? I felt like you're the only one who could have an answer after reading your post. You're very experienced and insightful. Love from Bangladesh.
Thank you Hema :-). You probably could put them together, but I personally would keep them apart. Spider plants will eventually have very vigorous root systems, and Epiphyllums like to be pot bound, but it might be too overwhelming depending on how big the pot is. It is certainly possible, but you may be creating a bigger problem! Just my thoughts.
Hi Carole! It's probably no reason to be alarmed. I'd have to see a photo, but can you tell me if the plant is growing a lot of direct sun? This can cause that coloration. As long as the leaves aren't burning, you should be ok! But if you are growing in tons of sun, you may want to diffuse that direct sun a bit. Otherwise, if your plant looks OK, there is no reason to change! If you provide some more details, I can tell you for sure 🙂
Hello
I was given a lager plant about 9 months ago. It is doing very well in as much as it is growing. I've used the banana peels too and am watering properly.
It has loads of new stalks growing up to the ceiling, but like Sharon's comment above, lots of stalk no new leaves. Do the stalks eventually turn into leaves? Thanks Jim
I've had my plant from cuttings of an aquantance for about a year. The 'leaves' haven't gown at all nor has it produced more leaves. It has produced the skinny canes. How do I get it to grow more leaves? It is quite an unattractive plant with all the 'leaves hanging down in an unattractive way rather hugging the pot. Any suggestions? I haven't overwatered. Thanks, Sharon
Hi Sharon. The skinny canes commonly occur in the winter where there is poor light. If you've had it for a year and it hasn't grown, the first question that pops in my mind is do you have your plant in too dark of a location? How far from a window is it? If it is not directly in front of a window, move it there now. Maybe reread the light section of the post. Eastern and Western exposures would be good. South may be too much sun but if you can filter the sun with blinds or sheer curtains, that would be good. North windows would work too, but are the least ideal. Also, are you watering it thoroughly?
Hello
I was given a lager plant about 9 months ago. It is doing very well in as much as it is growing. I've used the banana peels too and am watering properly.
It has loads of new stalks growing up to the ceiling, but like Sharon's comment above, lots of stalk no new leaves. Do the stalks eventually turn into leaves? Thanks Jim
Hello
Do the stalks turn into leaves?
Thanks
Jim
They'll sometimes have a leaf of two, but if you have a bunch of them and you can't stand them, you can cut them off. Those long growths tend to happen in the winter when there is less light.


I have had this epiphyllum for 50 years..or a cutting from the original when it got too out of control. It has NEVER flowered. It's lived in an east window in Las Vegas, a south facing greenhouse in Summit County, Colorado. I've tried outside in the summer in the sun/in the shade in various rooms in houses in Utah. It lived in a sunny eastern window in Alaska with 22 hours of filtered sunlight. It is now back in Colorado - spent the summer outside in the shade - lived through the first snow last week - I took cuttings before I left it out....nothing - nada - and 50 years later I still haven't thrown the darn thing out. I keep promising myself I will get it to flower.....so good luck to the rest of you....
Wow 50 years old! Have you fertilized the plant? If you haven't I would start. Consider using a bloom booster type fertilizer in the spring and summer next year and see if that does the trick!
I commented on 15th August,but I haven't received any reply.kindly respond to the quories.
I have a Epiphyl oflum Oxypetalum plant
Since four years.It bloom recently in June and again last night.The size andthe fragrance is excellent.I have propagated three leaves dropped from the same plant.All the three growing well with new leaf. Now I want to increase the size of the older pot.I hope your above article will help me in repotting.Kindly suggest when to repot so that plant health and blooming will not be effected. Thanks for your above article.
I have a Queen of the Night plant that is 60+ years old and maybe as old as 80. It was given to me. The blooms are beautiful! I need to repot it, as it is very pot bound. Should I wait until after it blooms to disturb it? It lives on my screen porch during the summer and in my garage during the cold months.
Wow, that sounds incredible! When does yours usually stop flowering? As long as it's not too late in the season. Otherwise I would wait until the Spring. I'm curious about your garage. Is it a heated garage with windows?
Really this is very useful.I have succeeded by following the above-mentioned procedures.Thanks.
Glad it was helpful! 🙂
I've water started stem cuttings. They just take off. Fun to watch them grow.
Yes, they're very fun to watch how they progress!
Hi Rafaele,
Thank you for sharing the 'secret recipe'. My mom gave us a plant few years ago. We have it at the large south facing window in living room and for years it never bloom. Finally, we had one flower bloom in 2018. After that year, we discovered your blog and added dried banana peels to the plant. In 2019, we got several flowers, and in couple of 'waves'.
One question I have is, in mid-spring, May time frame here in US Pacific Northwest, the 'first wave' bud just 'die', meaning, the bud will grow big and shape like fish-hook, then, they will slowly turn pink-ish and eventually go droopy and die, but never bloom. This has happen to us two years in a row. Any idea why the buds just die like that? too much sun perhaps in the large south facing window?
Was your soil moisture inconsistent? Did it go too dry perhaps for a while? Sometimes plants still terminate their flower buds if soil moisture is inconsistent. They don't like to be in too much direct sun, so if it's sitting in all day direct sun, you may want to decrease it a bit too.
Hey, I stumbled upon your site while searching for information on overwintering my Amaryllis bulb. I saw that the next article was on the Night Blooming Cereus, I had to read it. My grandmother obtained a cutting of this plant and grew it to enormous proportions, well over 6 feet tall and spanning a wall/picture window of over 8 feet. I recall her feeding it bone meal. It would bloom for her at least once a year, and she made sure to let me know when, so I could spend a few days with her during blooming. We would stay up and have tea while the blooms opened. I loved the scent of them. I found it would begin to fill the house days before opening and then linger for days after. I would love to get one to grow on my own, as she is long gone. Can you advise me as to where I might obtain one? Your articles are great by the way, I have become a follower. Thank you so much for igniting this special memory for me.
Hi Dawn, thank you for sharing your lovely story! What a beautiful memory! You can actually get one of these at Logees. Here is a link for you! https://www.logees.com/night-blooming-cereus-epiphyllum-oxypetalum.html
Hi,
I just received a rooted night blooming cereus cutting. Do you have any care tips? I potted it in cactus soil upon reviving it and it seems to be doing okay but I’ve only had it for a couple days so it’s hard to say.
I would follow the same care as in this post.
Hi - we have a healthy queen of the night that produces flowers every two years. Recently, it has grown very large tendrils that are slightly taking over the lounge! Should I prune these near their joining onto the main stems to help the plant put more energy into growing flowers, or are flowers likely to next come off possible future leaves on the tendrils? There are no leaves on the tendrils, which I suppose is normal? If you give me your email I can send you photographs. Thanks
Hi Lucas! I know exactly what you mean. Those tend to grow when there are periods of lower light (like in the winter time). In nature, these stolons keep growing until they find more light and then the plant will continue to grow from there. In the home, I think you are perfectly fine to chop those thin stolons off. I do the same because otherwise the plant just takes up so much room! The flowers will grow on the big, flat leaves (which are actually modified stems) so go ahead and chop those thin growths off!
Good afternoon,
I have 2 plants. I got cuttings from a friend. In July it will be 2 years old. No flowers yet. I repotted them in a large container last year. The pots are 18.5 in tall and at the top it is 18 in wide. You mentioned that they don’t need to be in a big pot. Is my pot too big? Should I report them in a smaller pot?
Can I use grow lamp on them? I live in WI so it gets cold here.
Thank you for your article.
Tang
Hello, it's hard to say without actually seeing your plant, but those are extremely large pots. I would probably repot them into a pot that is more appropriate for the size of the root ball. Feel free to send me a photo though so I can take a look and see how large your plants are.
@Raffaele
How do you want me to send the picture? Email?
Good morning Sir,
I have 3 epiphyllum plants. And they bloom regularly. But for years I have been searching the use of its flowers. And didn't get any adequate information. Please can you explain the use of its flowers? Is the flowers consumable? By the way I am from Mauritius. Thanks in advance. Best regards
Hi Ashwani. I really have no idea if the flowers are edible or not...sorry I can't help!
Hi, can you please help me out? I've been thinking about putting my spider plant and queen of the night together in a terra cotta pot. Will they survive together? I'm not too worried about water and sun because I give them both the same watering and light condition and they're doing fine. I'm only worried that both of them tend to be pot-bound. So will they hinder each others growth? I felt like you're the only one who could have an answer after reading your post. You're very experienced and insightful. Love from Bangladesh.
Thank you Hema :-). You probably could put them together, but I personally would keep them apart. Spider plants will eventually have very vigorous root systems, and Epiphyllums like to be pot bound, but it might be too overwhelming depending on how big the pot is. It is certainly possible, but you may be creating a bigger problem! Just my thoughts.
Hi
the stalks of my plant have turned yellow and pink! Any idea of the problem please?
Hi Carole! It's probably no reason to be alarmed. I'd have to see a photo, but can you tell me if the plant is growing a lot of direct sun? This can cause that coloration. As long as the leaves aren't burning, you should be ok! But if you are growing in tons of sun, you may want to diffuse that direct sun a bit. Otherwise, if your plant looks OK, there is no reason to change! If you provide some more details, I can tell you for sure 🙂
Hello
I was given a lager plant about 9 months ago. It is doing very well in as much as it is growing. I've used the banana peels too and am watering properly.
It has loads of new stalks growing up to the ceiling, but like Sharon's comment above, lots of stalk no new leaves. Do the stalks eventually turn into leaves? Thanks Jim
I've had my plant from cuttings of an aquantance for about a year. The 'leaves' haven't gown at all nor has it produced more leaves. It has produced the skinny canes. How do I get it to grow more leaves? It is quite an unattractive plant with all the 'leaves hanging down in an unattractive way rather hugging the pot. Any suggestions? I haven't overwatered. Thanks, Sharon
Hi Sharon. The skinny canes commonly occur in the winter where there is poor light. If you've had it for a year and it hasn't grown, the first question that pops in my mind is do you have your plant in too dark of a location? How far from a window is it? If it is not directly in front of a window, move it there now. Maybe reread the light section of the post. Eastern and Western exposures would be good. South may be too much sun but if you can filter the sun with blinds or sheer curtains, that would be good. North windows would work too, but are the least ideal. Also, are you watering it thoroughly?
Hello
I was given a lager plant about 9 months ago. It is doing very well in as much as it is growing. I've used the banana peels too and am watering properly.
It has loads of new stalks growing up to the ceiling, but like Sharon's comment above, lots of stalk no new leaves. Do the stalks eventually turn into leaves? Thanks Jim
Hello
Do the stalks turn into leaves?
Thanks
Jim
They'll sometimes have a leaf of two, but if you have a bunch of them and you can't stand them, you can cut them off. Those long growths tend to happen in the winter when there is less light.