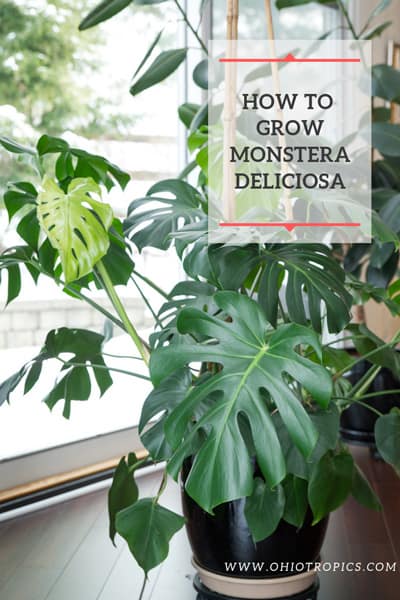
Monstera deliciosa care is easier than you think! This post is the ultimate guide on growing Monstera deliciosa, and I will also show you some remarkable tips and tricks on repotting Monstera as well so that you can be the best plant parent that you can be!
Would you like to save this post?
Enter your email, and I will send this link straight to you!
This plant was once popular a few decades ago, and it is back with a vengeance! Monstera deliciosa is one of the trendiest houseplants that you can grow these days.
Not only are they a striking houseplant, but they are also very easy to grow and a fantastic beginner plant! Anyone can grow a Monstera!
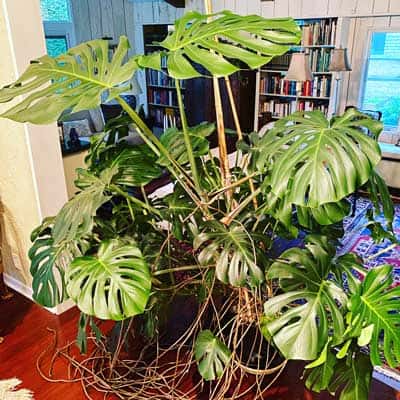
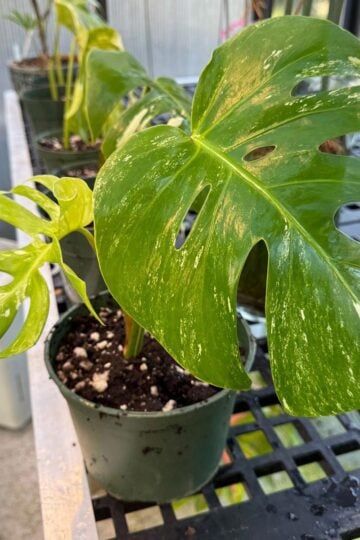
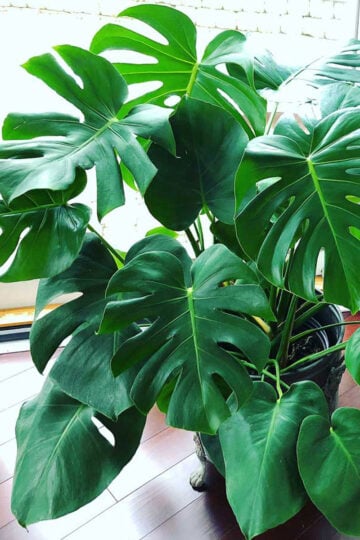
My plant which was barely 1 ½ feet tall when I purchased it, grew quite large after less than 3 years.
Keep reading to find out exactly how to care for Monstera deliciosa, and also learn about repotting Monstera.
I will also show you how to provide a very sturdy support so your Monstera can climb securely! Forget about the moss posts. I have a much easier and more effective solution.
There are so many common names for this plant: Swiss Cheese Plant, Mexican Breadfruit, and even Split Leaf Philodendron. Common names are enormously confusing and I always refer to this plant by its botanical name (genus + species), Monstera deliciosa.
You may be wondering about the botanical name Monstera deliciosa. The genus, Monstera, literally refers to the "monstrous" proportions that this plant takes on in the wild.
The species name, deliciosa, refers to its edible fruit that it commonly produces in the wild. Indoors, you may never see this, but know that it does produce an edible fruit!
These plants hail from tropical regions in the south of Mexico and also parts of Central America and are found growing at the base of trees. They will climb and attach to tree trunks via the aerial roots that they produce.
Monstera Deliciosa Care
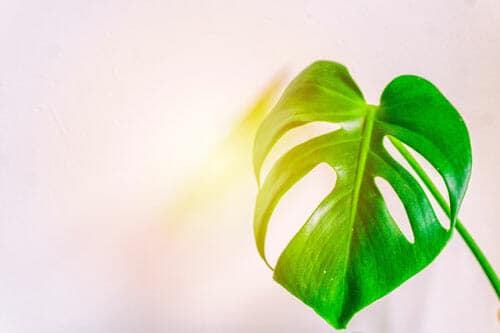
1. LIGHT
As you can imagine by how this plant grows in the wild in its natural habitat, as described above, it prefers filtered light, or bright indirect light. I grow mine in a large Eastern exposure window so it received plenty of light, including morning sun which is gentle on the plant.
It can tolerate much darker, low light conditions, but your growth won't be as spectacular. After all, plants need light to photosynthesize!
You'll want to avoid too much direct sun however, especially the harsher afternoon sun.
If you live in areas that typically have a lot of strong sun, you'll want to shield your Monstera deliciosa so that it doesn't receive too much direct sun.
2. WATERING, FERTILIZING & HUMIDITY
Monstera deliciosa is pretty forgiving when it comes to watering. Just like most plants, I like to let the top part of the soil dry out before watering again.
Depending on the size of the pot, I'll let the top inch or two completely dry out before I water again. Just use your finger to test the soil moisture. Tap water will work just fine.
Mine is growing in a 14 inch pot, so I'll let the top 2 inches, roughly, dry out before I even think about watering.
Keep in mind that larger pots may take longer to dry out than much smaller pots, so don't water by your calendar.
Use your finger as your guide! If your Monstera is in a smaller pot, let at least the top inch of the soil dry out before watering again.
Avoid extremes in watering. Never let this plant sit in water otherwise it can easily experience root rot. Always discard any excess water that accumulates in the plant saucer.
On the other hand, try not and let the potting mix completely dry out if you can help it. Find a happy medium!
As far as fertilizing goes, I fertilize my Monstera deliciosa year round except for the winter months.
I sometimes rotate and change fertilizers, but I'm currently using Dyna-Gro Grow for most of my leafy houseplants and I don't think I'll ever switch again. This is an AMAZING fertilizer and I stock up on it from Amazon.
I like to fertilize dilutely with every watering. That way my plants receive constant nutrients, similar to how they would grow in nature, and I don't have to remember the last time I applied fertilizer!
As far as humidity goes, although this plant would appreciate high humidity, it does just fine in my home, even with low humidity during the winter time.
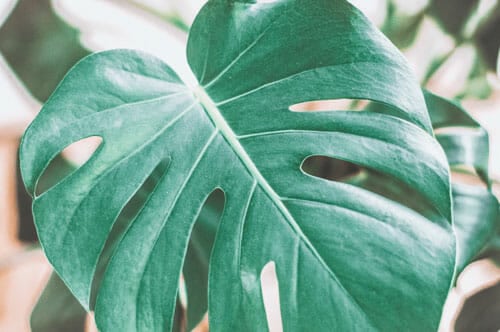
3. LEAF PROGRESSION
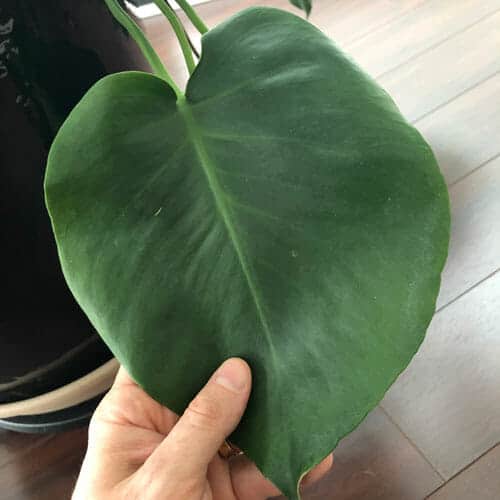
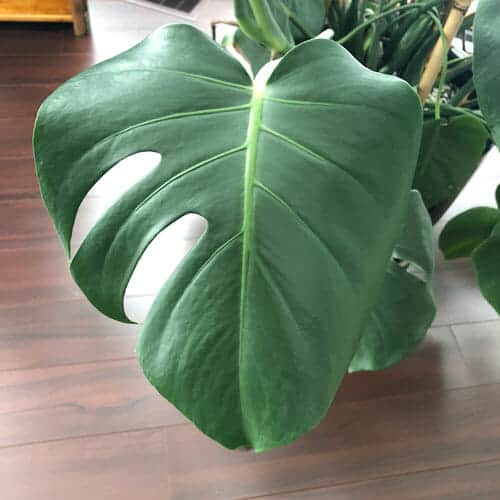
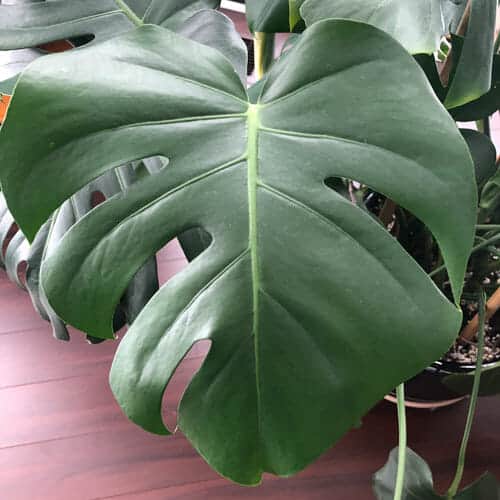
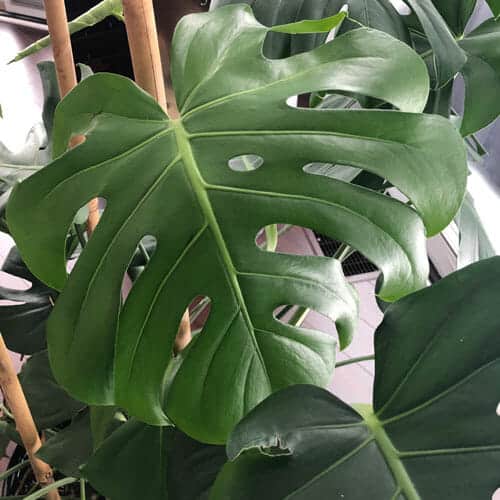
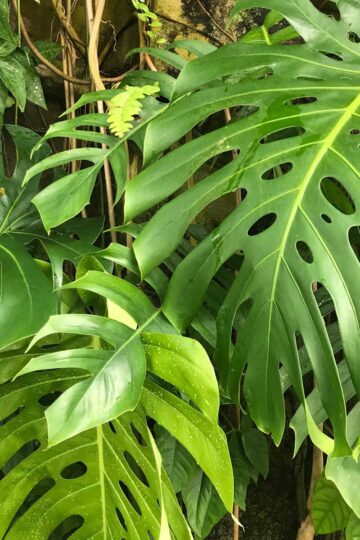
One of the most rewarding parts of growing Monstera deliciosa is watching the plant evolve from its juvenile leaves, to the more mature adult leaves.
Young plants have leaves that are completely solid and that have no slits or holes.
As Monstera deliciosa ages, the new leaves will have more and more fenestrations (holes) and slits among the leaves. Keep in mind that after a leaf opens up, it will stay the way it is and will not change.
As the plant matures, the newer leaves will slowly have more and more fenestrations.
Depending on how good your growing conditions are, very young monstera plants may take years indoors before they start to exhibit any fenestrations.
Take a look at the following progression of leaves from my own plant:
4. Repotting
For some general repotting tips, and knowing when to repot your plant, check out my blog post on repotting.
This post contains many critical aspects of repotting and important steps, so be sure to read up after you're done reading this Monstera post.
Perhaps the best time of year to repot your plant is early spring when plants are starting to perk up. It can really be done at any time of year if you have good growing conditions. Later winter or early spring is a good bet though.
As I mentioned earlier, Monstera deliciosa is a climbing plant in nature, so you'll want to add some support, and the perfect time to do this is when you repot your plant!
This way, you will minimize the damage to any roots. Although if you are careful, you can really add support at any time.
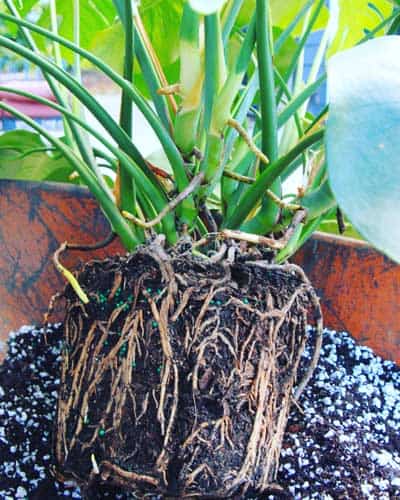
After you take your plant out of the pot, be sure to loosen up the root ball a bit. Only choose a larger pot that is 1 or 2 sizes bigger than the current pot. And always use a pot with drainage holes!
I used a wheelbarrow outdoors to blend my potting mix and loosen the root ball on my plant.
I like to cover the drainage hole with a broken pot shard (placed like an upside down U over the hole, which leaves space on the sides). Some people like to place a piece of old window screening over the hole.
When you repot, this is the perfect time to add a support so that your plant can start climbing!
As the vines grow, you can loosely tie them to the posts.
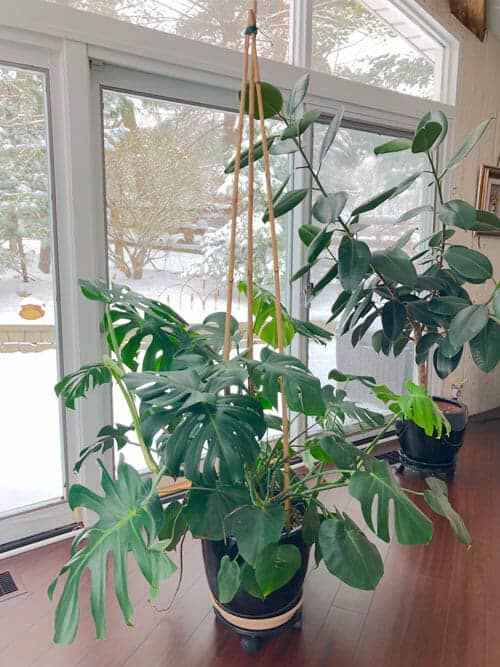
Take a look at the bamboo tee-pee that I created below.
I simply purchased some bamboo stakes online from Amazon, and put three of them in the pot at the time of repotting. I like to have extras on hand because I also use them in my garden.
Then I simply took some garden twine and tied the top up. It is a very stable structure!
You can also add a moss pole or moss stick when you repot. I wrote a printable, detailed how-to blog post that shows how you can make your own moss post! It's way better than anything you would buy pre-made and much better quality.
Use about 1 part of the perlite to 2 parts, or even 3 parts, of the potting soil.
It is a highly sustainable mix, and the owners of the company compost food scraps and add the compost to the mix. I've had amazing experiences with this mix and am switching many of my houseplants to this mix (when the time comes to repot).
It already contains plenty of perlite, so there is no need to adjust at all!
I also surveyed my readers to inquire about all their frustrations with potting mixes, and the makers of 'House' potting mix answered all these questions and more.
If you want an organic, sustainable, top-quality mix that you can use straight out of the bag, check out my blog post: Oh Happy Plants Potting Mixes.
This will give you a nice airy, nutritious, well draining soil that this plant loves!
If you're trying to decide what type of pot to give your Monstera, check out my Monstera Pots post that will help you choose the best pot for your plant.
5. Propagating Monstera Deliciosa
Who wouldn't want more of a good thing? If you want to propagate your Monstera deliciosa, it is very easy to do.
There are a couple of different ways that I will describe to propagate your Monstera deliciosa.
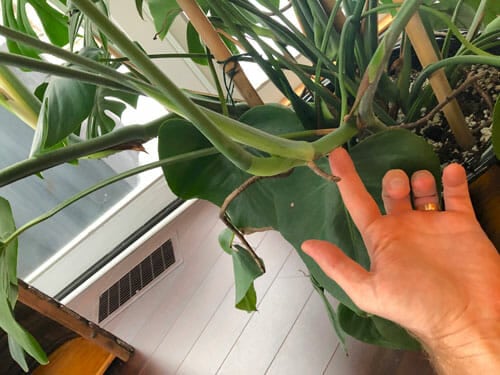
If you are impatient and don't want to spend too much time, you can simply just cut a vine and place it in water. Not just any old vine though. You'll want to choose a vine where you see an aerial root.
Then simply just cut below where the aerial root is, near where my finger is in the photo below.
Then simply place this cutting in water. The aerial root will quickly grow in water and it you'll be able to pot it up in no time at all.
The other method that you can use to propagate your Monstera deliciosa is by air layering. You'll want to air layer in the exact same spot that I described above (where my finger is in the photo).
For a detailed photo guide, check out my blog post on propagating Monstera in water. The benefit of doing this is that your vine will be much less stressed (versus just cutting it completely off the plant).
You can check out my blog post on air layering houseplants where you can read exactly how to do it! You can do it exactly as described in that post.
Or, alternatively, as long as you choose a vine where you can wrap the sphagnum moss around an existing aerial root, you don't even have to cut into the vine like I mention in the air layering post.
Simply proceed without cutting because the aerial root will start growing almost immediately.
Other than that one detail, you can follow all the rest of the instructions. Then once it is ready, you can simply cut the vine under where you air layered and pot up your new plant!
Be sure to get everything you need to help your Monstera deliciosa thrive. To summarize, these are the products I talked about in the blog post so you can grow your own gigantic Monstera deliciosa. (Pretty soon, mine will overtake the living room...)
Use 2 or 3 parts Miracle Gro Potting Mix to 1 part #3 perlite. This provides a beautifully airy and well-draining potting mix that these plants just love.
Dyna-Gro Grow is just simply one of the best fertilizers around. Use it regularly on you Monstera deliciosa plant and ALL of your tropicals!
And don't forget the bamboo stakes to make your tee-pee with. Monsteras need support as they grow.
If you want to browse other species of Monstera that you'd like to explore growing, don't miss my post that includes 15 Amazing Monstera Varieties to add to your collection.
There is a huge debate on whether you may have a Monstera deliciosa vs. Monstera borsigiana. Be sure not to miss my post on how to tell the difference between the deliciosa vs. borsigiana species.
If you like the look of Monstera deliciosa, but don't have the room, you can consider growing Rhaphidophora tetrasperma. It is commonly called "mini-monstera" but isn't actually a Monstera. It does have a similar look, but with smaller leaves.
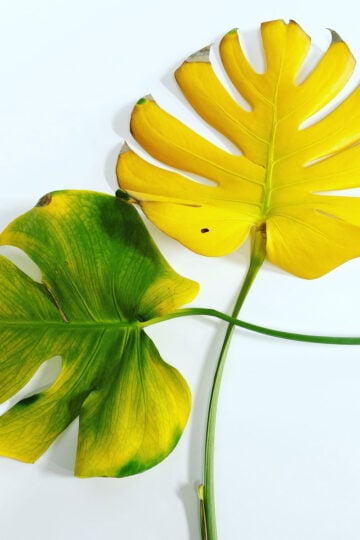
Yellow leaves on your Monstera plant can be caused by a lot of different issues, and this is a very common problem. The causes of yellow leaves can include too little light, too MUCH light, soil that went too dry for too long (which typically results in the lower leaves yellowing), soggy soil, cold temperatures, and more.
These tropical plants do appreciate higher humidity levels, but normal room humidity is just fine! You don't have to invest in a humidifier for your plant. As long as you have proper watering practices and don't allow your soil to get too dry, average indoor humidity is just fine. Proper watering is far more important than trying to maintain a humid environment for your plant.
For smaller pots, wait to water until the top inch of soil has dried out. For larger pots, say 10 or 12 inches in diameter or more, you can easily allow the top 1-2 inches of soil to dry out before watering again.
Should you use a moisture meter for your plant?
I've seen too many people kill their plants by using faulty moisture meters. Many of the inexpensive ones are junky and will read moist, when in fact, your potting mix is bone dry. Save yourself the hassle, and use your finger to judge soil moisture. Wait until the top 1-2 inches of soil have dried out, and then water.
I hope you have enjoyed this post on how to care for your Monstera deliciosa.
If you have any questions, please let me know in the comments below and thanks for reading!
Can Monstera recover from spider mites?
Yes, but early detection is key in controlling any pests. You can tell if you have spider mites if you see fine webbing. You'll also start to see a speckled or mottled appearance on the leaves.
For best results, you'll want to knock off any existing spider mites with a stream of water, or use a damp cloth to wipe down all the foliage. Then regularly treat with an insecticidal soap or horticultural oil. Check out my post on treating houseplants for spider mites for step by step details.
Do Monstera plants need drainage holes?
Absolutely yes. It is much too risky to grow this plant without drainage holes. The risk of too much water accumulating at the bottom of the pot is too high. And if you're fertilizing, all the fertilizer salts will accumulate in the pot if you don't have drainage holes.
Is Monstera deliciosa toxic to animals?
Monstera deliciosa is toxic to cats and dogs, according to the ASPCA, because it contains calcium oxalate.
Does Monstera deliciosa product fruit?
Yes! And it is edible! It needs to be ripe though otherwise it may be painful to eat. Don't miss my blog post that is all about eating Monstera deliciosa fruit.
I hope you have enjoyed this post on how to care for your Monstera deliciosa.
If you have any questions, please let me know in the comments below and thanks for reading!
Is there any downside to not providing a pole? I see many instructions about providing one- moss, or bark, or even your great tripod idea. But I don't really get the point other than to try to contain the spread of the plant. Are there any other upsides or downsides to providing one?
Thanks!
Hi Manya. It's not about the spread of the plant. It's about when it starts to grow longer. These plants are vining in nature and they will start to climb vertically. Granted, if you have a smaller plant, it won't happy for a while. But you will eventually need a post of some sort because they vines will grow long, and when they do, they will need a support. Hope this helps!
I’m so in love with this page! Thanks so much for all the information.
I have a monstera that’s doing something I’ve never seen. The newest opened fenestrated leaf has gone straight up in a vertical line from stem to tip. Almost to the point of cupping forward. I’m thinking too close to southern light? I also just started running a humidifier near it. None of the other leaves are reaching toward the humidifier but this is the newest and first fenestrated leaf.
The plant is doing well otherwise with two new leaves about to open. It’s about 2 feet tall.
I’ve moved it back a bit to see if it sits back down 😀
Hi Magdalena! I've very happy that you are enjoying my blog site. Monsteras in general should not be in full sun. Southern windows in general are very sunny. These plants prefer very bright indirect light, and some morning sun is OK. Avoid extended periods of sun, especially during mid-day and also try and avoid a lot of afternoon sun. I have mine in a big Eastern window and it receives some morning sun which is gentle, and then bright indirect light the rest of the day. If your plant looks good otherwise, keep doing what you're doing and you already adjusted your light situation so keep a close eye on it. If you'd like to email me a photo, I'd be happy to look at it.
What do you recommend if I don't necessarily want my plant to get much bigger than it already is? At some point, we will run out of larger size pots, correct? What should be done to improve the health of the plant at that point?
Also, the aerial roots on my plant have gotten really long. Just leave them alone?
Thanks!
Hi Fanny. You can repot into the same sized pot. I don't have a blog post on this topic, but I found a link for you that seems resasonable: https://www.dummies.com/home-garden/gardening/steps-for-fool-proof-repotting/
As far as the aerial roots, you can try to redirect them into the pot if you can, or just leave them out! You will find that the plant will grow a lot of aerial roots over time. There is no harm in leaving them exposed.
Hi! I have a Monestra and I am thinking about repotting it soon... I think I need to make some adjustments to the potting mix.... Maybe make it more chunky since Monestra's like well draining soil. Any advice as to what to use? Thanks for the help!
Hi Jessica. I talked about this in the blog post. Maybe you missed it? I talked about using #3 size perlite. You can also use things like orchid bark as well. Or both!
Such a helpful post, thank you! I like seeing the progression of your split leaves, as my plant (not small anymore!) has only one split leaf. The plant is a couple of years old. I'm hopeful for more split leaves!
I would like to transplant my monstera, and support it with a pole or trellis. I'm just wondering what I should do with the aerial roots. Would they ideally 'grasp' the pole? When using a trellis do you just let the aerial roots grow and do their own thing or do you tie them to the pole too?
Thank you so much!
Hi Grace. Glad you liked the blog post 🙂 Instead of worrying about the aerial roots, I would support the vine itself and loosely tie it to the post as it grows. The aerial roots may attach to the post, but you'll find that there will be more than you know what to do with over time. I actually leave mine alone. They can get quite long. You can redirect them into the soil though but be gentle because they can break.
Thanks for a very helpful post!
I got a monstera about 3 months ago and it has already grown 3 new leaves and a very long aerial root! I was thinking of re-potting it and adding a support pole. I have read your other post about re-potting houseplants as well, but I still have a doubt: is it really a big deal to choose the right pot size?
Since I want to add a big pole, I bought a pot several sizes bigger, and I don't know how critical is it to choose a pot which is only 1 or 2 sizes bigger than the current one. Do I really need to go through the hassle to return the pot and get a smaller one? Thanks in advance! 🙂
Hi Anna! I'm glad you enjoyed the post and thanks for the question. The short answer is "it depends." I know that's what most people don't want to hear but it's the truth. The main danger in having too large of a pot size is how slowly the soil will dry. If you use a very large pot and a poorly draining soil, you may be in trouble. If you used a very well draining and airy soil blend, you should be fine. But it's hard to say for your particular case without more details and seeing what you did. If your soil dries out in a reasonable amount of time, you should be fine. Just keep a close eye on your plant and if you run into any issues, you can always change something at that point. Hope this helps!
We have a plant that is about 35 years old and has been declining. It is now just putting out small leaves that eventually turn yellow and die off. It is in a large (15") pot . I hate to admit it but we hardly ever have fed this plant. Not sure if we can save it by starting a half strength fertilizer program or by re-potting it. I feel bad that we have neglected it but for most years it was large and vigorous. It has taken so long that I thought it only needed very infrequent fertilizer
Hi Jim. Those are classic symptoms of nitrogen deficiency. I would start a regular program of fertilizing your plant right now. You can get away with not fertilizing for a while, but eventually it will catch up to the plant. Keep in mind that for plants that are in the same pot for years and years and years, everything is basically depleted from the soil. I would fertilize year-round except for the winter months. Good luck!
I recently purchased a monsters deliciosa about a month ago. It looks rather healthy and has 4 new leaves opening up. However I woke up this morning and two of the largest leaves that have the cuts in them are drooping at their widest part. I have a water meter and water when the top 1-2 inches of the pot are dry. All other leaves looks fine aside from 3-4 small leaves at the bottom turning yellow and shriveling up. I can send pix. Help ????
If the top couple inches of the pot are dry, give it a thorough watering. It sounds like a moisture issue to me. I would just use your finger to test how dry the soil is instead of relying on a moisture meter. How big is the pot? Do you have drainage holes?
My Monsterra kept falling apart as it tried to climb before I used the bamboo Teepee so I kept putting the lost parts in water and now I have a table filled with vases and huge jars of Monsterra that need potting up. This plant will take over once it finds a good home.
Hi Clare! Those are actually all different leaves on the plant at the same time. I just wanted to show a progression. The ones with solid leaves are the more juvenile leaves. Once the leaves open up, they won't get more slits and holes (fenestrations). But as the plant ages and grows older, it will grow more and more new leaves that have the fenestrations. Does that make sense? 🙂
Thank you very much for your article, very helpful! I have a little monstera who is starting to put bigger leaves, but it's not been growing as it should and the leaves look a bit wilted.
I have repotted it a couple of months ago in a bigger pot and it doesn't seem to like it at all.
Any suggestions on what to do? I fertilise regularly as well.
Any tip will be much appreciated ☺️
I would have to see some photos to be able to help out. What you said it doesn't seem to like it...what exactly do you mean? Sometimes we just have to be patient and let the plant do its thing! If you send me some photos, I can take a look and maybe provide some further guidance.
Oh, thanks. I was hoping my comment hadn't just disappeared.
Now , I know
Very lovely to learn so much about the progressive fenestration of the Monstera leaf. I used to wonder at this. I enjoyed counting from zero ,two to about ten holes.
Thank you so much for this information. I am waiting for warmer weather so that I can buy a plant or leaf starter online. (I am in Ontario). Thanks again! Rosemary
I love the bamboo tripod idea... I recently repotted a smallish one into a large pot with a moss pole and placed it under a skylight... It quickly outgrew the moss pole and I've been wondering what to do now.... I didn't think bamboo stake would have been sturdy enough - I will try a tripod .... I rarely need to water her as she sits beneath an air conditioner which drips into her and only occasionally need to drain the saucer - I was initially going to move her but she seems to be extremely happy so I've left her alone.
Great article! I love the idea of the bamboo teepee climbing structure! I’m going to demonstrate that in my class next week! So much easier than a moss pole. Thanks! I love picking up new tips from you!


Is there any downside to not providing a pole? I see many instructions about providing one- moss, or bark, or even your great tripod idea. But I don't really get the point other than to try to contain the spread of the plant. Are there any other upsides or downsides to providing one?
Thanks!
Hi Manya. It's not about the spread of the plant. It's about when it starts to grow longer. These plants are vining in nature and they will start to climb vertically. Granted, if you have a smaller plant, it won't happy for a while. But you will eventually need a post of some sort because they vines will grow long, and when they do, they will need a support. Hope this helps!
I’m so in love with this page! Thanks so much for all the information.
I have a monstera that’s doing something I’ve never seen. The newest opened fenestrated leaf has gone straight up in a vertical line from stem to tip. Almost to the point of cupping forward. I’m thinking too close to southern light? I also just started running a humidifier near it. None of the other leaves are reaching toward the humidifier but this is the newest and first fenestrated leaf.
The plant is doing well otherwise with two new leaves about to open. It’s about 2 feet tall.
I’ve moved it back a bit to see if it sits back down 😀
Hi Magdalena! I've very happy that you are enjoying my blog site. Monsteras in general should not be in full sun. Southern windows in general are very sunny. These plants prefer very bright indirect light, and some morning sun is OK. Avoid extended periods of sun, especially during mid-day and also try and avoid a lot of afternoon sun. I have mine in a big Eastern window and it receives some morning sun which is gentle, and then bright indirect light the rest of the day. If your plant looks good otherwise, keep doing what you're doing and you already adjusted your light situation so keep a close eye on it. If you'd like to email me a photo, I'd be happy to look at it.
What do you recommend if I don't necessarily want my plant to get much bigger than it already is? At some point, we will run out of larger size pots, correct? What should be done to improve the health of the plant at that point?
Also, the aerial roots on my plant have gotten really long. Just leave them alone?
Thanks!
Hi Fanny. You can repot into the same sized pot. I don't have a blog post on this topic, but I found a link for you that seems resasonable: https://www.dummies.com/home-garden/gardening/steps-for-fool-proof-repotting/
As far as the aerial roots, you can try to redirect them into the pot if you can, or just leave them out! You will find that the plant will grow a lot of aerial roots over time. There is no harm in leaving them exposed.
Hi! I have a Monestra and I am thinking about repotting it soon... I think I need to make some adjustments to the potting mix.... Maybe make it more chunky since Monestra's like well draining soil. Any advice as to what to use? Thanks for the help!
Jessica
Hi Jessica. I talked about this in the blog post. Maybe you missed it? I talked about using #3 size perlite. You can also use things like orchid bark as well. Or both!
Such a helpful post, thank you! I like seeing the progression of your split leaves, as my plant (not small anymore!) has only one split leaf. The plant is a couple of years old. I'm hopeful for more split leaves!
I would like to transplant my monstera, and support it with a pole or trellis. I'm just wondering what I should do with the aerial roots. Would they ideally 'grasp' the pole? When using a trellis do you just let the aerial roots grow and do their own thing or do you tie them to the pole too?
Thank you so much!
Hi Grace. Glad you liked the blog post 🙂 Instead of worrying about the aerial roots, I would support the vine itself and loosely tie it to the post as it grows. The aerial roots may attach to the post, but you'll find that there will be more than you know what to do with over time. I actually leave mine alone. They can get quite long. You can redirect them into the soil though but be gentle because they can break.
Thanks for a very helpful post!
I got a monstera about 3 months ago and it has already grown 3 new leaves and a very long aerial root! I was thinking of re-potting it and adding a support pole. I have read your other post about re-potting houseplants as well, but I still have a doubt: is it really a big deal to choose the right pot size?
Since I want to add a big pole, I bought a pot several sizes bigger, and I don't know how critical is it to choose a pot which is only 1 or 2 sizes bigger than the current one. Do I really need to go through the hassle to return the pot and get a smaller one? Thanks in advance! 🙂
Hi Anna! I'm glad you enjoyed the post and thanks for the question. The short answer is "it depends." I know that's what most people don't want to hear but it's the truth. The main danger in having too large of a pot size is how slowly the soil will dry. If you use a very large pot and a poorly draining soil, you may be in trouble. If you used a very well draining and airy soil blend, you should be fine. But it's hard to say for your particular case without more details and seeing what you did. If your soil dries out in a reasonable amount of time, you should be fine. Just keep a close eye on your plant and if you run into any issues, you can always change something at that point. Hope this helps!
We have a plant that is about 35 years old and has been declining. It is now just putting out small leaves that eventually turn yellow and die off. It is in a large (15") pot . I hate to admit it but we hardly ever have fed this plant. Not sure if we can save it by starting a half strength fertilizer program or by re-potting it. I feel bad that we have neglected it but for most years it was large and vigorous. It has taken so long that I thought it only needed very infrequent fertilizer
Hi Jim. Those are classic symptoms of nitrogen deficiency. I would start a regular program of fertilizing your plant right now. You can get away with not fertilizing for a while, but eventually it will catch up to the plant. Keep in mind that for plants that are in the same pot for years and years and years, everything is basically depleted from the soil. I would fertilize year-round except for the winter months. Good luck!
I recently purchased a monsters deliciosa about a month ago. It looks rather healthy and has 4 new leaves opening up. However I woke up this morning and two of the largest leaves that have the cuts in them are drooping at their widest part. I have a water meter and water when the top 1-2 inches of the pot are dry. All other leaves looks fine aside from 3-4 small leaves at the bottom turning yellow and shriveling up. I can send pix. Help ????
If the top couple inches of the pot are dry, give it a thorough watering. It sounds like a moisture issue to me. I would just use your finger to test how dry the soil is instead of relying on a moisture meter. How big is the pot? Do you have drainage holes?
My Monsterra kept falling apart as it tried to climb before I used the bamboo Teepee so I kept putting the lost parts in water and now I have a table filled with vases and huge jars of Monsterra that need potting up. This plant will take over once it finds a good home.
I hope you can find them all good homes 🙂
Hi!
I’m wondering about the timeline of the progression photos you showed. How long did it take to go from solid leaves to the leaf with lots of holes?
Thanks!
Hi Clare! Those are actually all different leaves on the plant at the same time. I just wanted to show a progression. The ones with solid leaves are the more juvenile leaves. Once the leaves open up, they won't get more slits and holes (fenestrations). But as the plant ages and grows older, it will grow more and more new leaves that have the fenestrations. Does that make sense? 🙂
Thank you very much for your article, very helpful! I have a little monstera who is starting to put bigger leaves, but it's not been growing as it should and the leaves look a bit wilted.
I have repotted it a couple of months ago in a bigger pot and it doesn't seem to like it at all.
Any suggestions on what to do? I fertilise regularly as well.
Any tip will be much appreciated ☺️
I would have to see some photos to be able to help out. What you said it doesn't seem to like it...what exactly do you mean? Sometimes we just have to be patient and let the plant do its thing! If you send me some photos, I can take a look and maybe provide some further guidance.
i left a reply a minute ago. where's it gone
Since you were new to commenting on my blog, I have to approve all new comments. It should appear now 🙂
Oh, thanks. I was hoping my comment hadn't just disappeared.
Now , I know
Very lovely to learn so much about the progressive fenestration of the Monstera leaf. I used to wonder at this. I enjoyed counting from zero ,two to about ten holes.
Glad you enjoyed the blog post!
Thank you so much for this information. I am waiting for warmer weather so that I can buy a plant or leaf starter online. (I am in Ontario). Thanks again! Rosemary
You are very welcome Rosemary!
I love the bamboo tripod idea... I recently repotted a smallish one into a large pot with a moss pole and placed it under a skylight... It quickly outgrew the moss pole and I've been wondering what to do now.... I didn't think bamboo stake would have been sturdy enough - I will try a tripod .... I rarely need to water her as she sits beneath an air conditioner which drips into her and only occasionally need to drain the saucer - I was initially going to move her but she seems to be extremely happy so I've left her alone.
Great article! I love the idea of the bamboo teepee climbing structure! I’m going to demonstrate that in my class next week! So much easier than a moss pole. Thanks! I love picking up new tips from you!
Thank you! I'm glad it was helpful, so spread the word! 🙂